Purpose
The purpose of this Quick Reference Guide (QRG) is to explain how to enter transactions in the North Carolina Financial System (NCFS).
Introduction and Overview
This Quick Reference Guide provides the General Ledger (GL) Journal Entry user step-by-step instructions for entering transactions into North Carolina Financial System as a GL journal entry. A journal entry is the NCFS capability used to record a transaction to the Ledger. Manual Journal entries are entered directly into NCFS; only one transaction can be entered at a time. Deposits and Disbursements (requisitions) are entered as journal entries via the NCFS’ General Accounting module. Journals can be entered via spreadsheet upload also. The journal entries are broken down into three sections: journal batch, journal, and journal lines. The journal batch is a standard naming convention that allows users to easily search for the journal entry. The journal information consists of information such as the journal name, the ledger, date entered, and the journal category. The journal line information contains the accounting string, debit and credit amount, and a short description of the entry type. Journal type and the bank account information is some additional information that must be entered in the journal line section.
Key Terms
| Key Terms | Description |
|---|---|
| Accounting Period | The fiscal period reports financial results such as a calendar month or fiscal period. |
| Journal Batches | A Journal Batch is a single or group of journal entries processed under a combined "header". |
| Journal Category | Journal categories are used to differentiate journal entries by purpose or type, such as accruals, payments, or receipts. |
| Journal Entries | Journal entries are a tool to record financial transactions to the system's general ledger. Journal creation, posting, and editing work together in the recording process to produce accurate financial records. |
| Ledger | Ledger is the main record-keeping tool for financial transactions. It records transactional balances by using a chart of accounts with a consistent calendar and currency and accounting rules implemented in an accounting method. |
| Disbursements | A disbursement refers to any payments that are made. The payment can be electronic, such as ACH, e-pay wire transfer, or printed, such as a check. |
| Deposits | A deposit is the recording of incoming funds into a Depository Bank Account. |
Information Needed to Complete this Process
- Transaction Accounting (Effective) Date
- Transaction (Deposit or Disbursements)
- Accounting information (agency, budget fund, account)
- Amount(s) per accounting string
- Bank account or Disbursing account
- Supporting documentation to be attached to journal (if applicable)
Output of this Process
- Completed journal entry
User Tip
All first-time users should ensure at log-in that the browser cache is empty prior to initiating the log-on sequence.
Manual Journal Entry
To enter a manual journal entry, please follow the steps below. There are 15 steps to complete this process.
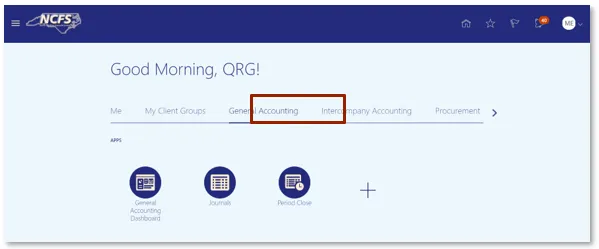
Step 1. Access the Home page and click the General Accounting icon.
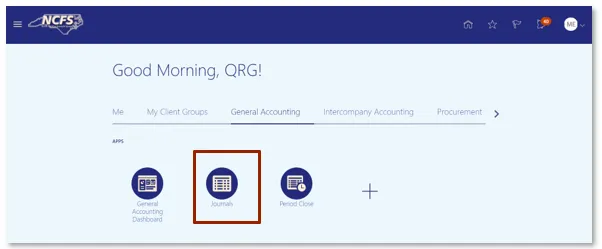
Step 2. Click the Journals app.
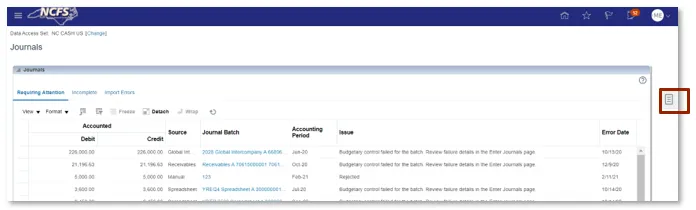
Step 3. Click the Tasks icon to open the task list.
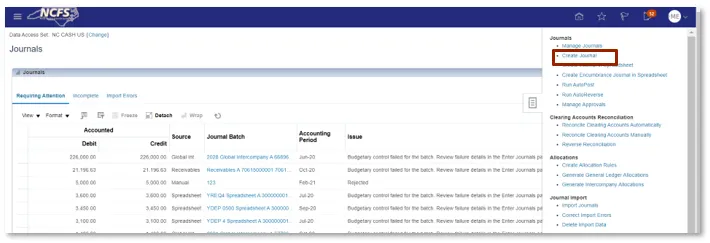
Step 4. From the task list, click Create Journal under the Journal section.
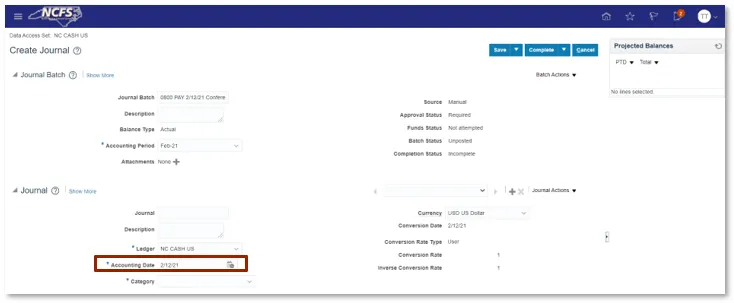
Step 5. Enter the Journal Batch details. Users should include the agency, transaction type (DEP or PAY), entry date in MMDDYY format and a short description. Ex: 0800 PAY 2/12/21 Conference Fees.
User Tip
Users should copy the journal batch name to the Journal name field. Otherwise, the system will default a Journal name.

User Tip
Journal Batch and Attachments are not system requires fields but still can be entered. The Journal Batch name must be unique and include only one journal for each batch.
Step 6. Click into the Accounting Date field, the Accounting Date Calendar, and then select the transaction receipt date from the calendar.
User Tip
The accounting date is controlled by the Accounting Period. The Accounting Period defaults to the most recent open period but can be changed as needed to any period that is open in the system.
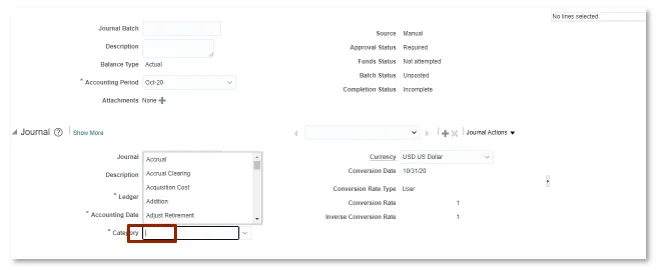
Step 7. From the Category drop down, select the appropriate value.
User Tip
In NCFS, custom Categories have been created and should be used. The custom categories related to deposits all begin with DEP, and the custom categories related to disbursements all begin with PAY. Categories other than these should be used only at the direction of OSC.
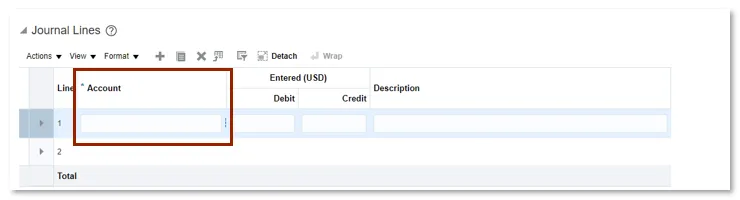
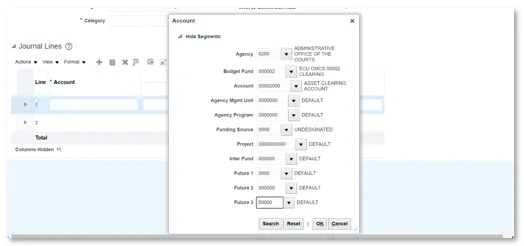
Step 8. Enter the Distribution account information by selecting the three lines next to the Account box. The Chart of Account segments appear.
Step 9. Enter the Agency, Budget Fund, and Account. Once entered click OK.
User Tip
For NCFS Release 1, users need only enter Agency, Budget Fund, and Account. The remainder segments of the chart default to all zeros. These will be used for NCFS Release 3.
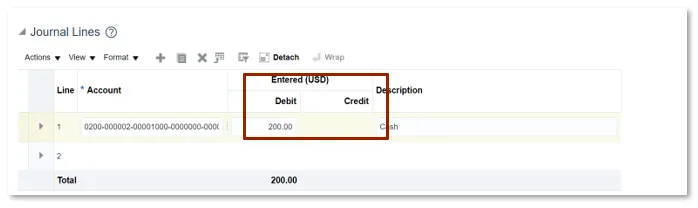
Step 10. Enter an amount in either the Debit or Credit fields (as appropriate) for each line that contains accounting information.
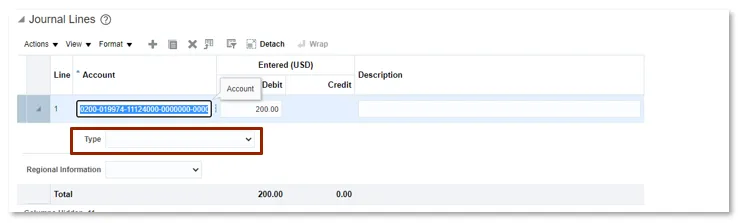
Step 11. Select the Transaction Type drop-down.
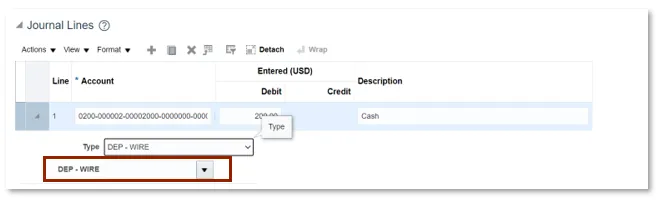
Step 12. A DEP – WIRE drop-down displays. Please select the correct Bank Account Number.
Step 13. Click Complete to create the journal.
User Tip
The journal can be saved without completing it for approval.

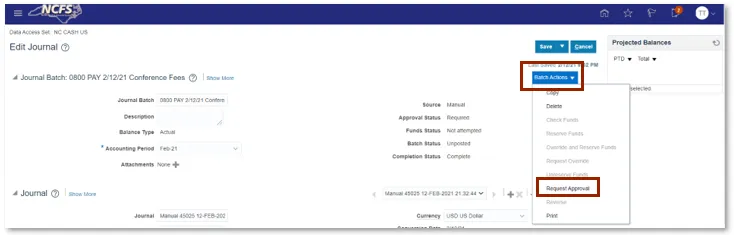
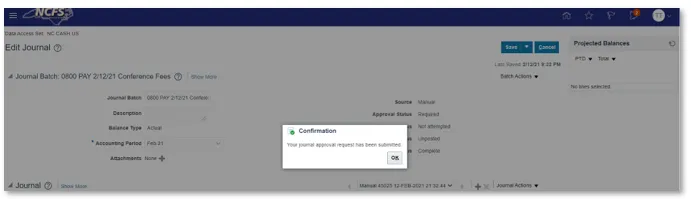
Step 14. Click Batch Actions, then click Request Approval.
Step 15. A Confirmation pop-up displays.
Wrap Up
Once the journal has been submitted for approval, it must be reviewed. Journal Entries are reviewed by users with the Journal Approval role (as OSC Central Compliance or DST; depending on the transaction type). If a journal entry is rejected, the user who input the journal entry receives a rejection notification that includes the reason for rejection. Upon notification that a journal entry has been rejected, the journal entry user who entered the journal entry must then edit the necessary journal information and then resubmit for approval. For more information on review responsibilities and journal posting timelines please see the table below.
| Transaction Types | Reviewing & Approving Org. | Approval Time | Posting Time |
|---|---|---|---|
| ACH/Wire | DST | An ACH/Wire Deposit must be approved by 9:44 a.m. to be posted on the same day. | An ACH/Wire Deposit posts weekly (Monday – Friday) at 9:45 a.m. |
| Cash and Check | Auto Approved | A Cash Deposit must be approved by 9:44 a.m. to be posted on the same day. | A Cash Deposit posts weekly (Monday – Friday) at 9:45 a.m. |
| Credit Card | Auto Approved | A Credit Deposit must be approved by 9:44 a.m. to be posted on the same day. | A Credit Deposit posts weekly (Monday – Friday) at 9:45 a.m. |
| Disbursements | OSC Central Compliance | A Disbursement must be approved by 9:44 a.m. to be posted on the same day. | A Disbursement posts weekly (Monday – Friday) at 9:45 a.m. |
| Transfer | OSC Central Compliance | Transfer must be approved by 11:29 a.m. to be posted on the same day. | A Transfer posts weekly (Monday – Friday) at 11:30 a.m. |
*Note: Times are subject to change.
Additional Resources
Instructor Led Training (ILT)
• GL100c: Journal Entry