Purpose
The purpose of this Quick Reference Guide (QRG) is to provide instructions and tips for creating spreadsheet templates for Journal Entries or Intercompany (IC) Transfers using the multiple journals tabs.
Introduction and Overview
Follow the steps below to create a Journal Entry or Intercompany Transfer Spreadsheet template using the Multiple Journals Tab.
How to Create a Journal Entry or IC Transfers Spreadsheet Template Using the Multiple Journals Tab
There are 7 steps to complete this process.
Step 1. Download the journal or IC transfers spreadsheet from NCFS and open the file. Follow prompts to login to NCFS.
Step 2. Enter the lines in "Multiple Journals" tab.
Step 3. Use Excel’s Save As function and name the template file before uploading.
Step 4. Upload the file.
Note: Do not save over the template file; once the lines upload successfully, close the file without saving. A copy of what was uploaded can be saved under a different name than the template.
Step 5. To reuse the template, open the file and login to NCFS.
Step 6. Click "No" for pop up message "Do you wish to discard the pending changes?"
Note: To make permanent changes to the template file update the file and save the template before proceeding to step 7.
Step 7. Modify the fields as required and repeat Step 4.
Note: Carefully modify any data that needs to be changed, especially dates. Having different effective dates on lines within the same batch will cause an import error.
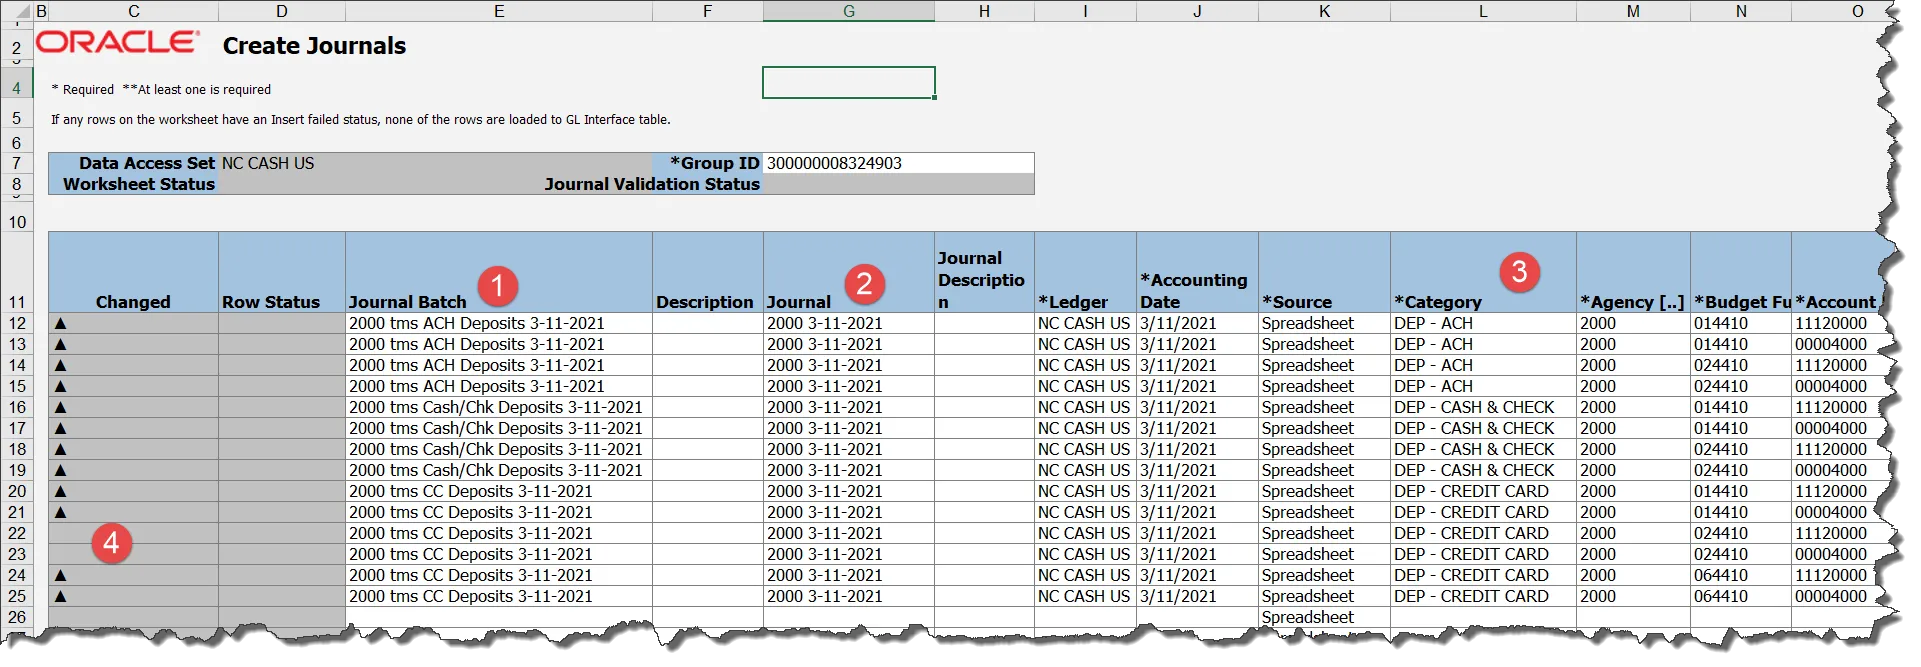
Tips for Creating a Journal Entry Template File
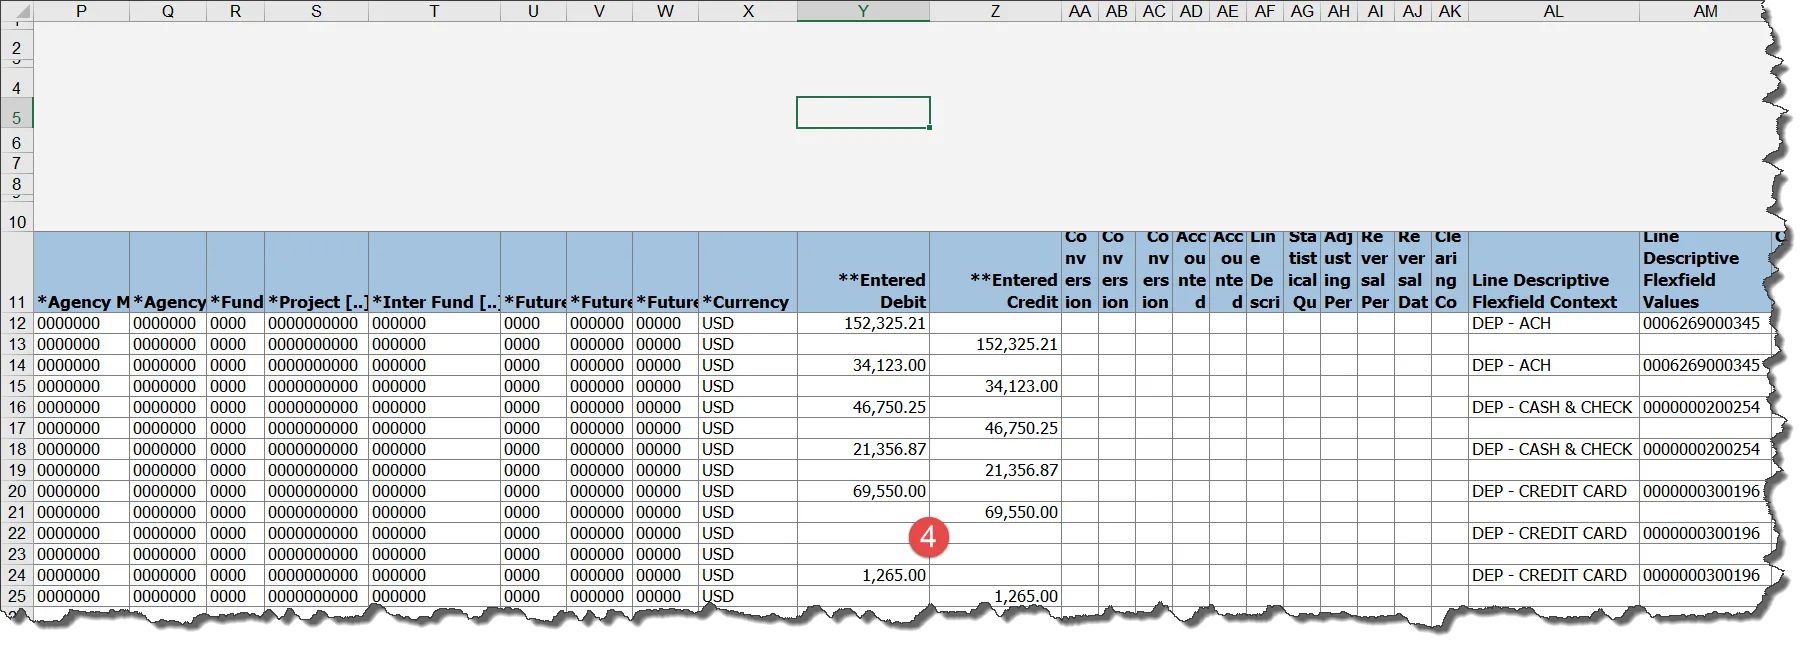
The following steps provide a detailed explanation for entering journal batches into the template file. It is important to note that the images below provide an example of a deposit entry into the template and comments are relevant to a disbursement entry template.
There are 5 steps to complete this process.
Note: Although a Journal Batch can contain one or more Journals, OSC recommends only one Journal created per Journal Batch due to the approval/rejection and reversal function at the Journal Batch level.
Step 1. Enter unique Journal Batch names to group rows into separate batches.
Step 2. In the example below, there are three Journal Batch names (column E). Each Journal Batch name is associated with one deposit category (column L). When the file is uploaded, NCFS creates three separate batches to approve/post.
Note: Multiple journal batches can be created per deposit category to match actual bank deposit amounts. Each journal batch should correspond to a single bank deposit to facilitate matching between DST Core Banking and NCFS Cash Management.
Step 3. During the upload process, NCFS generates the Journal name within the Journal Batch by combining the value entered on the spreadsheet in column G and appending the value in column L.
Step 4. Workflow approval is based on the first value in column L for each unique Journal Batch name.
Note: Be careful not to mix categories with different approval workflows within the same Journal Batch.
Step 5. Whenever a change is made to a row in the template, a black triangle appears in column B. NCFS attempts to process all rows with the black triangle, even if all data on the row has been deleted. A blank or incomplete row will error out during the upload process. Rows without a black triangle in column B are ignored during the upload process. When reusing a template, if rows are not relevant for the current entry, clear the black triangle before uploading the template. In the example, there are no credit card deposits for budget fund 024410 so the debit/credit amounts are blank. This will cause an error if the row is read during the upload process. The solution is either to delete the unnecessary rows or clear the black triangle from column B, so the rows are ignored.
Note: Debit/Credit amounts of $0 will process and create $0 lines in the uploaded entry. Also, complete only one amount column (either Debit or Credit) per row. Entering a value in both columns, even if the value is $0, causes an error during the upload process.
Tips on Creating an Intercompany Transfer Entry Template File
The following steps provide a detailed explanation for creating and placing intercompany transfer entries into a template file. It is important to note that the images below provide an example of an intercompany transfer entry into the template.
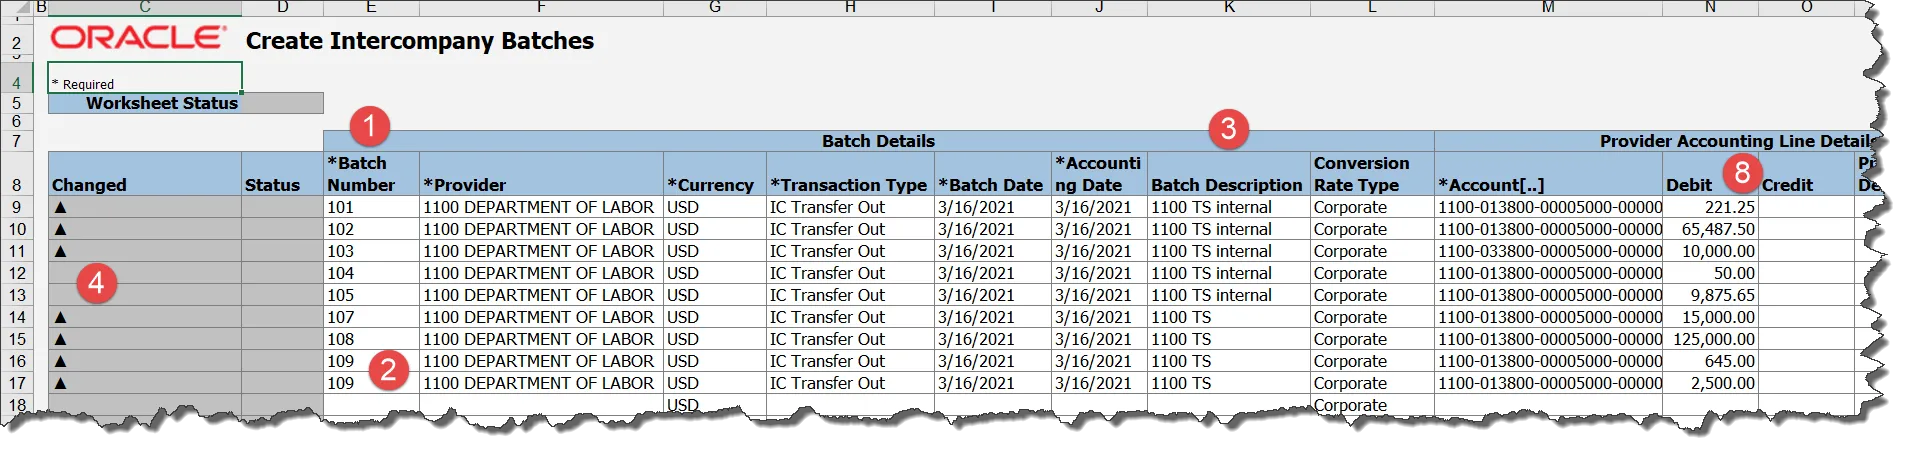
There are 8 steps to complete this process.
Note: Intercompany transfers are initiated from the Provider agency.
Step 1. Use a unique Batch Number to group rows into individual transfers. This batch number is not uploaded into NCFS. NCFS will generate its own batch number to identify the transaction.
Step 2. When a transfer contains multiple provider funding sources (more than one budget fund), identify each line with the same Batch Number to create only one transfer entry to the receiver.
Step 3. While Batch Description is an optional field, it is a good place to enter additional information useful to the Provider agency such as information linking the transfer to a source system or the initials of the user creating the entry. The Batch Description is available on dashboard or searches directed to the Provider agency (e.g., new tab, Manage Intercompany Outbound Transactions).
Step 4. Whenever a change is made to a row in the template, a black triangle appears in column B. NCFS attempts to process all rows with the black triangle, even if all data on the row has been deleted. A blank or incomplete row will error out during the upload process. Rows without a black triangle in column B are ignored during the upload process. When reusing a template, if rows are not relevant for the current entry, clear the black triangle before uploading the template. In the example, internal transfer rows 104 and 105 are not relevant for this entry. The black triangle from column B has been cleared so these rows will be ignored during the upload process.
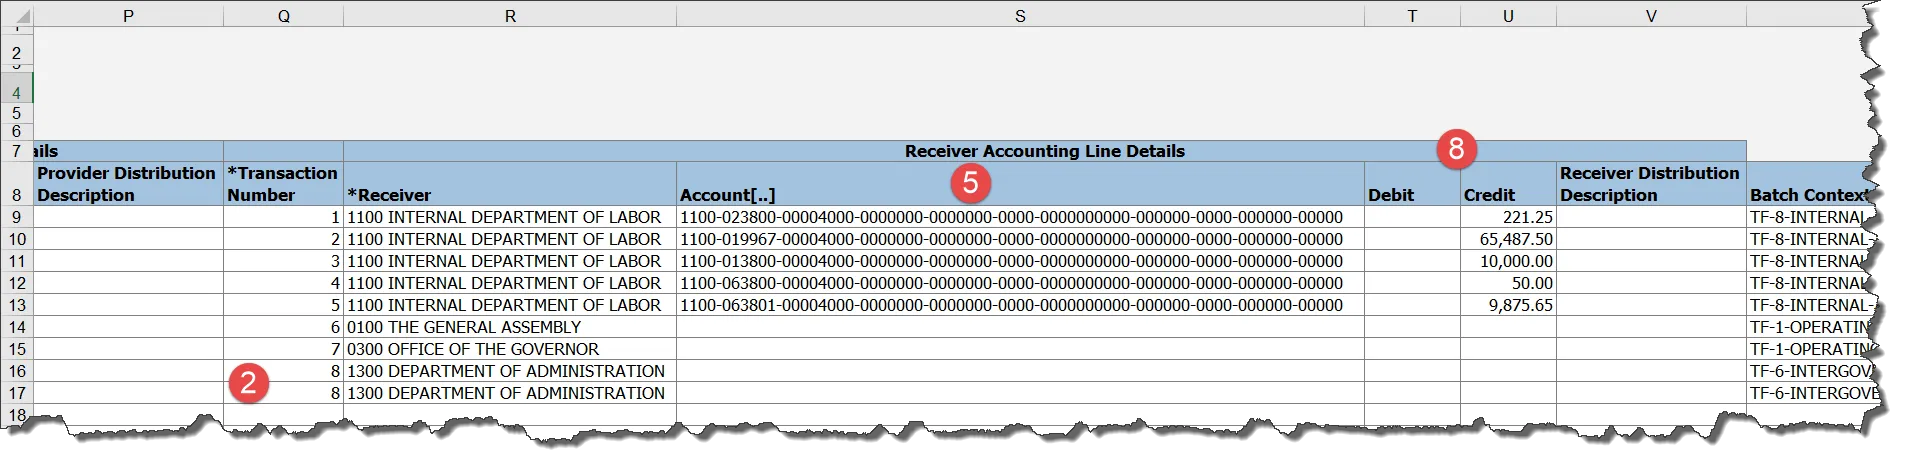
Step 5. Complete the Receiver accounting distribution and amount fields for intra-agency transfers. It is acceptable to include both intra-agency and between agency transfers on the same spreadsheet if they are identified by separate batch numbers.
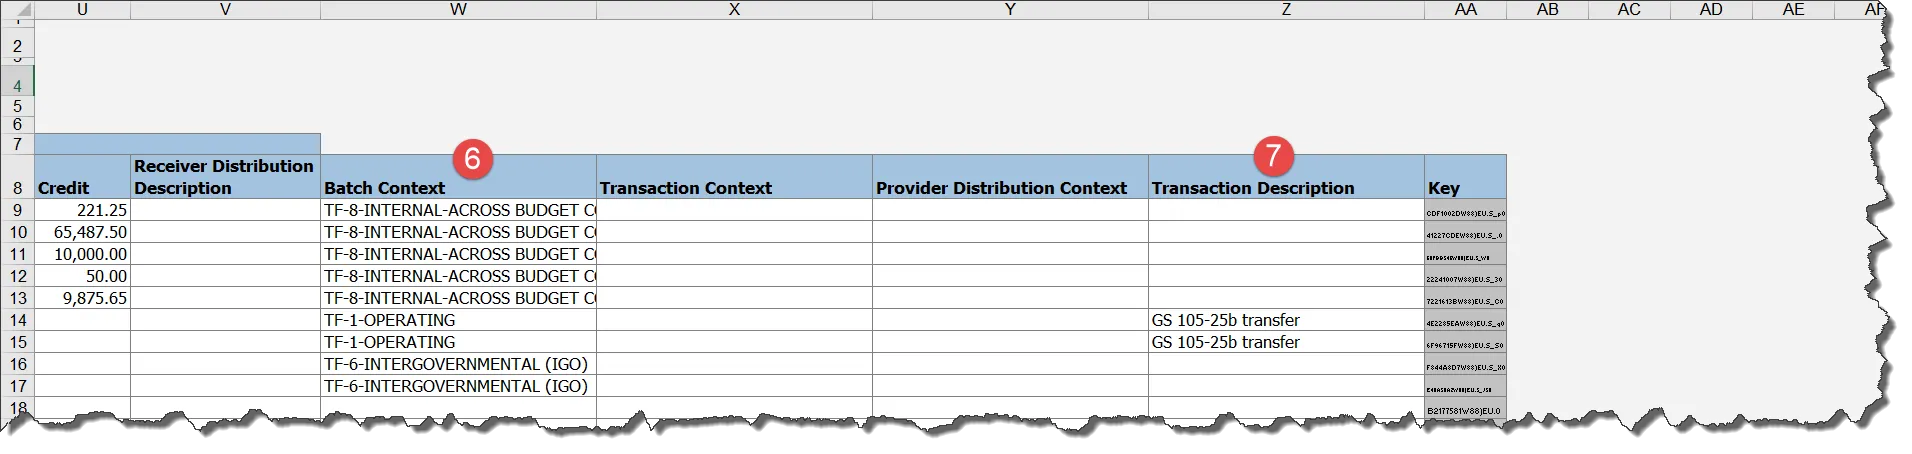
Step 6. IMPORTANT – DO NOT COPY/PASTE A VALUE INTO THE BATCH CONTEXT FIELD. There is a known error in the Oracle spreadsheet for intercompany transfers. You MUST double-click the batch context field in each row and select the transfer type from the pop-up box for the transfer type to load to NCFS. Otherwise, the transfer type will be blank on the NCFS entries, and your transfer will be rejected.
Note: Oracle is working on a software fix for this issue. OSC will notify users when this issue is resolved.
Step 7. While the Transaction Description field is optional, it is a place to enter limited information useful to the Receiver agency related to the transfer. In the NCFS entry, it appears on the Receiver identification row. It is also available on dashboards or searches directed to the Receiver (e.g., Manage Intercompany Inbound Transactions, Manage Approvals). The Provider agency also can see it on the Requiring Attention tab.
Step 8. Complete only one amount column (either Debit or Credit) per Provider (and Receiver if applicable) row. Entering a value in both amount columns, even if the value is $0, causes an import error during the upload process. Intercompany Transaction spreadsheet import errors cannot be corrected and must be deleted by OSC.