Purpose
The purpose of this Quick Reference Guide (QRG) is to provide a step-by-step guide of how to create a sales order in the North Carolina Financial System (NCFS).
Introduction and Overview
This QRG covers the process of creating a sales order. This involves detailing how to create an order draft, selecting a customer, entering key order details in NCFS, adding items to the order, managing attachments, and submitting the order.
Follow the steps outlined in the MFG-28: Entering Manual Orders QRG. Once the sales order draft has been created, continue with the steps below to create a sales order.
Create a Sales Order – Sales Order Line: Shipment Details
The next step in the create a sales order process is to review and verify information in the Shipment Details tab in the Sales Order screen. This draft contains multiple items in the Order Lines section. The information within each tab should be reviewed to determine if any edits are required, starting with the Shipment Details tab.
To verify shipment details, please follow the steps below. There are 12 steps to complete this process.
Step 1. Within the General tab of the Shipment Details tab, verify the Ship-to Contact and Ship-to Contact Method fields are accurate.
Step 2. In the Requested Date field, verify that the Requested Date is accurate.
Step 3. In the Shipping Method field, select the appropriate option.
Note: If an option is not selected from this field, the plant or shipping team responsible for delivering the product determines the appropriate shipping method for the order.

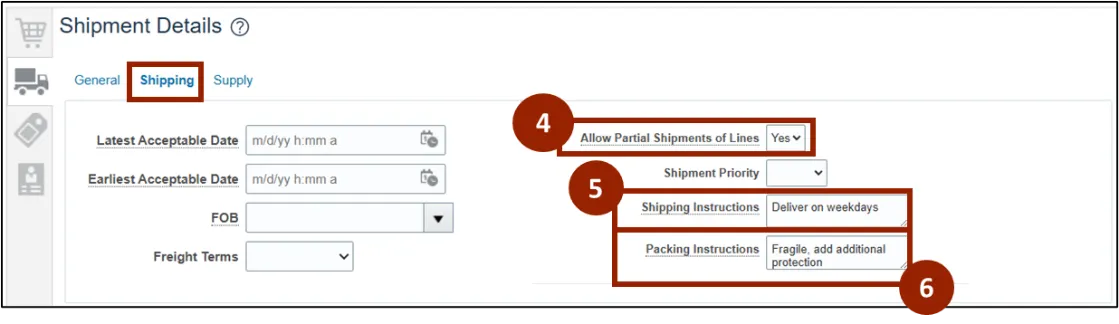
Step 4. Within the Shipping tab, in the Allow Partial Shipments of Lines drop-down field, select Yes if the customer requests for each item to be shipped partially.
Note: By default, NCFS sets this field as Yes.
Step 5. (Optional) In the Shipping Instructions field, enter specific instructions for shipping order, if any (e.g., Deliver on weekdays).
Step 6. (Optional) In the Packing Instructions field, enter specific instructions for packing the order, if any (e.g., Fragile, add additional protection).
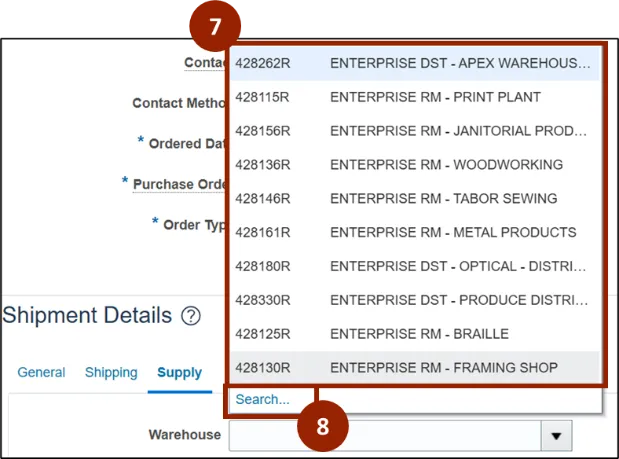
Step 7. (Optional) In the Warehouse drop-down field of the Supply tab, select the warehouse, or plant this item should be supplied from.
Step 8. From the Warehouse field’s drop-down list, click Search… link to open the Search and Select: Warehouse window.
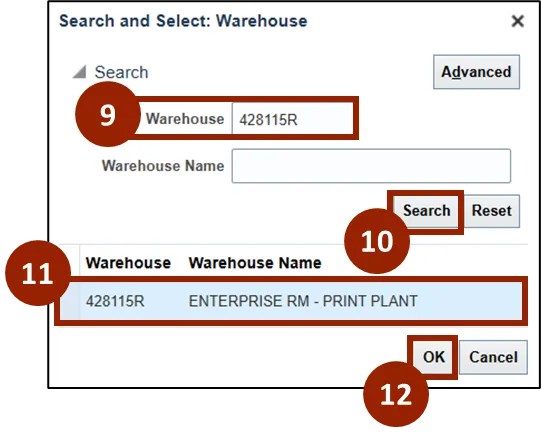
Step 9. In the Warehouse field enter the desired plant (e.g., 428115R).
Step 10. Click Search.
Step 11. From the Search Results, select the desired plant option.
Step 12. Click OK to return to the Create Order screen.
Note: If the warehouse or plant is manually selected, NCFS prioritizes this selection. If not, the system automatically assigns a warehouse or plant based on item configuration.
Create a Sales Order – Sales Order Line: Price Adjustment
Once an item is added to the Order Lines table, a frequent task is updating item prices. For example, custom items are priced at $0 and need to be updated as per the customizations. Updating prices confirms the order reflects accurate charges for each item, which is essential for correct billing.
To update pricing for items from the Lines tab, follow these steps. There are 8 steps to complete this process.
Step 1. Within Your Price column of the Order Lines table, click the pencil icon next to price.
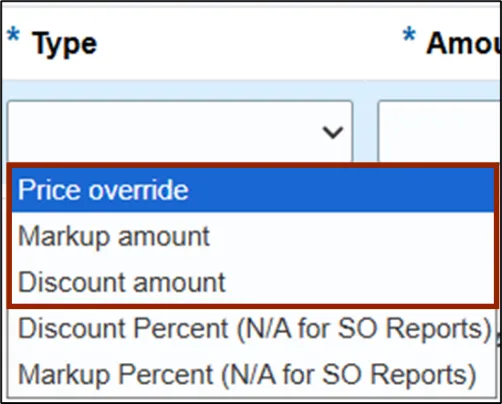
Step 2. In the Edit Item Price: Line 1 pop-up window, click the Type drop-down field and select the appropriate price adjustment type from the list (e.g., Price Override).
Note: Three adjustment options are available: Price Override, Markup Amount, and Discount Amount.
• Price Override: Replaces the price from the price list. If multiple overrides are added, the most recent one applies.
• Markup Amount: This is commonly used to add extra cost to an item, increasing the final price.
• Discount Amount: Subtracts a specified amount from the base price of an item.
Step 3. In the Amount field, enter the adjustment amount (e.g., 100).
Step 4. Click the Reason drop-down field and select the appropriate reason for the adjustment from the list (e.g., Customizations).
Note: While NCFS offers multiple price adjustment reasons, for DAC the following reasons have been added: Customizations, Flash Drive Delivery, Installation Fees, Rush Fees, Setup Fees, and Tailoring Fees.
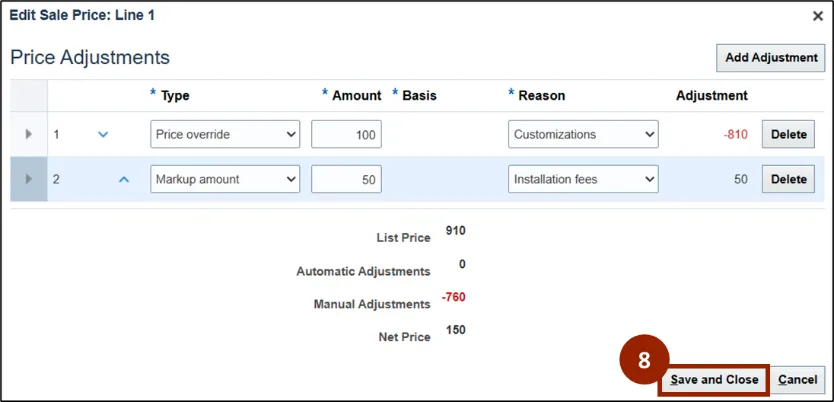
Once all required fields are completed, NCFS populates the Adjustment column below the Price Adjustments section to display the adjustment amount related to the selections.
Additionally, below the rows is a total amount for the List Price, Automatic Adjustments, Manual Adjustments, and Net Price.
Note: As many adjustments can be added or deleted, as needed.
Step 5. Click the Add Adjustment button to add another price adjustment line.
Step 6. Complete each of the fields according to the new price adjustment (e.g., Markup amount, 50, Installation fees).
Note: The newly added Price Adjustment line is automatically calculated and reflected within the List Price, Automatic Adjustments, Manual Adjustments, and Net Price.
In some cases, another price override may need to be added to the Price Adjustments for this item. If a price override is added on lower adjustment line, the latest price override adjustment takes priority.
Step 7. Click the Delete button on the desired row to delete an added price adjustment.
Step 8. Once all changes have been made to the Edit Price Item: Line 1 pop-up window, click the Save and Close button.
Create a Sales Order – Submit an Order
Once outlined information has been completed and the order is ready for submission it is time to submit the order.
To submit the order from the Create Order screen, follow these steps. There are 7 steps to complete this process.
Step 1. Click the Submit button.
Note: A warning or error pop-up window may appear with the message along with specific details related to the order selections.
Step 2. (Optional) If changes need to be made based on the warning or error, click Cancel to adjust the selections and resubmit.
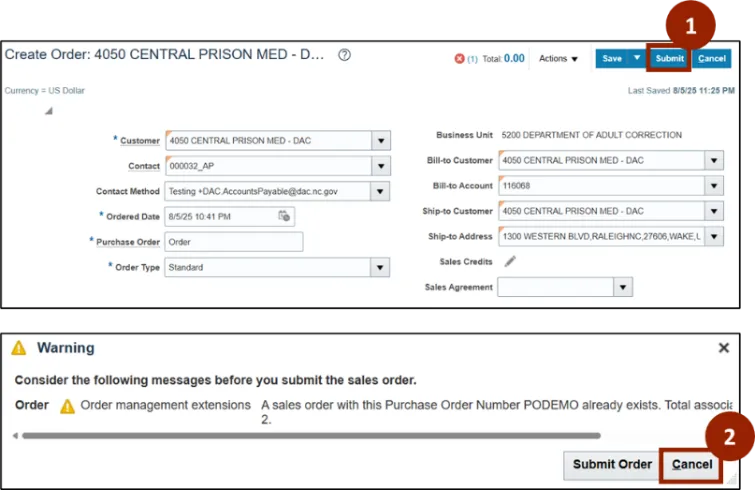
Step 3. Click the Submit Order button.
Note: If the same Purchase Order is used across multiple sales orders, a warning message will display with the Purchase Order Number along with the count of sales order duplicates.
Once submitted, a Confirmation pop-up window displays with the options to Create Another Order or click OK to return to the recently submitted order.
Step 4. Click OK.

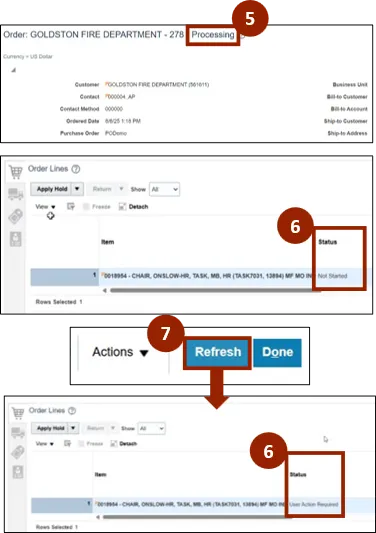
Step 5. Once submitted, Order Header Status and Lines are updated. Order Header Status is updated from “Draft” to “Processing”.
Step 6. The Order Lines Status column will change throughout the order fulfillment process.
Step 7. To refresh the information to display the most recent updates to the sales order, within the Create Order screen, click the Refresh button the Create Order screen.
Wrap-Up
NCFS users can follow the steps above to create sales orders within the NCFS system.
Additional Resources
- Instructor Led Training (ILT)
- Web-based Training (WBT)