Purpose
The purpose of this Quick Reference Guide (QRG) is to provide step-by-step instructions on how to create receipts using both the manual and automatic approaches in the North Carolina Financial System (NCFS).
Introduction and Overview
This QRG describes the two available methods for creating receipts in NCFS: the manual approach and the automatic approach. The manual approach allows users to enter and apply receipts directly in the system, while the automatic approach enables batch processing of receipts for improved efficiency. Both methods support accurate recording and management of receipts in NCFS.
Process for Receipt Creation
Manual Receipt Creation
The manual approach allows users to create and apply receipts individually within NCFS. This method provides users with full control over receipt details, customer information, and the application of payments to specific invoices. To create receipts using the manual approach in NCFS, please follow the steps below. There are 30 steps to complete this process.
Create a Receipt
Step 1. Log in to the NCFS portal using the Company Single Sign-On (SSO) button.
Step 2. Enter your @dac.nc.gov email address.
Step 3. Click Next, then enter your password.
Step 4. On the Home page, click the Receivables tab.
Step 5. Click Accounts Receivable.
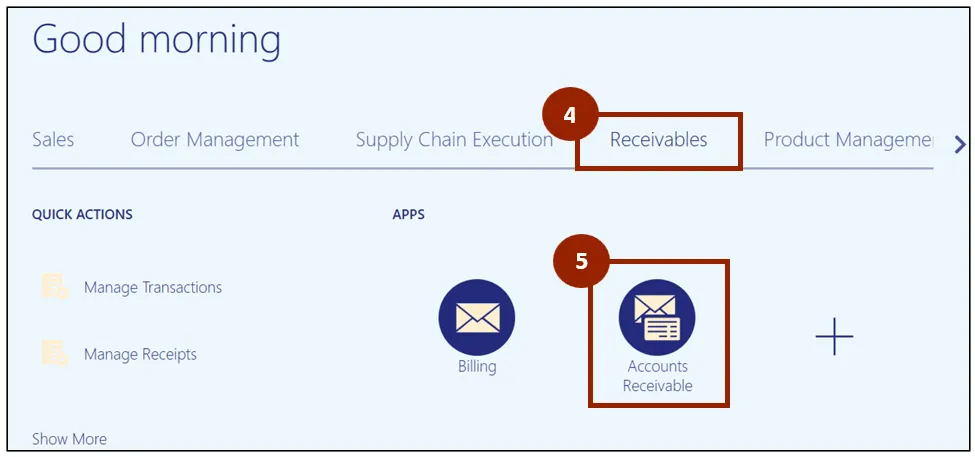
Step 6. On the Accounts Receivable page, click the Task icon.
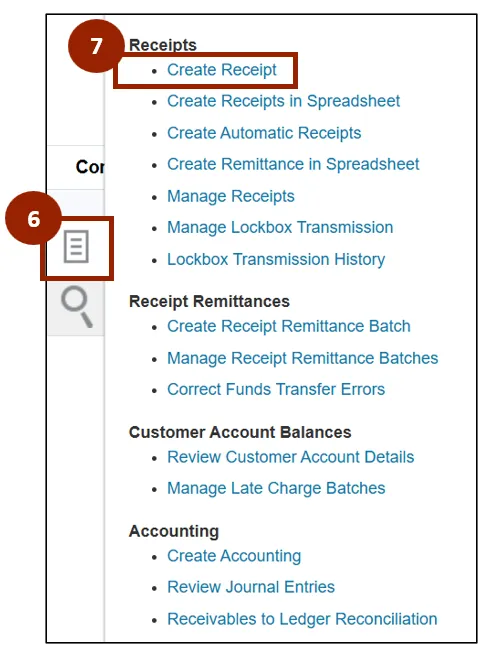
Step 7. Under the Receipts heading, click Create Receipt.
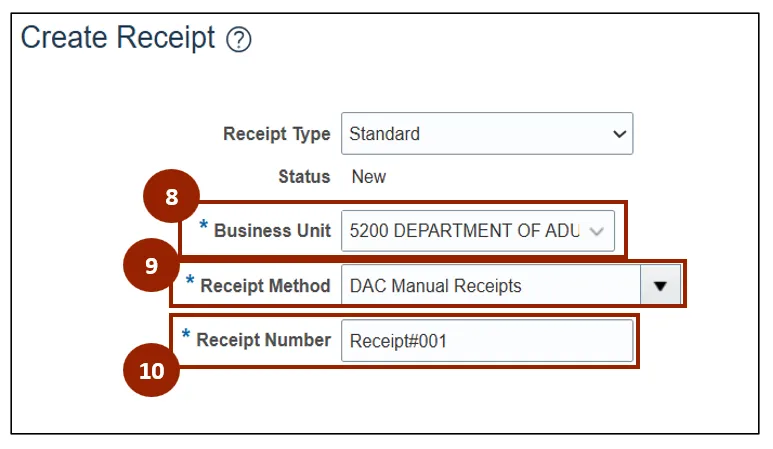
Step 8. On the Create Receipt screen, within the Business Unit drop-down field, select 5200 Department of Adult Correction.
Step 9. In the Receipt Method drop-down field, select DAC Manual Receipts.
Step 10. In the Receipt Number field, enter the receipt’s unique identifying number.
NOTE: For Manual Receipts, the Receipt Number is not automatically generated. Type the number in manually to move forward.
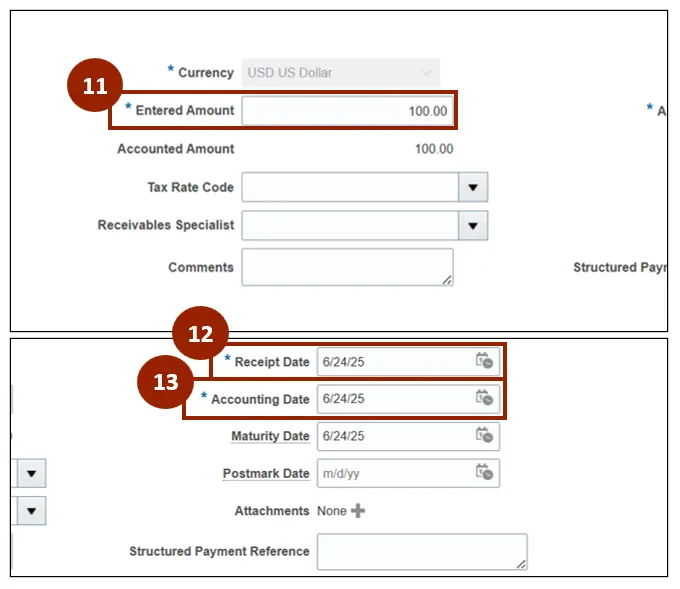
Step 11. In the Entered Amount field, enter the amount received in dollar and cent format (i.e., 1.23).
Note: The Currency field is locked and defaulted to the USD US Dollar option.
Step 12. In the Receipt Date and Accounting Date fields, enter or select the date of the receipt and appropriate accounting date.
Step 13. In the Accounting Date field, enter or select the appropriate accounting date.
Provide Remittance Bank and Customer Information
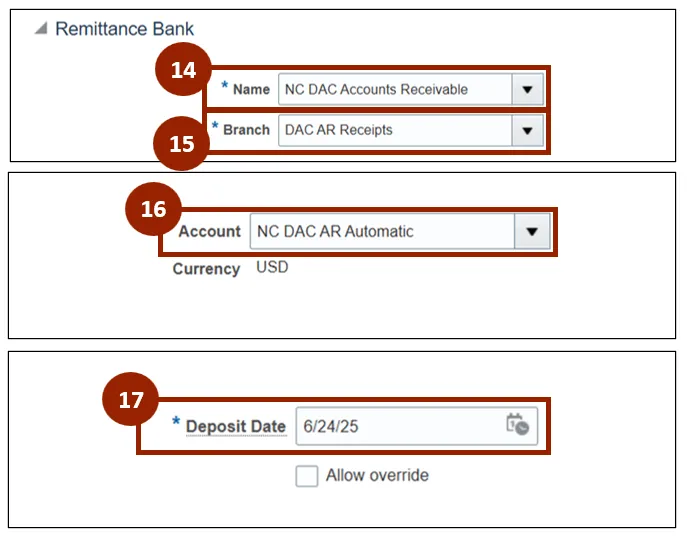
Step 14. Within the Remittance Bank section under the Name drop-down field, select NC DAC Accounts Receivable.
Step 15. In the Branch drop-down field, select DAC AR Receipts, then in the Account drop-down field, select the NC DAC AR Automatic option.
Step 16. In the Account drop-down field, select the NC DAC AR Automatic option.
Step 17. In the Deposit Date field, enter or select the appropriate deposit date.
NOTE: If remittance bank details are auto populated, proceed directly to customer details.
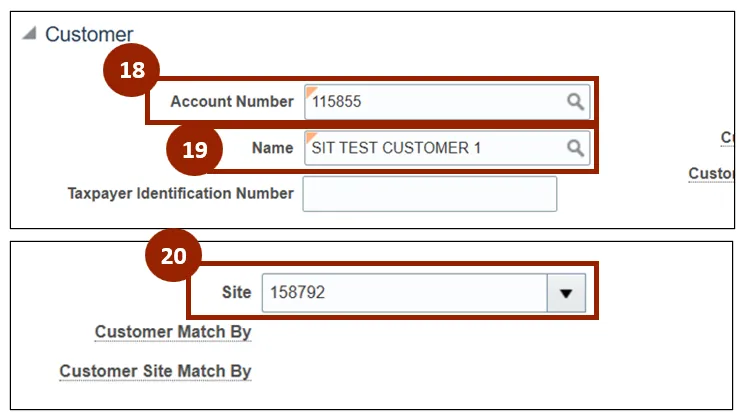
Step 18. Within the Customer section on the Account Number field, enter the appropriate Account Number.
Step 19. In the Name field, enter the Customer Name.
Step 20. In the Site drop-down field, select the appropriate site option.
NOTE: The Site drop-down field options will automatically update based on the customer information linked.
Apply Receipts to an Invoice
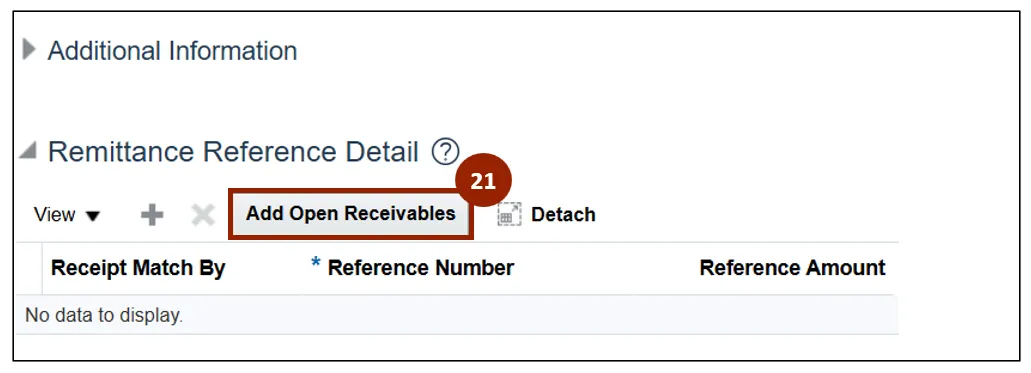
Step 21. Within the Remittance Reference Detail section, click the Add Open Receivables button to apply the invoices against the receipt.
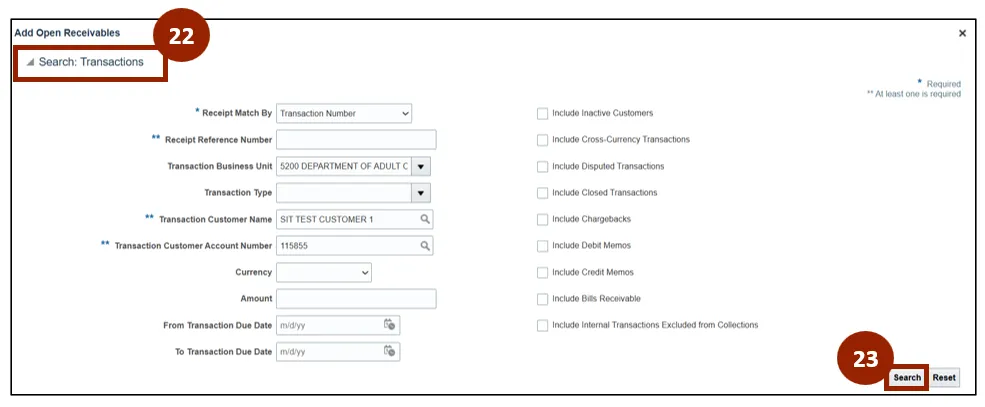
Step 22. In the Search: Transactions section of the Add Open Receivables window, click the caret icon to expand the search options.
Step 23. Click the Search button.
NOTE: The Search: Transactions section will auto-populate fields, which you can adjust as needed before clicking the Search button.
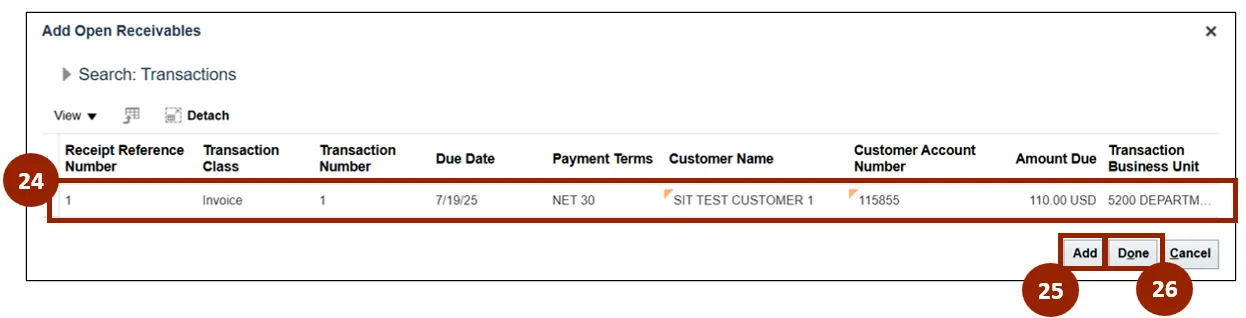
Step 24. Within the Search: Transactions results, select the required invoice by clicking the record’s row.
Step 25. Click Add to add the selected invoice to the Remittance Reference Detail section.
Step 26. Click Done to close the Add Open Receivables window.
Note: To add multiple invoices at once, select each desired row and click Add.
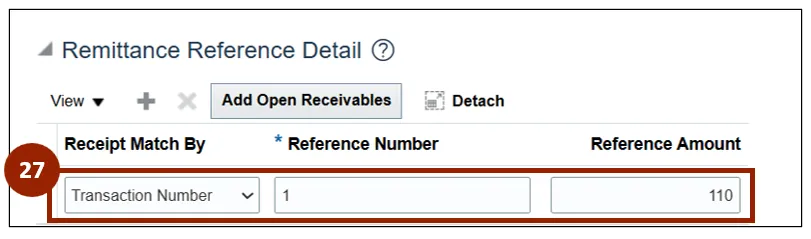
Step 27. The added transaction displays within the Remittance Reference Detail section.
Note: Any of the unlocked fields within the Remittance Reference Detail table can be adjusted, as needed.
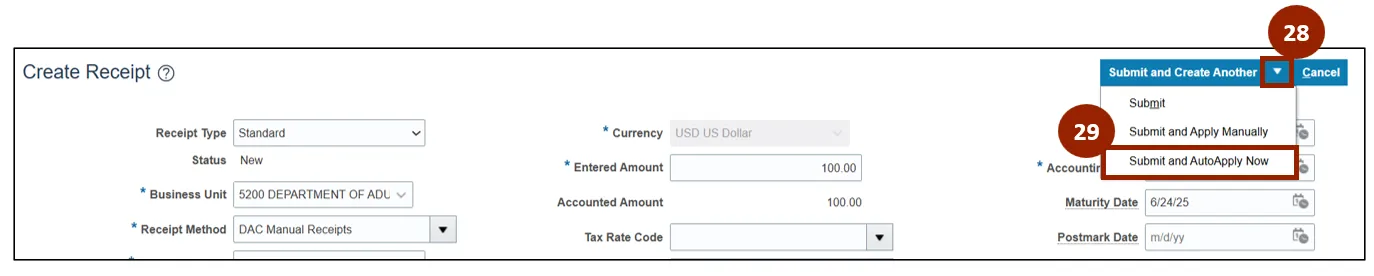
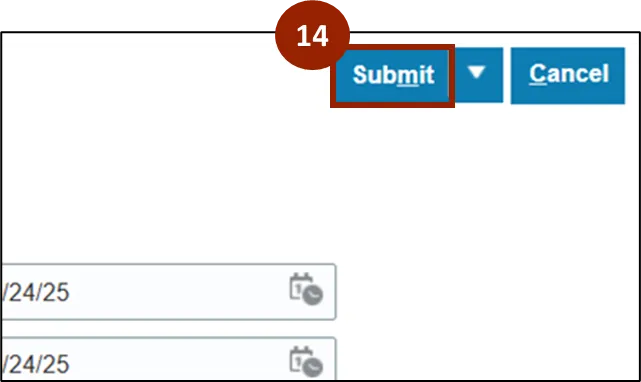
Step 28. Review all details on the Create Receipt screen, then click the Submit and Create Another drop-down arrow to display additional options.
Step 29. Select Submit and Auto Apply Now from the list.
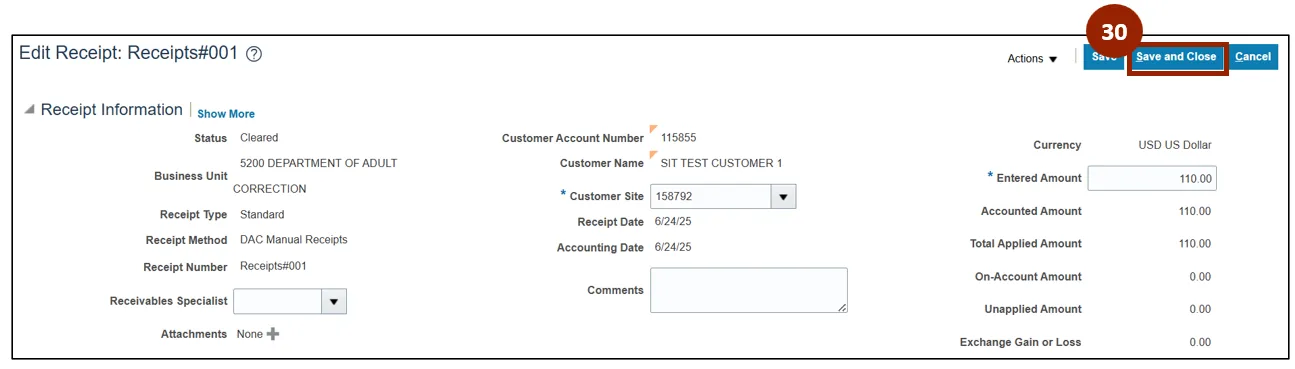
Note: The receipt is now recorded in the system, and the applied transactions are updated accordingly.
Step 30. The Edit Receipt screen displays for the submitted receipt record. Click the Save and Close button.
Note: This completes the manual approach process for receipt creation.
Automatic Approach
The automatic approach streamlines receipt processing in NCFS through five main activities: creating an automatic receipt batch to group receipts, approving the batch for accuracy, creating a receipt remittance batch for payment processing, approving the created receipt remittance batch, and clearing automatic receipts to finalize and reconcile transactions. To create receipts using the automatic approach, once logged into NCFS, please follow the steps below. There are 62 steps to complete this process.
Create an Automatic Receipt Batch
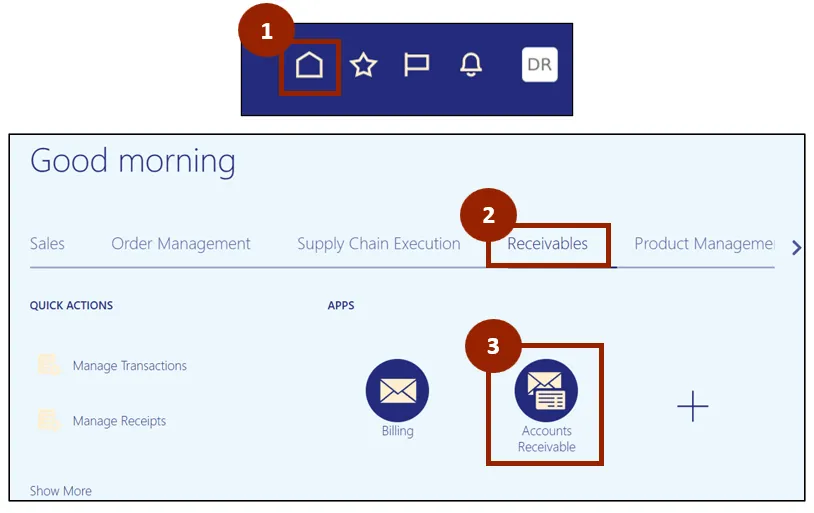
Step 1. Begin from the Home page, or click the Home icon.
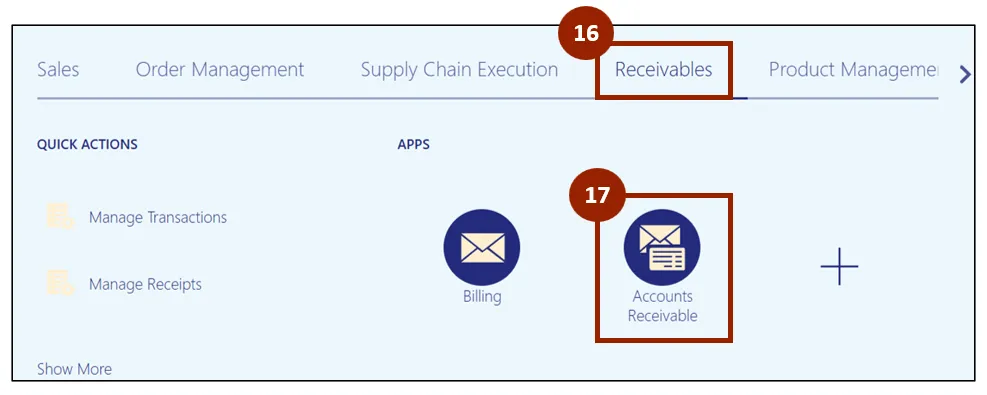
Step 2. On the Home page, select Receivables.
Step 3. Within the Receivables tab, select Accounts Receivable.
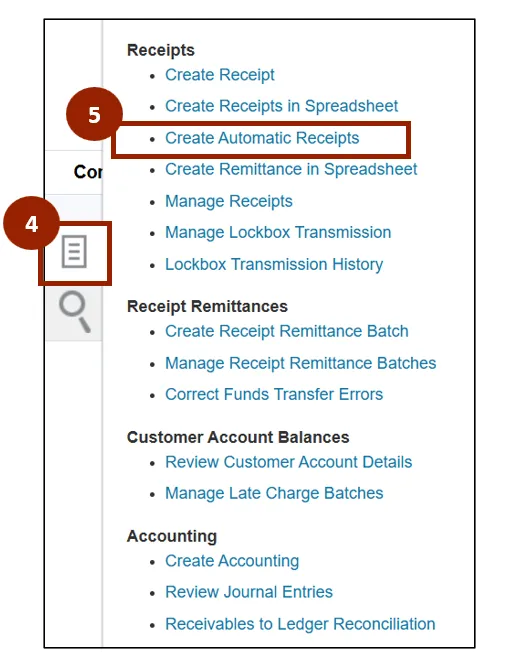
Step 4. On the Accounts Receivable page, click the Task icon.
Step 5. Under the Receipts heading, click Create Automatic Receipts to open the Create Automatic Receipt Batch screen.
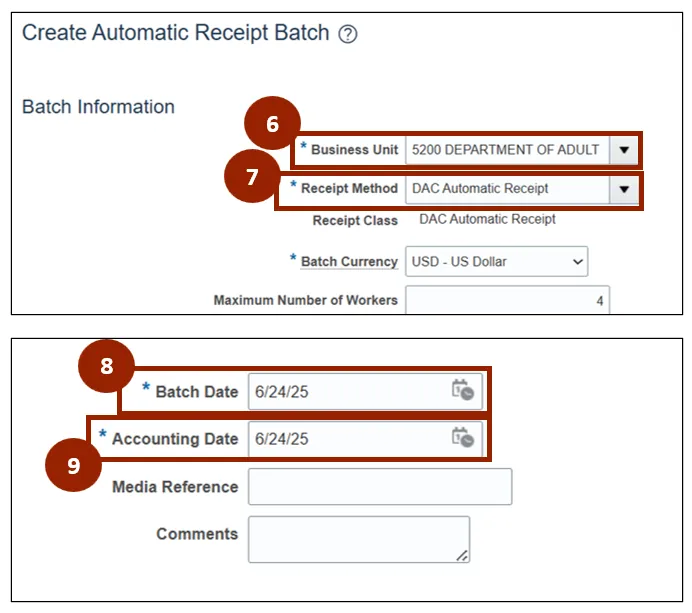
Step 6. On the Create Automatic Receipt Batch screen, within the Business Unit drop-down field, select 5200 Department of Adult Correction.
Step 7. In the Receipt Method drop-down field, select DAC Automatic Receipt.
NOTE: The Batch Currency field is locked and defaulted to the USD - US Dollar option.
Step 8. In the Batch Date field, enter or select the desired date.
Step 9. In the Accounting Date field, enter or select the desired date.
Step 10. In the From Customer Name search field, enter or select the starting customer name for the range you wish to select.
Step 11. In the To Customer Name search field, enter or select the ending customer name for the range you wish to select.

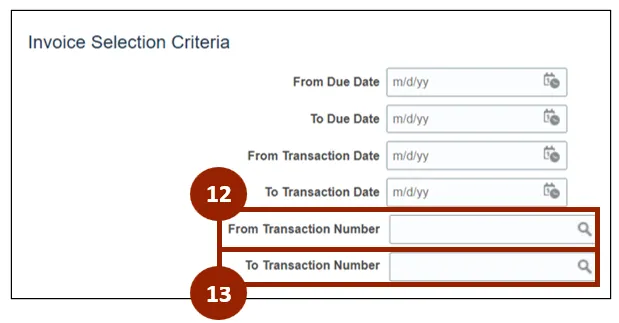
Step 12. In the From Transaction Number search field, enter or select the starting transaction number for the invoices you wish to select.
Step 13. In the To Transaction Number search field, enter or select the ending transaction number for the range of invoices you wish to select.
Note: You can use any of the fields within the Invoice Selection Criteria section to specify invoices for NCFS to batch select.
Step 14. Once all desired criteria are specified, click Submit.
Step 15. Once submitted, an Information pop-up confirmation message appears on screen, click OK to close the message.

Approve the Automatic Receipt Batch
Step 16. On the Home page, click the Receivables tab.
Step 17. Click the Accounts Receivable app.
Step 18. On the Accounts Receivable app page, click the All business units drop-down.
Step 19. Select 5200 Department of Adult Correction.
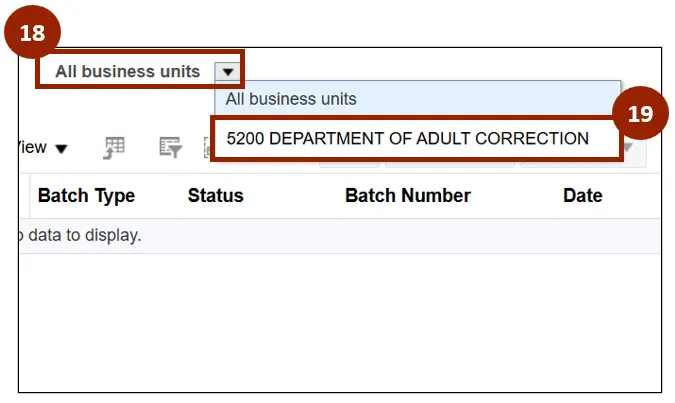
Step 20. Within the Batch Number column, click on the desired Batch Number link.
Note: Clicking the Batch Number link opens the Approve Automatic Receipt Batch screen for that record. The Batch Details section displays a table containing all record-level information related to the receipt batch.

Step 21. The Batch Details section displays a table containing all record-level information related to the receipt batch.
Step 22. Once reviewed, click the Approve button.
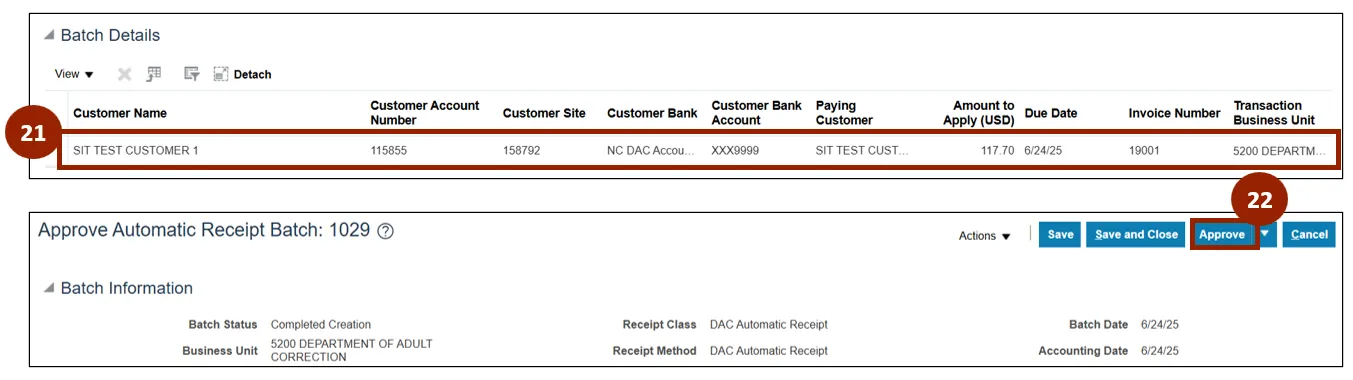
Step 23. Click the Save and Close button.
Step 24. Once approved, an Information pop-up confirmation message appears on screen, Click OK to close the message.
Note: The Information pop-up screen will display your submission details and provide the request ID while the automatic receipt batch approval is being processed.
Create Receipt Remittance Batch
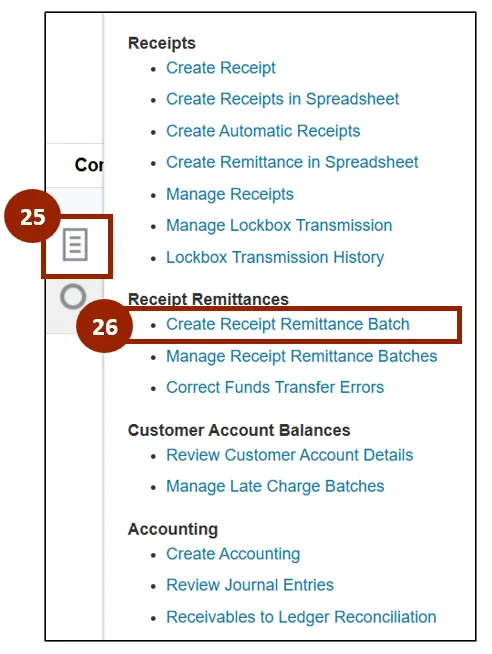
Step 25. From the Accounts Receivable application page, click on the Task icon.
Step 26. Under the Receipt Remittances heading, click Create Receipt Remittance Batch.
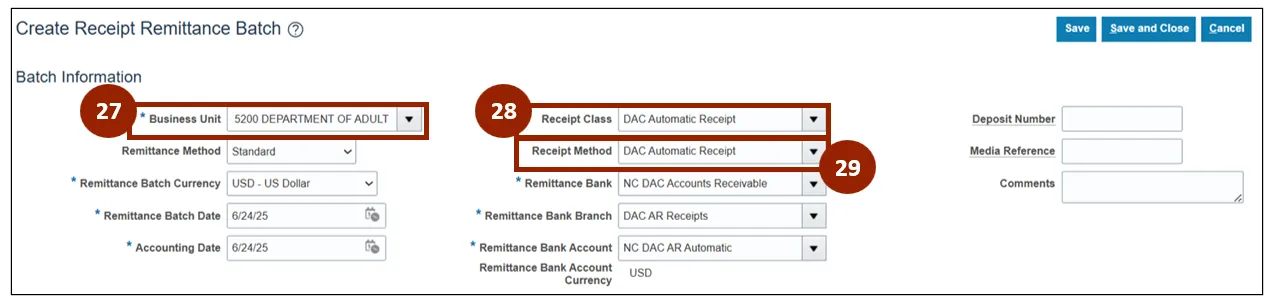
Step 27. On the Create Receipt Remittance Batch screen within the Business Unit drop-down field, select 5200 Department of Adult Correction.
Step 28. In the Receipt Class drop-down field, select DAC Automatic Receipt.
Step 29. Then in the Receipt Method field, select DAC Automatic Receipt.
Note: Complete all required fields marked with an asterisk (*). Begin with the fields highlighted above, as many others will auto-populate based on your selections.
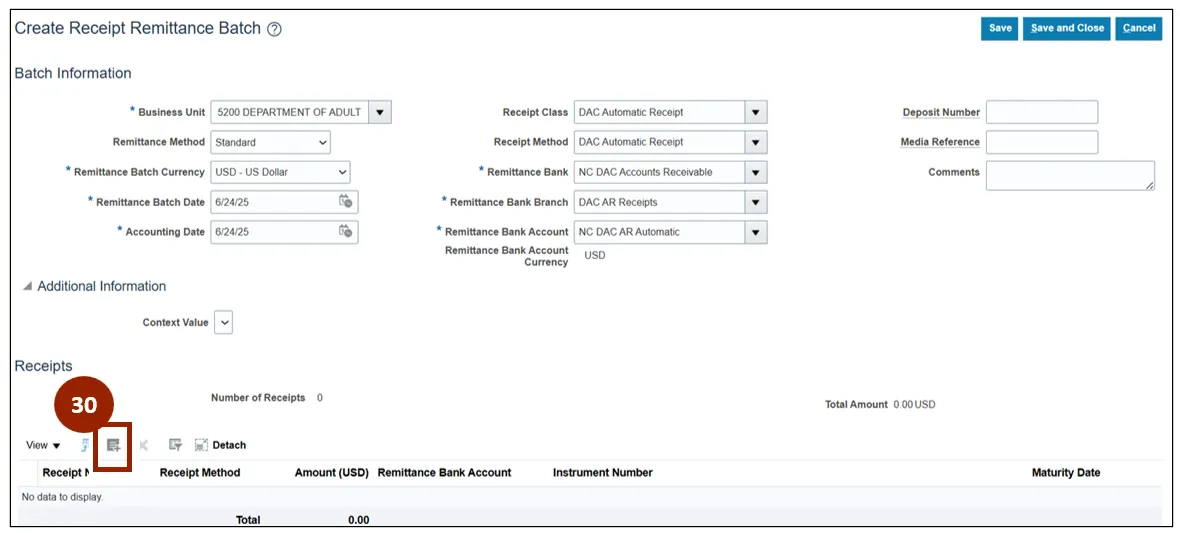
Step 30. Within the Receipts section of the Create Receipt Remittance Batch screen, click the Add Search and Select icon.
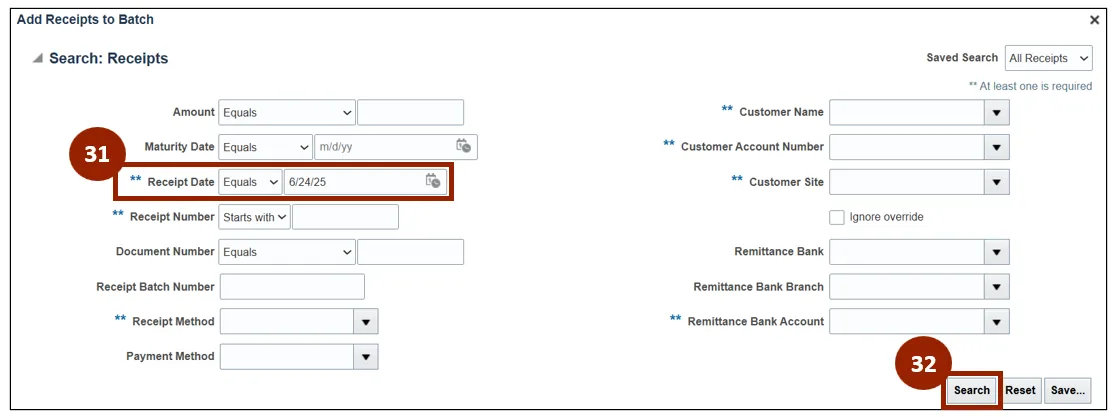
Step 31. Within the Receipt Date field, enter or select the desired date.
Step 32. Click Search.
Note: At least one field marked with a double asterisk (**) must be entered to search for a receipt. While this example uses the Receipt Date field, any marked field may be used.
Step 33. Within the Search: Receipts results, select the desired receipt record.
Step 34. Click the Apply button.
Step 35. Click the Done button.
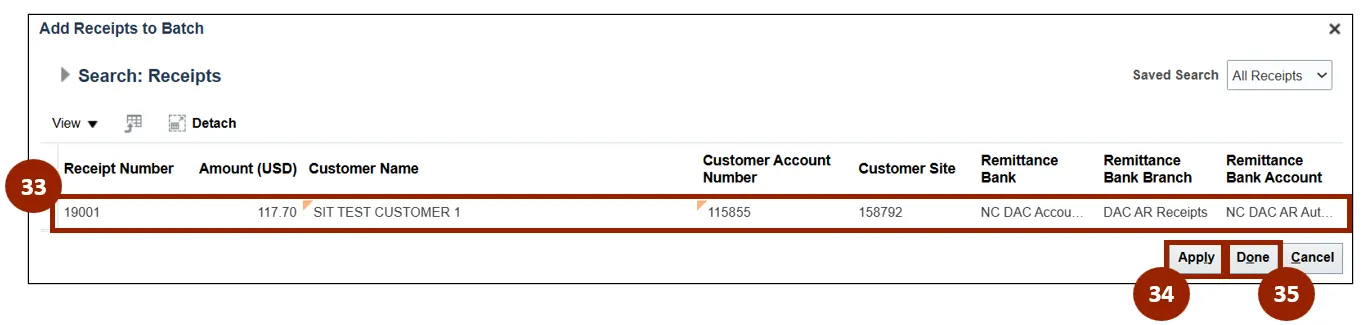
Step 36. Within the Receipts table, verify that the applied receipt has been added.
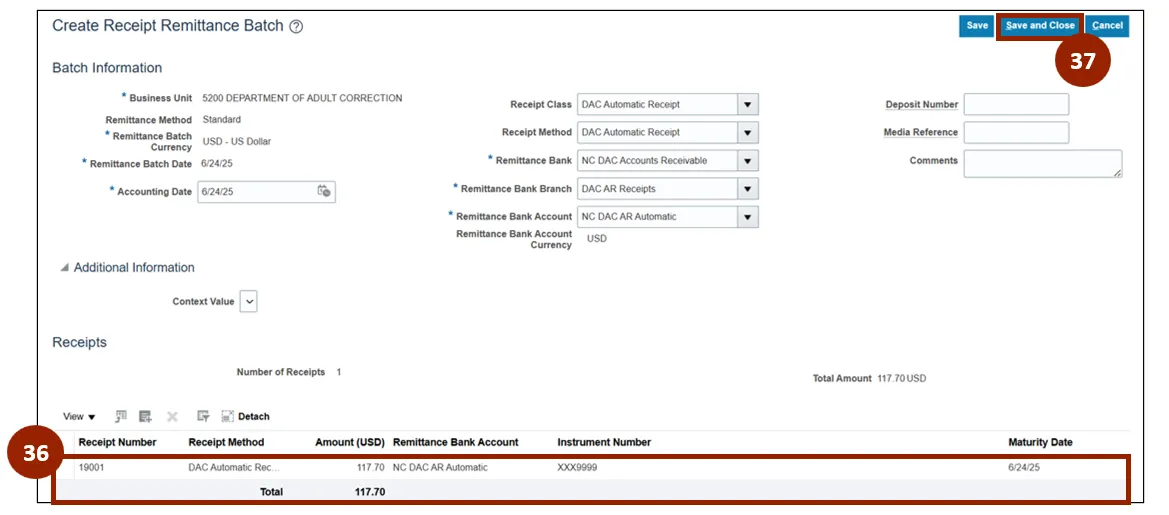
Step 37. Click the Save and Close button.
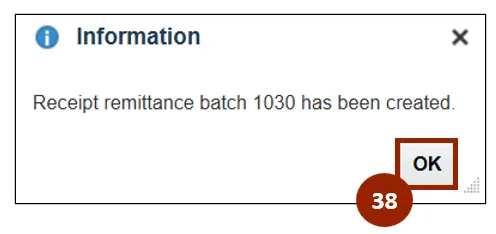
Step 38. Once submitted, an Information pop-up confirmation message appears on screen, click OK to close the message.
Approve Receipt Remittance Batch
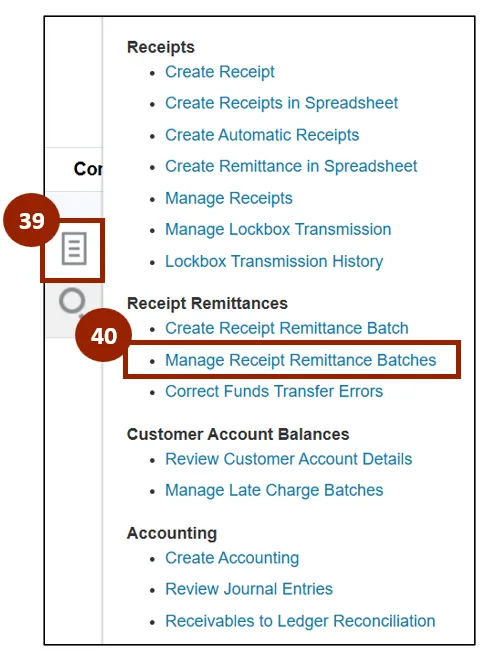
Step 39. From the Accounts Receivable app page, click the Task icon.
Step 40. Under the Receipt Remittances heading, click Manage Receipt Remittance Batches to open the Manage Receipt Remittance Batches screen.
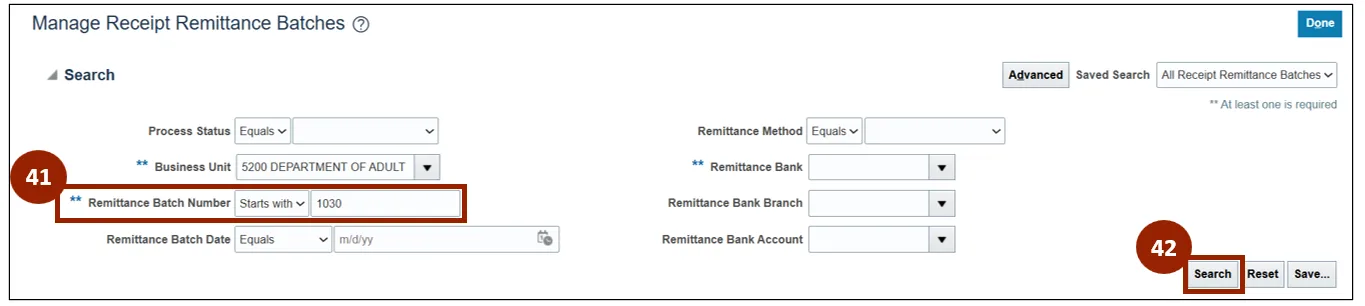
Step 41. Within the Remittance Batch Number field, enter the associated batch number.
Step 42. Click Search.
Note: At least one field marked with a double asterisk (**) must be entered to search for a receipt. While this example uses the Remittance Batch Number field, any marked field may be used.
Step 43. Within the Search Results table, select the desired record.
Step 44. Click the Approve button.

Step 45. Once the Approve button is clicked, an Information pop-up confirmation message appears on screen, click OK to close the message.

Clear Automatic Receipts
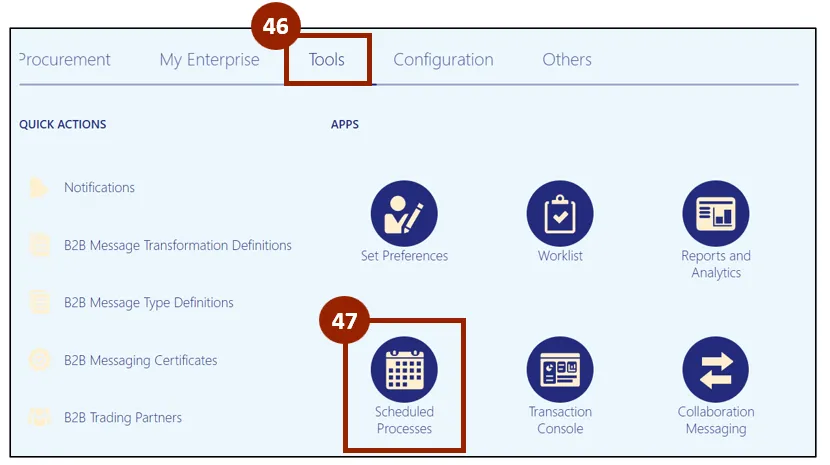
Step 46. On the Home page, select the Tools tab.
Step 47. Click the Scheduled Processes app.
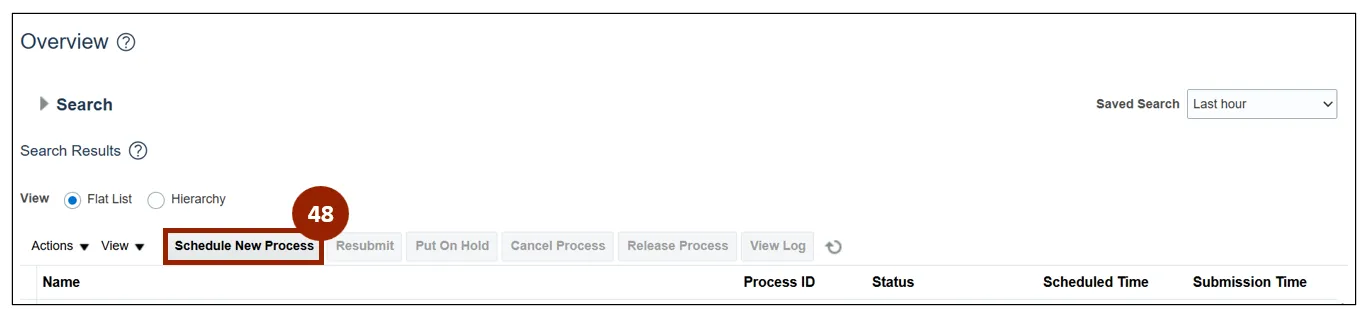
Step 48. Within the Overview screen, click the Schedule New Process button.
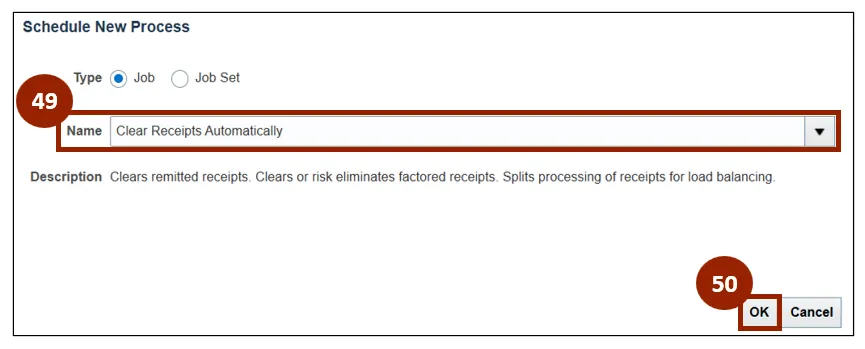
Step 49. On the Schedule New Process window, enter or select Clear Receipts Automatically within the Name field.
Step 50. Click OK.
Note: When the Clear Receipts Automatically process is entered the description of the process will display under the selection.
Step 51. Within the Business Unit drop-down field, select 5200 Department of Adult Correction.
Step 52. In the Remittance Batch Number field, enter the desired remittance batch number.
Step 53. In the Number of Instances field, enter the desired number of instances.
Note: Complete all required fields marked with an asterisk (*). Begin with the fields highlighted above, as many others will auto-populate based on your selections.

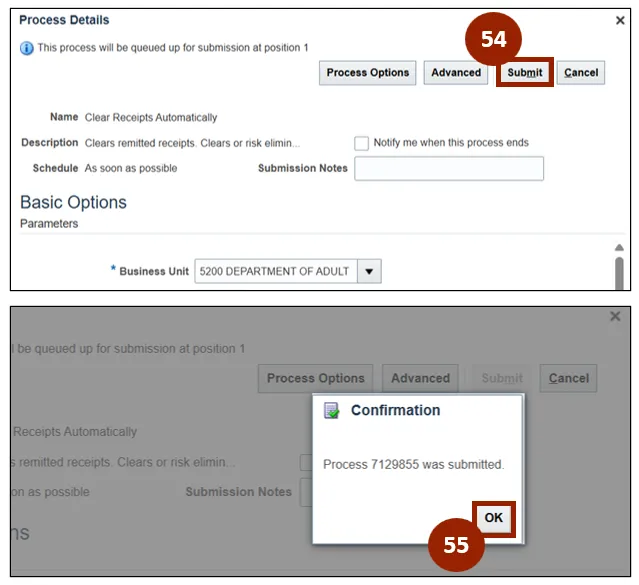
Step 54. Once all mandatory fields within the Basic Options section have been completed, click the Submit button.
Step 55. Once submitted, a Confirmation pop-up window appears on screen, click OK to close the message.
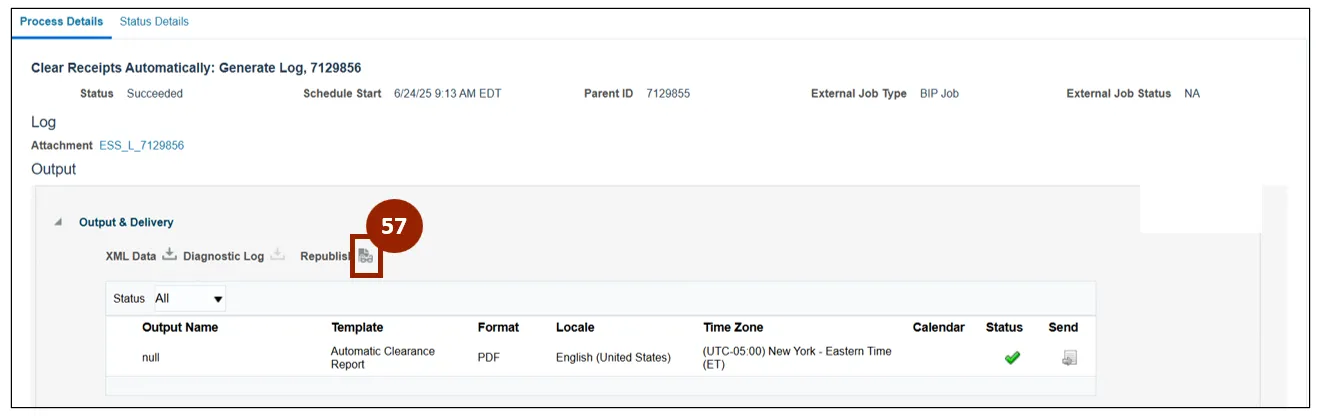
Step 56. Within the Overview screen of the Scheduled Processes application, select the created clear receipts automatically process from the Search Results list.

Step 57. Under the Output section of the Process Details tab, click the Republish Online icon.
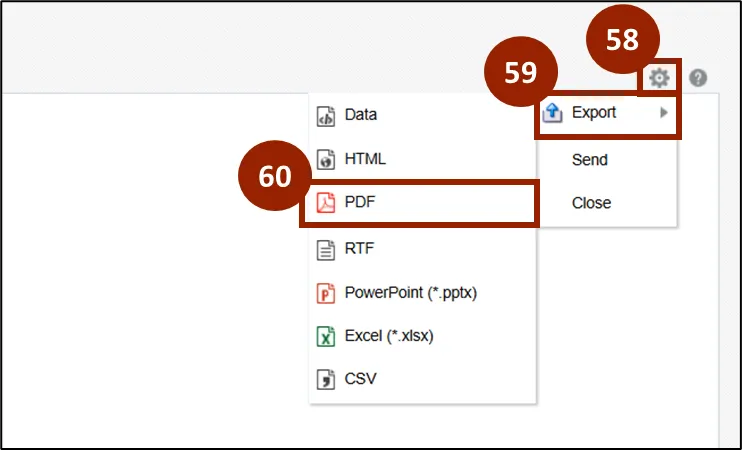
Step 58. Within the Automatic Clearing For Receipts pop-up window, click the Action icon.
Step 59. Scroll over Export to open the drop-down list.
Step 60. Select PDF from the list to download the PDF.
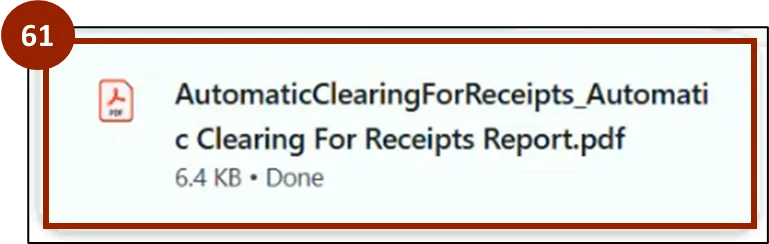
Step 61. From the browser’s downloads, click the downloaded PDF document to open within a new tab.
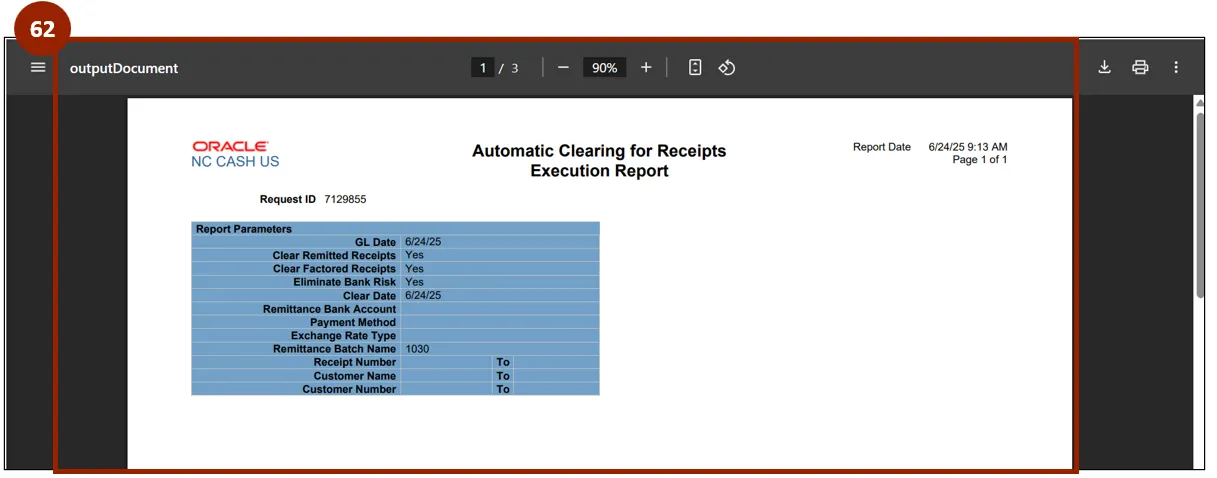
Note: The downloaded document opens in a new browser tab. The download functionality may vary depending on the browser used to access NCFS. The output document may contain multiple pages depending on the report parameters.
Step 62. Review the output document and verify that all information is correct before marking this process as complete.
Note: This completes the automatic approach process for receipt creation.
Wrap-Up
NCFS users can create, apply, and manage receipts using manual or automatic approaches to support accurate and timely financial recordkeeping using the steps outlined above.
Additional Resources
- Instructor Led Training (ILT)