Purpose
The purpose of this Quick Reference Guide (QRG) is to provide a step-by-step explanation of how to Create Journals Through Spreadsheet in the North Carolina Financial System (NCFS).
Introduction and Overview
This QRG covers the process of creating journals with multiple lines using the Application Development Framework Desktop Integration (ADFDI) spreadsheet.
User Tip
The following are prerequisites to creating and uploading a journal from spreadsheet:
-
User must download desktop integration installer for using ADFDI spreadsheet (Navigation: Tools >> Download Desktop Integration Installer).
Create Single Journals through Spreadsheet
To create single journals through spreadsheet, please follow the steps below. There are 33 steps to complete this process.
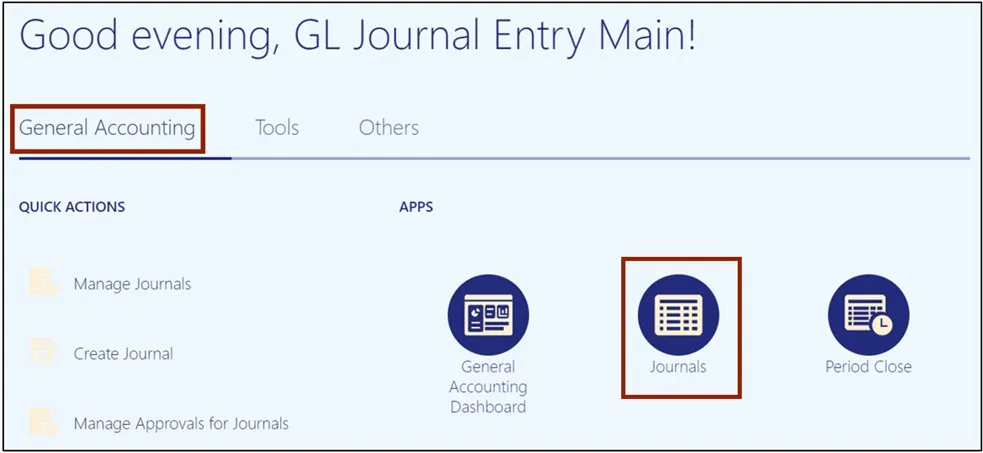
Step 1. Log in to the NCFS portal with your credentials to access the system.
Step 2. On the Home page, click the General Accounting tab and click the Journals app.
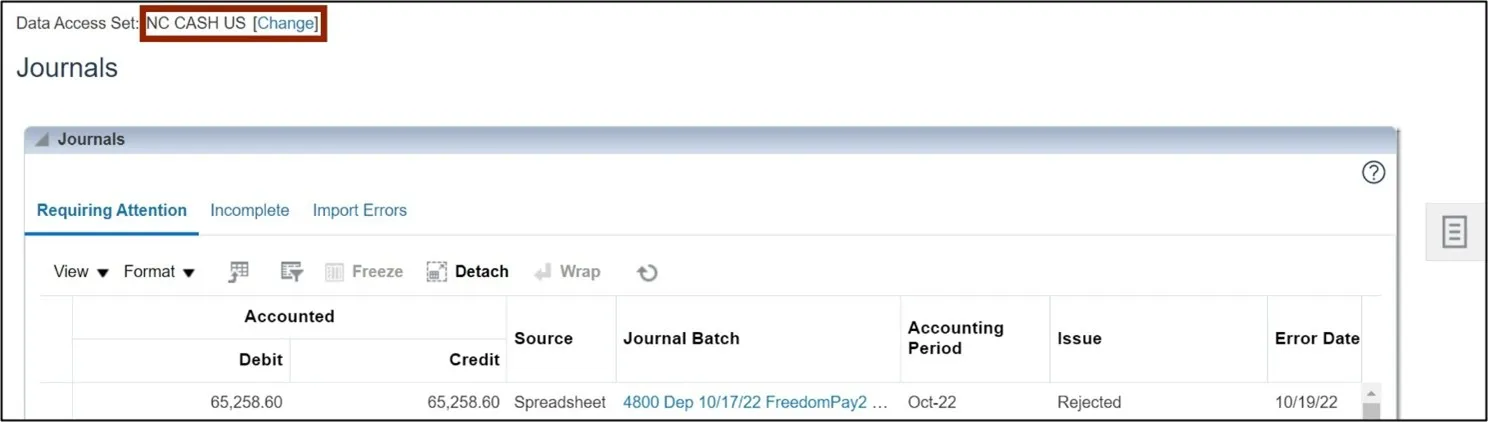
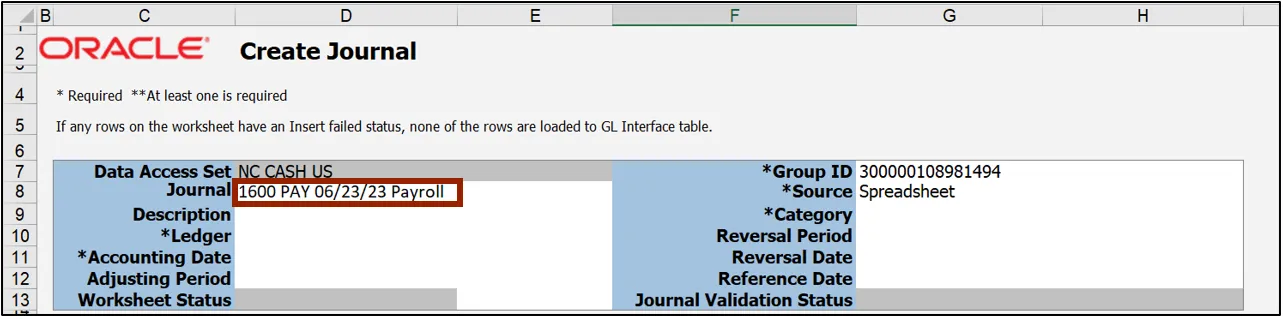
Step 3. On the Journals Landing page, select the appropriate Data Access Set on the top left corner by clicking Change. In this example, choose NC CASH US.
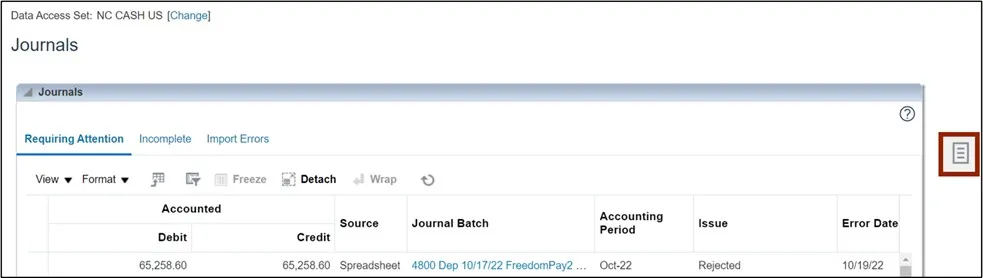
Step 4. Click the Tasks icon.
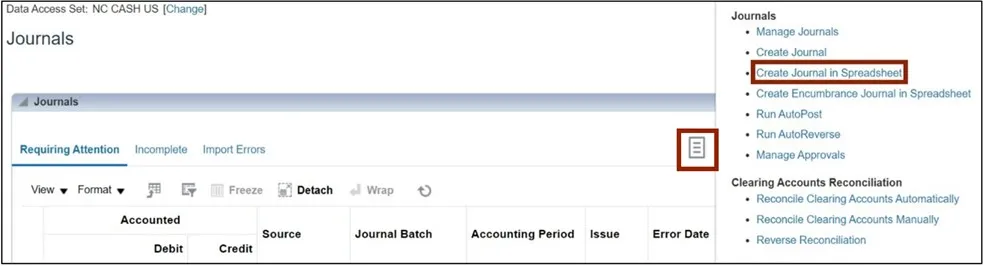
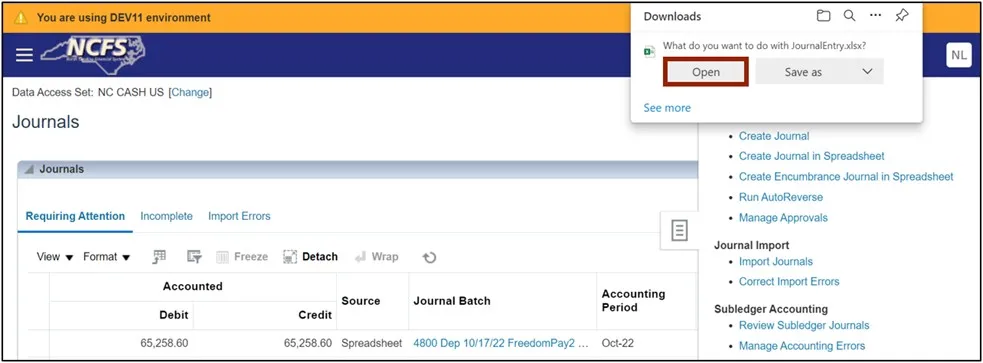
Step 5. On the Journals Landing Page, choose Create Journal in Spreadsheet to download the spreadsheet.
Click the Open button to open the downloaded Excel file.
Note: Use Microsoft Edge or Google Chrome browser to open the spreadsheet. If working remotely, sign into a VPN before opening the spreadsheet.
Step 6. Open the spreadsheet and click the Enable Editing button on top of the Excel file.

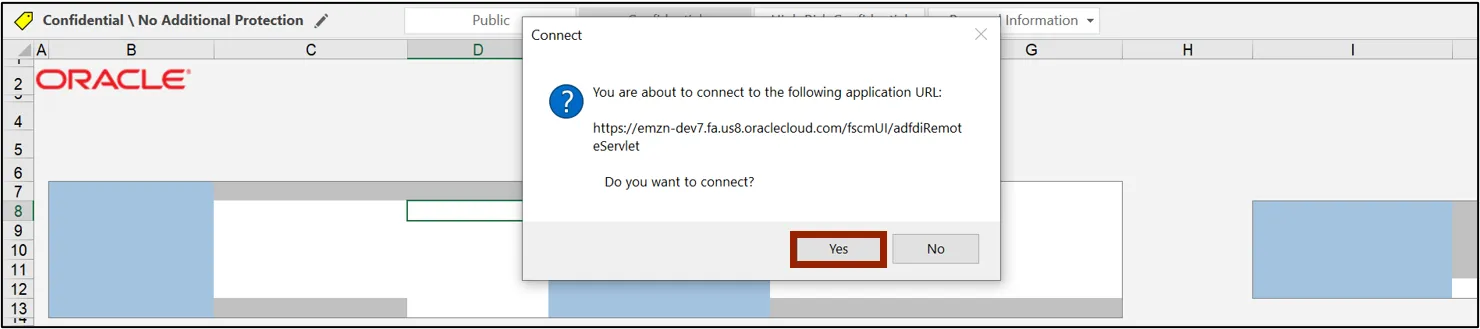
Step 7. On the Connect pop-up, click the Yes button to connect to the server.
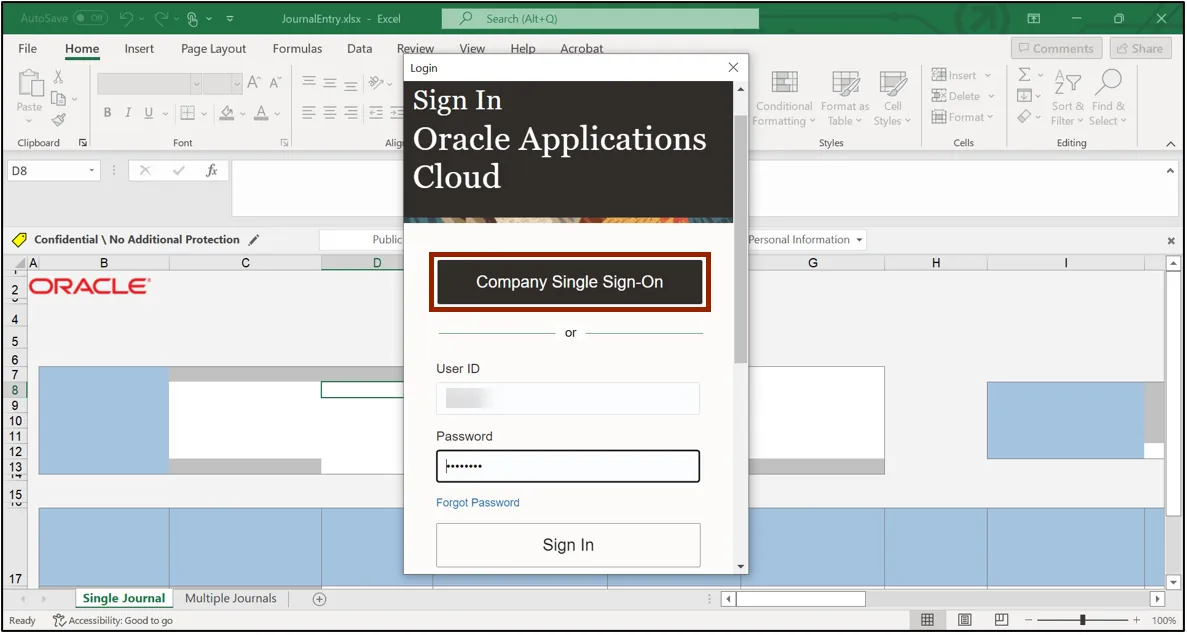
Step 8. On the NCFS Login pop-up, click the Company Single Sign-On button to login.
Step 9. Click the Single Journal tab on the bottom left corner of the spreadsheet.
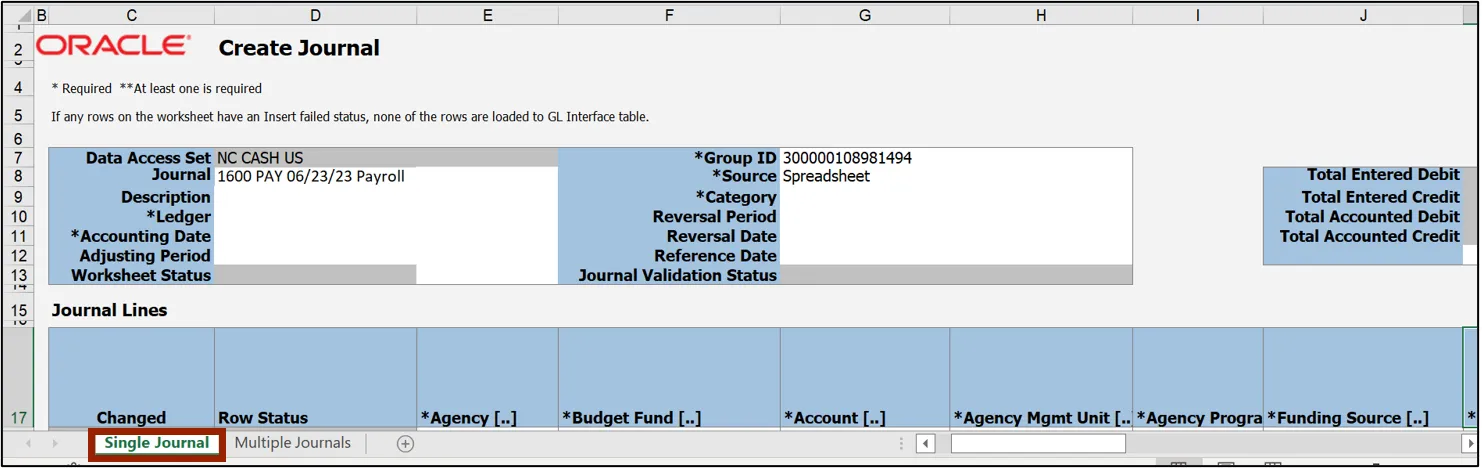
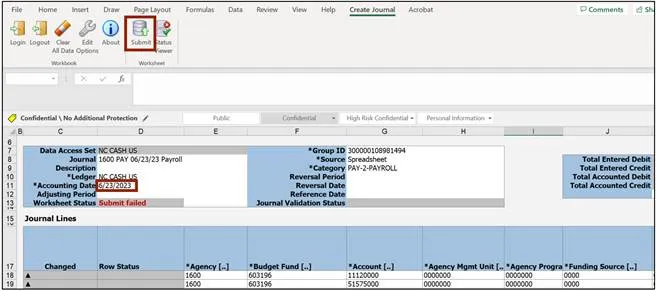
Step 10. Enter the Header section information. Enter the Journal Name on the Journal field.
In this example, enter 1600 PAY 06/23/23 Payroll. Next, enter a Description if desired.
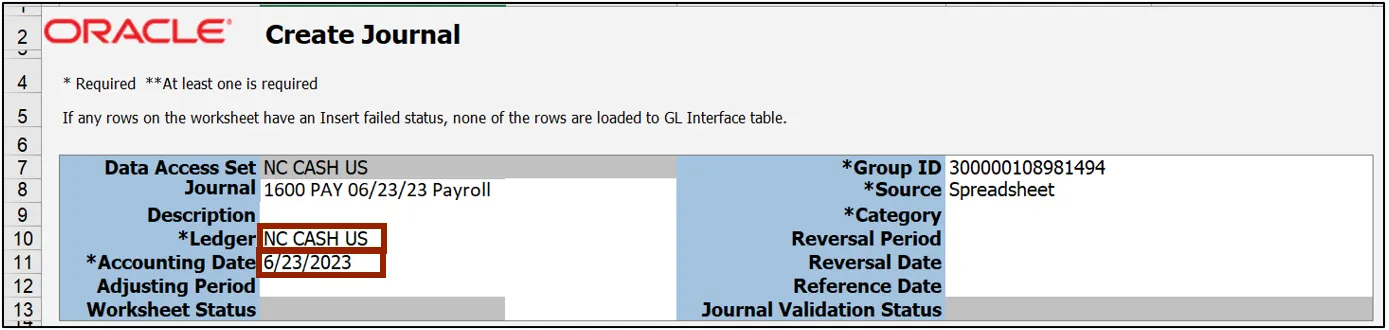
Step 11. Select the Ledger name from the drop-down choice list. Double-click in the field to activate the choice list.
In this example, choose NC CASH US. Next, enter the Accounting Date. In this example, enter 6/23/2023.
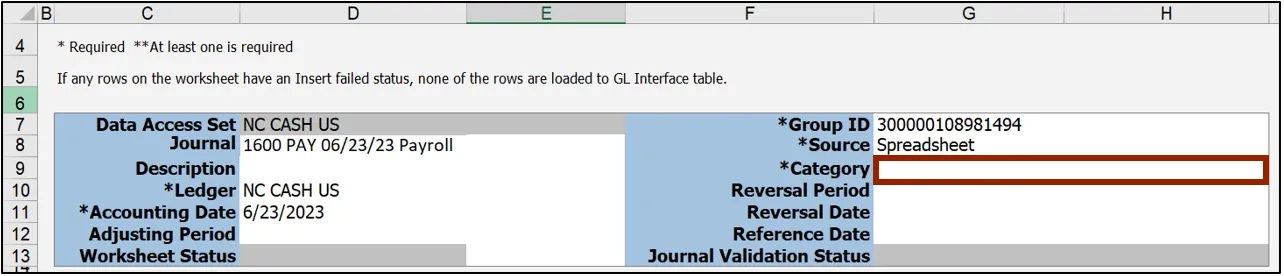
Step 12. Double-click the field next to Category field to open a pop-up.
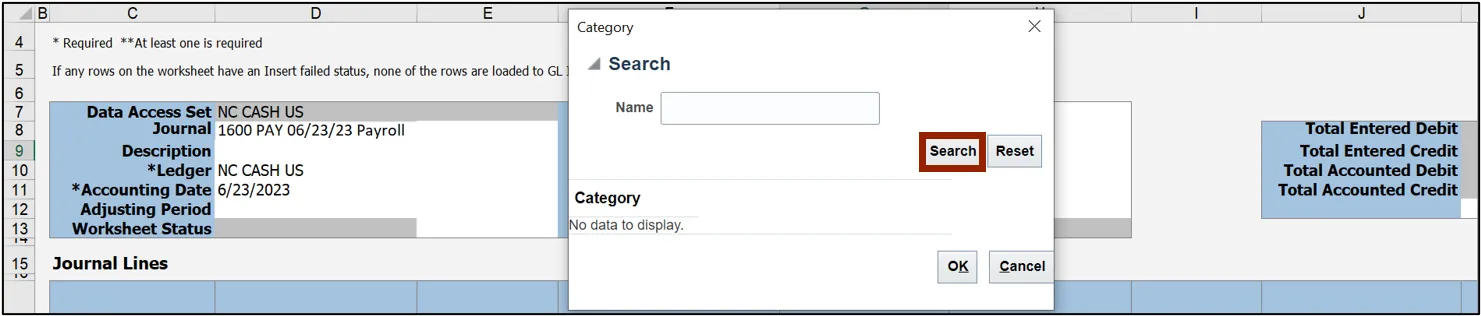
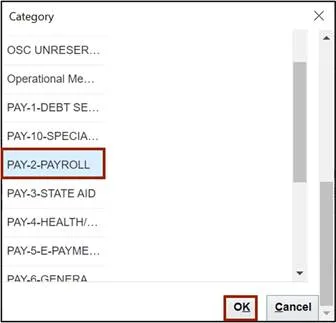
Step 13. The Category pop-up from NCFS appears. Enter the required Category or click the Search button to get a list of categories.
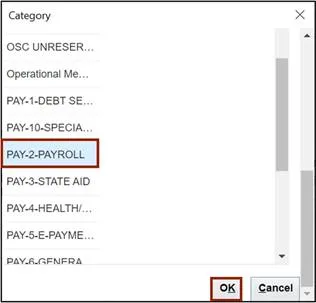
Step 14. Select the required Category and click the OK button.
In this example, choose PAY-2-PAYROLL and click the OK button.
Step 15. Scroll down to the Journal Lines section. Double-click the cell below the Agency field to open a pop-up from NCFS.
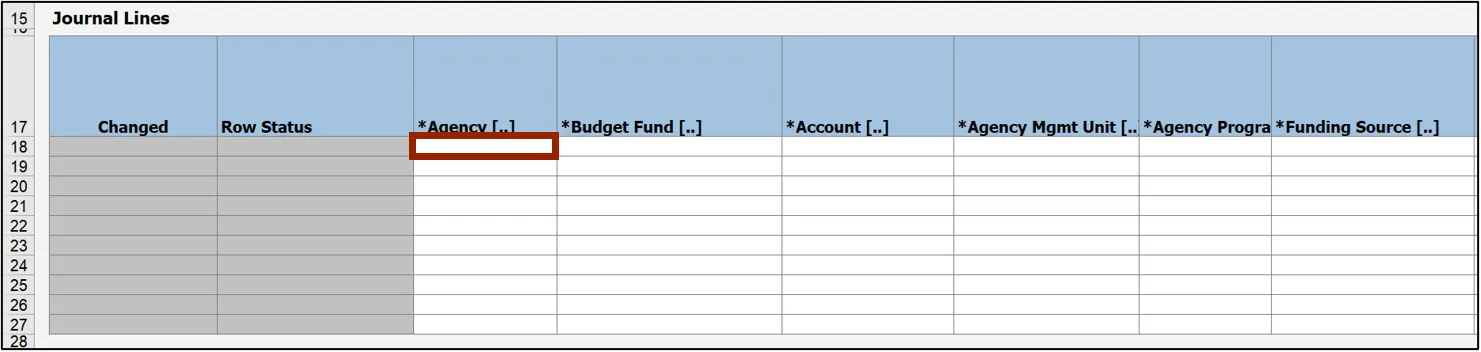
Step 16. The Accounts pop-up appears. On the Accounts field, click the Select icon.
Note: Additional lines can be added if the number journal lines exceed the ones enabled.

Step 17. The Key Flexfield pop-up appears. Enter the required account information and click OK.
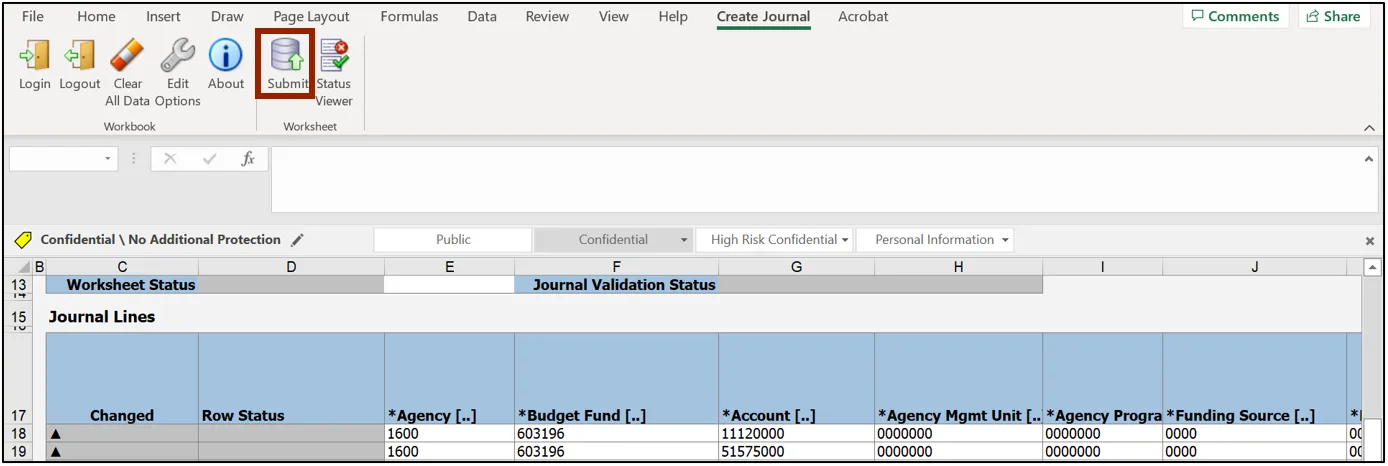
In this example, we choose:
Agency: 1600
Budget Fund: 603196
Account: 11120000
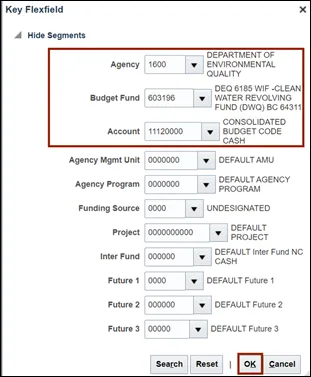
Step 18. The respective COA combination fields are auto populated with this information.

Step 19. Scroll to the right and select the Currency from the drop-down choice list. In this example, choose USD. Next, enter the required credit amount on the Entered Credit field.
In this example, choose 4000.

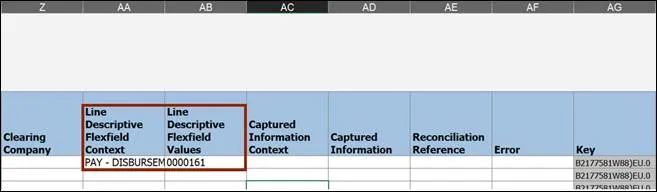
Step 20. Scroll further to the right and fill in the Line Descriptive Flexfield Context and Line Descriptive Flexfield Values fields.
In this example, choose PAY – DISBURSEMENT and 0000161 respectively.
Step 21. NCFS Scroll back to the left and double-click the second cell below the Agency field to open a pop-up.

Step 22. The Accounts pop-up appears. On the Accounts field, click the Select icon.
Note: Additional lines can be added if the number journal lines exceed the ones enabled in the sheet.

Step 23. The Key Flexfield pop-up appears. Enter the required account information and click the OK button.
In this example, choose:
Agency: 1600
Budget Fund: 603196
Account: 51575000

Step 24. The respective COA combination fields get auto populated with this information.

Step 25. Scroll to the right and select the Currency from the drop-down choice list.
In this example, we choose USD. Next, enter the required debit amount on the Entered Debit field. In this example, choose 4000.

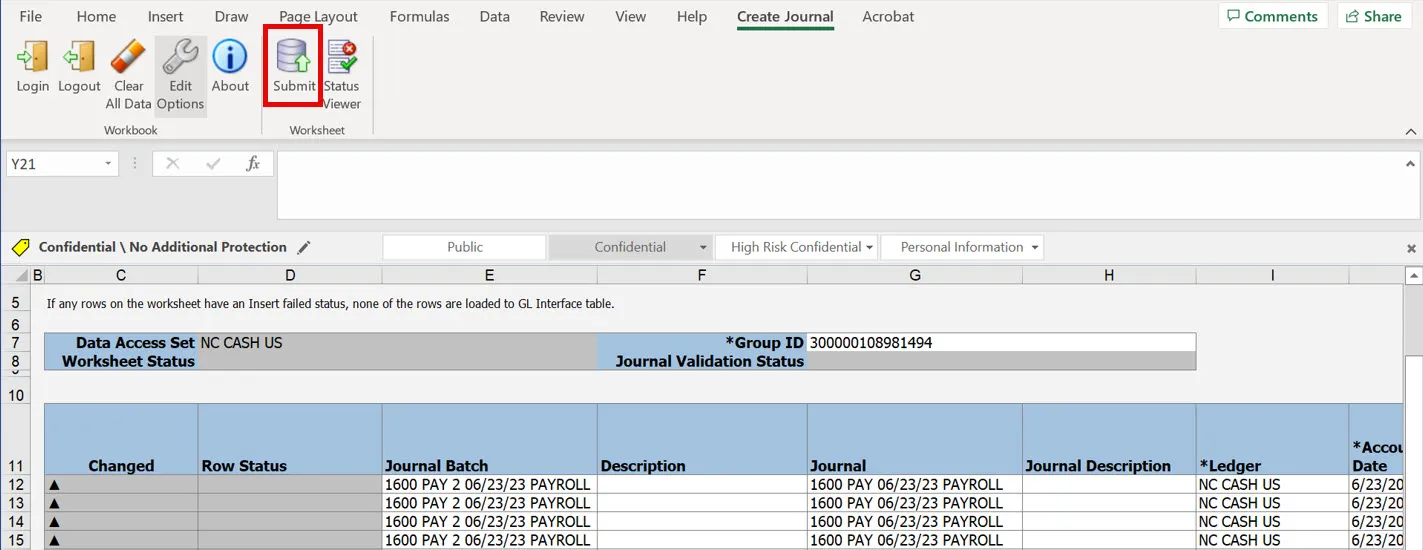
Step 26. On the Create Journal tab on top of the sheet, click Submit icon to attempt the upload of your journal entry.
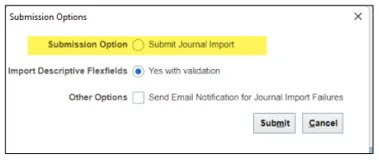
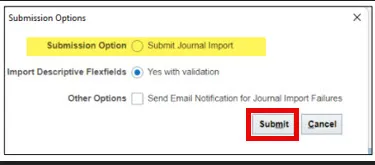
Step 27. The Submission Options pop-up appears. Ensure the Submit Journal Import radio button is selected and click the Submit button.
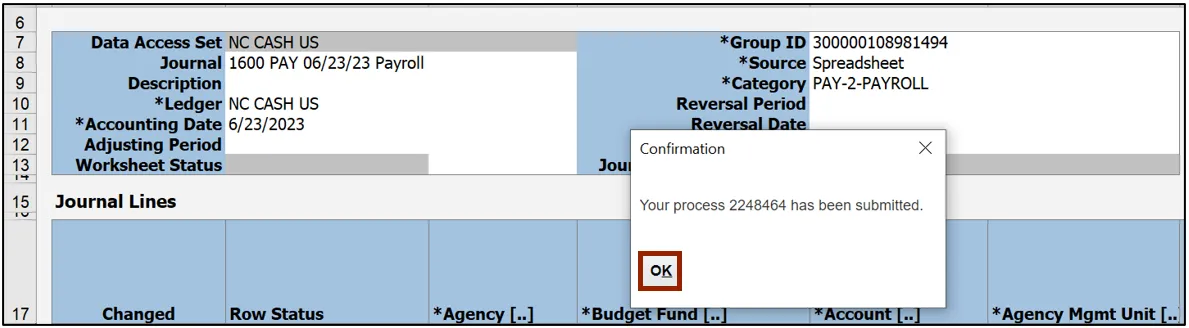
Step 28. The Confirmation pop-up appears, which indicates that the process has been submitted. Click the OK button.
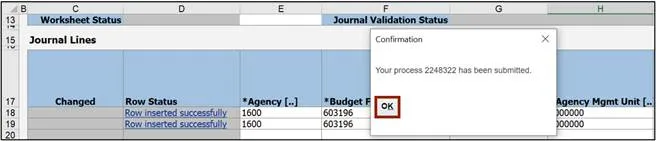
Step 29. Once the Submission Status showcases that the journal entries have been submitted, the Row Status field gets updated with Row Inserted Successfully.

Note: If the process fails, an error message will appear either on the header or the journal line causing the error.
In this example, we choose to show a worksheet error where the submission failed since the accounting date must be in an open or future enterable period. The error can be viewed on the Status Viewer section.
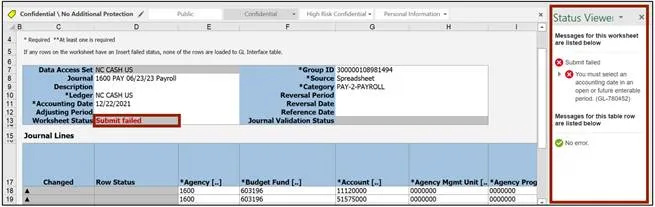
Step 30. Make the required fixes as per the nature of the error and click the Submit icon.
In this example, we choose to enter an Accounting Date in an open or future enterable period.
Step 31. The Submission Options pop-up appears. Ensure the Submit Journal Import radio button is selected and click the Submit button.

Step 32. The Confirmation pop-up appears, which indicates that the process has been submitted. Click the OK button.
Step 33. Once the Submission Status showcases that the journal entries have been submitted, the Row Status field gets updated with Row Inserted Successfully.
Note: To search for this journal, go to the Manage Journals page and search for your journal by selecting Source equals Spreadsheet as part of your search criteria.

Create Multiple Journals through Spreadsheet
To create multiple journals through spreadsheet, please follow the steps below. There are 12 steps to complete this process.
Step 1. Follow steps 1-9 from the above section.
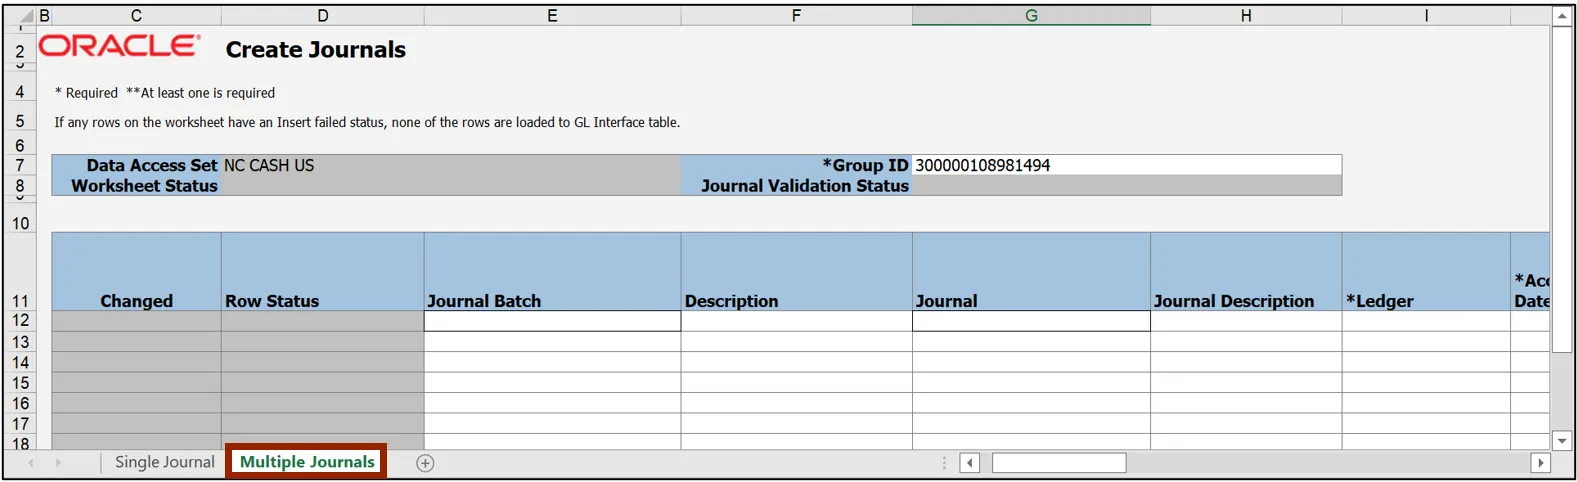
Step 2. Click the Multiple Journals tab on the bottom left corner of the spreadsheet.
Step 3. Enter the Journal Batch and Journal names in the respective fields.

Step 4. Select the Ledger name from the drop-down choice list.
In this example, we choose NC CASH US. Next, enter the Accounting Date. In this example, choose 6/23/2023.

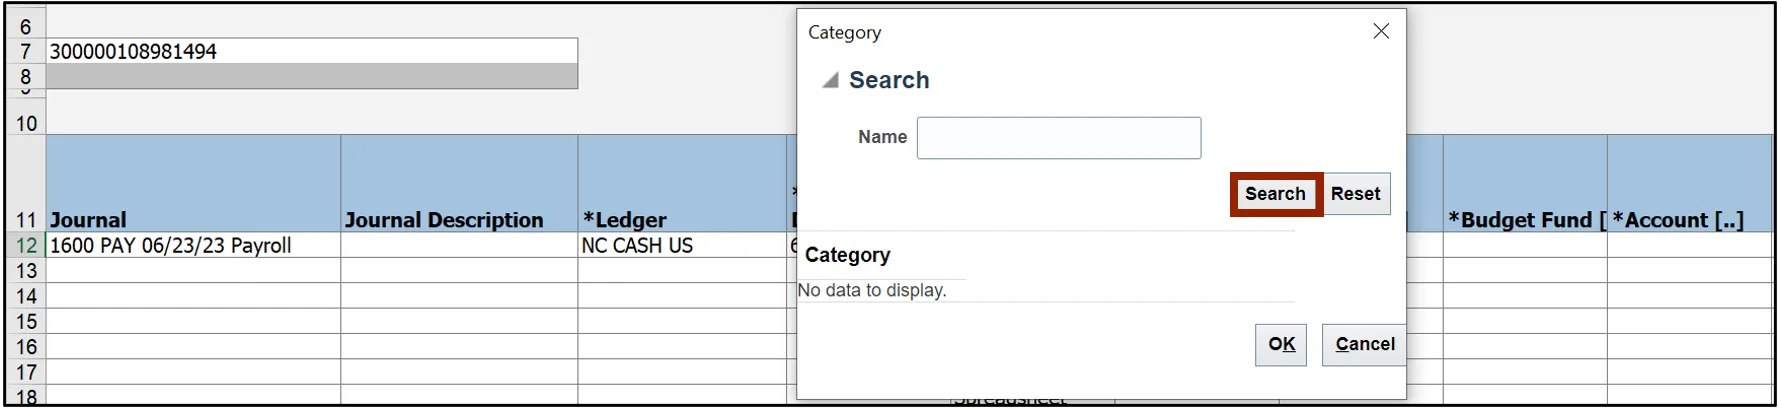
Step 5. Double-click the cell below the Category field to open a pop-up.

Step 6. The Category pop-up appears. Enter the required Category or click the Search button to get a list of categories.
Step 7. Select the required Category and click the OK button.
In this example, choose PAY-2-PAYROLL and click the OK button.
Step 8. To enter information on the COA Combination, Entered Debit, and Entered Credit fields, follow steps 16-28 from the previous section of this document.

Step 9. On the Create Journal tab on top of the sheet, click Submit to submit the journal entries.
Step 10. The Submission Options pop-up appears. Review the options and click the Submit button.
Step 11. The Confirmation pop-up appears, which indicates that the process has been submitted. Click the OK button.

Step 12. Once the Submission Status showcases that the journal entries have been submitted, the Row Status field gets updated with Row Inserted Successfully.

Wrap-Up
This QRG demonstrates how to create journals using the ADFDI spreadsheet by following the steps above.
Additional Resources
- Virtual Instructor-Led Training (vILT)