Purpose
The purpose of this document is to provide step by step detailed directions for interaction with the different prompts on Web Intelligence Reports.
To proceed to a specific topic, click the corresponding link below:
- Prompt Types
- Value Keys
- Searching Values
- Prompt Dependencies
- Prompt Types
- Action Reason(s)
- Action Type (s)
- Application of Fund(s) (Budget Code)
- Business Area(s)
- Calendar Filled Date
- Calendar Month/Year (Single Value)
- Calendar Qtr/Year (Single Value/Interval)
- CalMonth/Year (Single Value)
- Changed On Date (Single Value/Interval)
- Cost Center(s)
- Disability Code(s)
- Donor(s) PersNo.
- Effective Date
- Employee Pay Area(s)
- Employee Pay Type(s)
- Employee(s) PersNo.
- Exclude Employee Group
- Exclude Employee Subgroup
- Financial Key(s)
- Fund(s)
- Funding Source(s)
- Fund Type(s) (GASB)
- Job(s)
- Job Branch
- Job Family(s)
- Last Name UPPERCASE (Single Value)
- LI Effective Year
- LI Version (O-Original U-Updated)
- Min# Days Retro
- Order(s)
- Organizational Unit
- Payout Period(s)
- Personnel Area(s)
- Plan(s)
- Plan Option(s)
- Plan Type(s)
- Position(s)
- Position Number (Single Value)
- Receiver(s) PersNo.
- SSN Last 4 (Single Value)
- Supv Employee(s) PersNo.
- Supv Position(s)
Every Web Intelligence (WEBI) report within the Business Objects repository has a unique set of prompts. These prompts determine the information that will be retrieved for the report generation. Each report will have a combination of different prompts. Every report will have mandatory prompts. These prompts must have values selected for the report to generate. Reports may also have optional and or exclusion prompts. Optional prompts can be used to narrow down the data that is complied in the report. Exclusion prompts are used to remove any data that falls within a specific criterion, resulting in the data being removed from the complied report. Exclusion prompts are predefined with some initial values for example contractors and National Guard. Exclusion prompts act as a sort filter and can be removed on the prompt summary to include previously excluded values. Both optional and exclusion prompts are used to create more efficient and effective reports. Each type of prompt has an indication labeling it as a mandatory, optional, or exclusion prompt.
Mandatory prompts are identified by a yellow-orange triangle with an exclamation point inside of the triangle at the beginning of the prompt. Once values are selected for the prompt the triangle changes to a dark blue square with a check mark inside. Some mandatory prompts will be labeled Mandatory at the end of the prompt.
Optional prompts are identified with the phrase (Optional) at the end of the prompt.
Exclusion prompts are identified with the phrase Exclude at the beginning of the prompt and the phrase (Optional) at the end of the prompt.
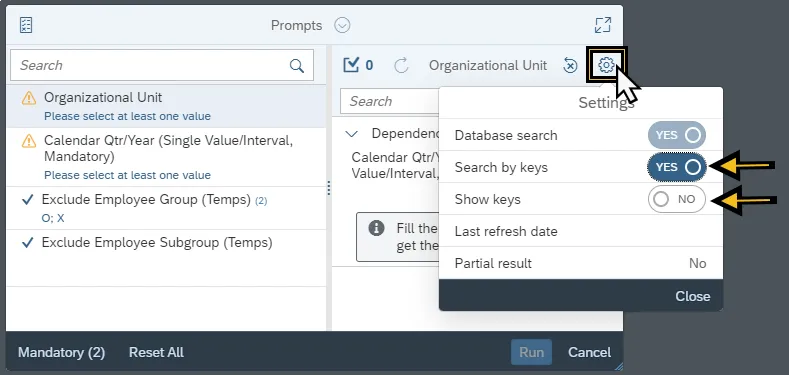
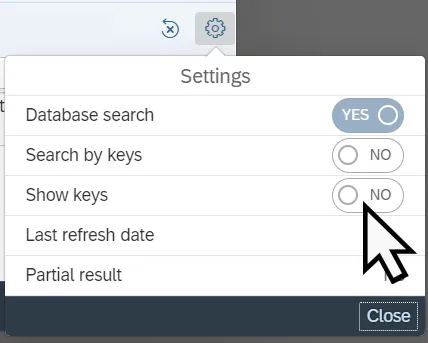
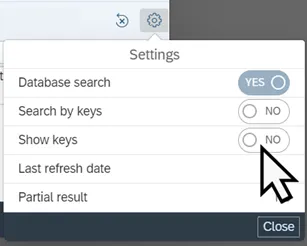
Every prompt value has an additional alphanumerical value assigned to the text value name. These keys make every value unique. Some examples of the alphanumerical keys are the personnel number is the key for the employee’s name, the position number 6####### is the key for the position’s text name, the job number 3####### is the key for the Job’s text name, etc. These keys can be displayed, directly entered, or searched for within the prompt. By default, the keys are toggled off, to turn the keys on click the Settings icon. Then toggle on Search by keys, to search by the key value, or toggle on Show Keys to display the key value.
Some prompts have many values, making it difficult to locate a specific value from the list. If part of the value is known the Search field can be used to reduce the number of results on the list, making it more efficient to locate needed values. The search field is case sensitive, results will only be matched to the search criteria if these cases match. Wildcards assist with result retrieval. Wildcards are (*) asterisks placed in specific locations around the criteria to dictate the retrieved values. Use the following methods to assist in retrieving values.
- To retrieve values starting with the criteria, place the asterisk after the criteria.
- Example: Criteria*
- To retrieve values ending with the criteria, place the asterisk before the criteria.
- Example: *Criteria
- To retrieve all values that contain the criteria, place the asterisk before and after the criteria.
- Example: *Criteria*
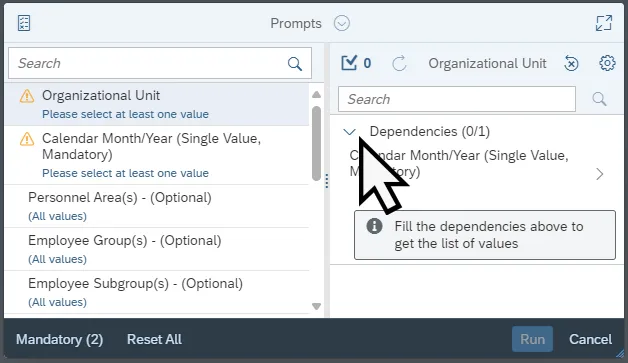
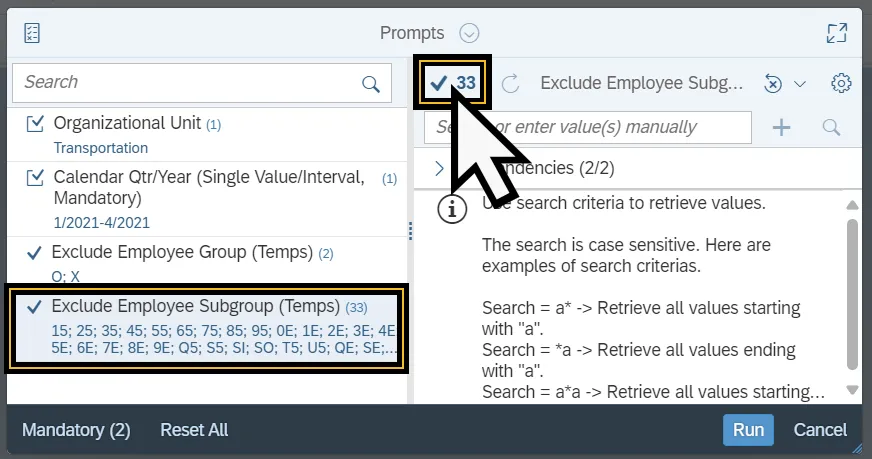
Some reports require prompts to be completed in a specific order, these reports have dependencies. If a report has dependencies, they are noted on the initial prompt summary screen under the search field. Clicking the Expand icon next to the word Dependencies will display the prompt that must be completed first. Once the dependent prompt is identified, it can then be completed to allow for additional prompts to be completed. When the dependent prompt has been filled select the other mandatory prompts from the left side panel.
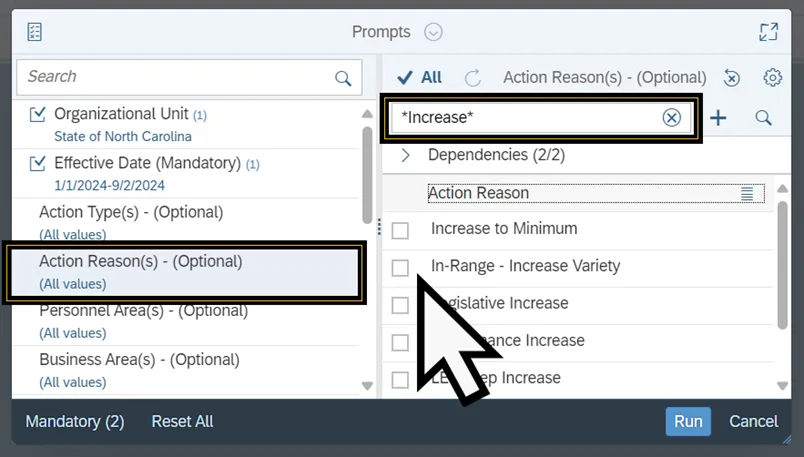
The Action Reason(s) prompt selects types of Action reasons to compile in the report. Follow the steps below to complete the Action Reason(s) prompt. There are 4 steps to complete this process.
Step 1. Select the Action Reason(s) prompt.
Step 2. Use the Search field to enter the desired Action Reason. Wildcards (*) can be used to search for values.
Step 3. Select the Search icon.
Step 4. Select checkbox next to the desired Action Reason(s).
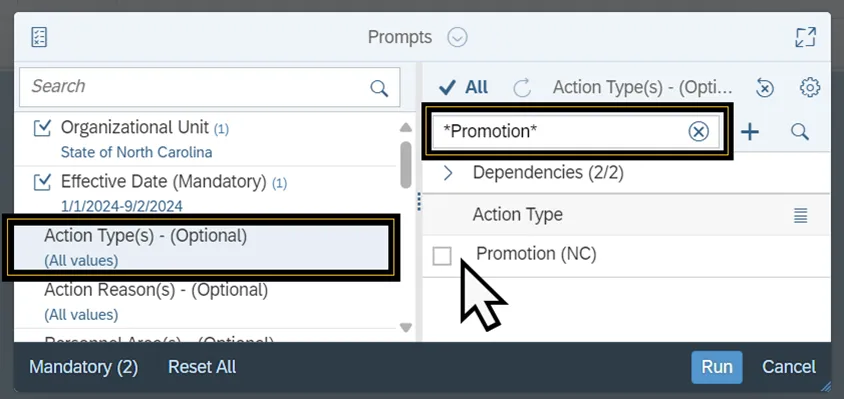
The Action Type(s) prompt selects types of Action data to compile the report. Follow the steps below to complete the Action Type(s) prompt. There are 4 steps to complete this process.
Step 1. Select the Action Type(s) prompt.
Step 2. Use the Search field to enter the desired Action Type. Wildcards (*) can be used to search for values.
Step 3. Select the Search icon.
Step 4. Select checkbox next to the desired Action Type(s).
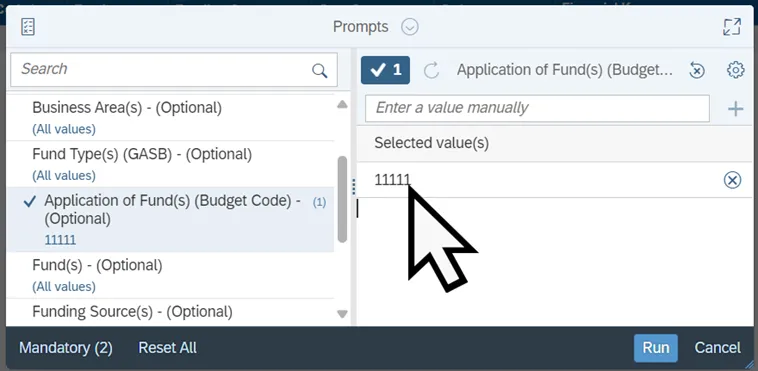
The Application of Fund(s) (Budget Code) prompt locates Budget Code. This prompt can be populated by searching for the Budget Code. Follow the steps below to complete the Application of Fund(s) (Budget Code). There are 4 steps to complete this process.
Step 1. Select the Application of Fund(s) (Budget Code) Prompt.
Step 2. Enter the Budget Code in the Search field.
Step 3. Select the Add icon.
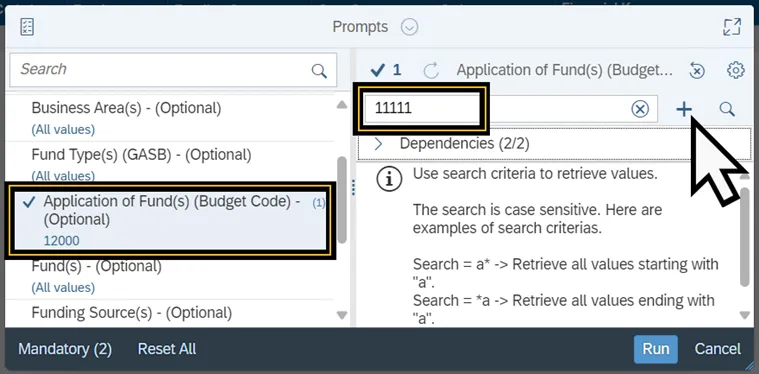
Step 4. The value will be added to the Selected Value list below the Search field.
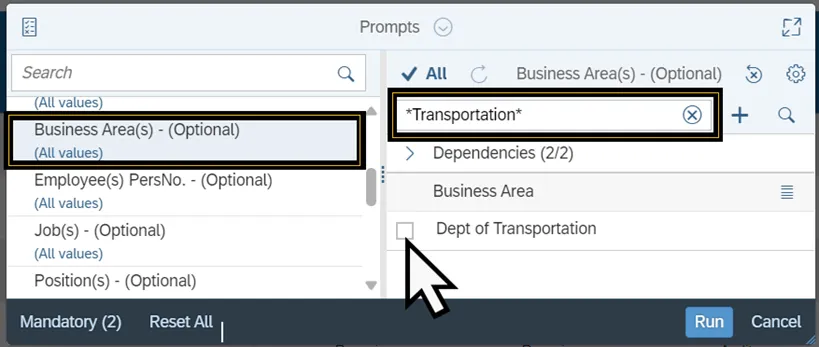
The Business Area(s) prompt selects Business Area data to compile the report. Follow the steps below to complete the Business Area(s) prompt. There are 4 steps to complete this process.
Step 1. Select the Business Area(s) prompt.
Step 2. Use the Search field to enter the desired Business Area. Wildcards (*) can be used to search for values. Alternatively, use the settings to toggle the Search by Keys on and enter the Business Area code into the search field.
Step 3. Click the Search Icon.
Step 4. Select checkbox next to the desired Business Area(s).
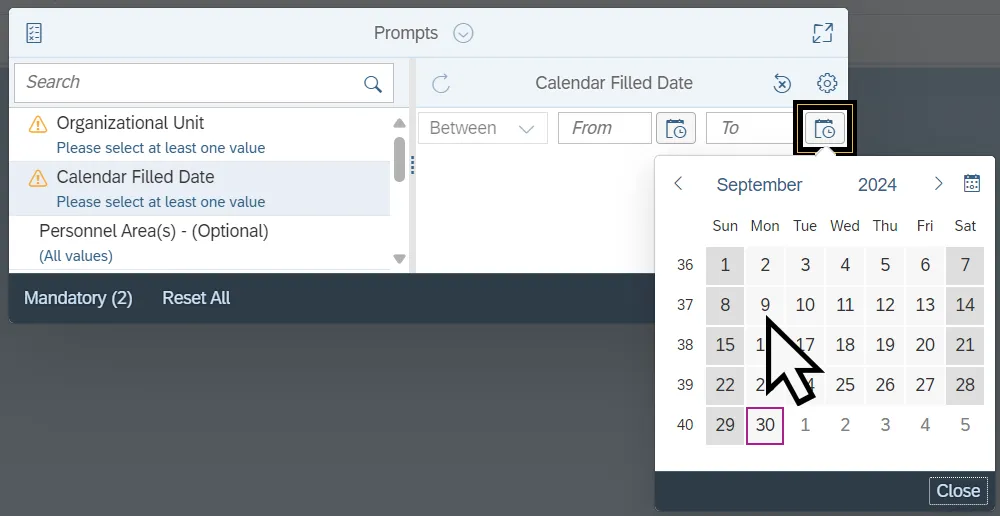
The Calendar Filled Date selects a date range to compile data for the generated report. Follow the steps below to complete the Calendar Filled Date prompt. There are 3 steps to complete this process.
Step 1. Select the Calendar Filled Date prompt.
Step 2. Enter the Start date in the From field or select the Start Date icon and select the date from the calendar.
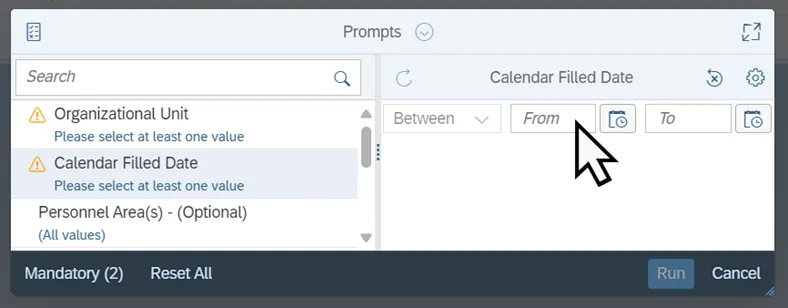
Step 3. Enter the End date in the To field or select the End Date icon and select the date from the calendar.
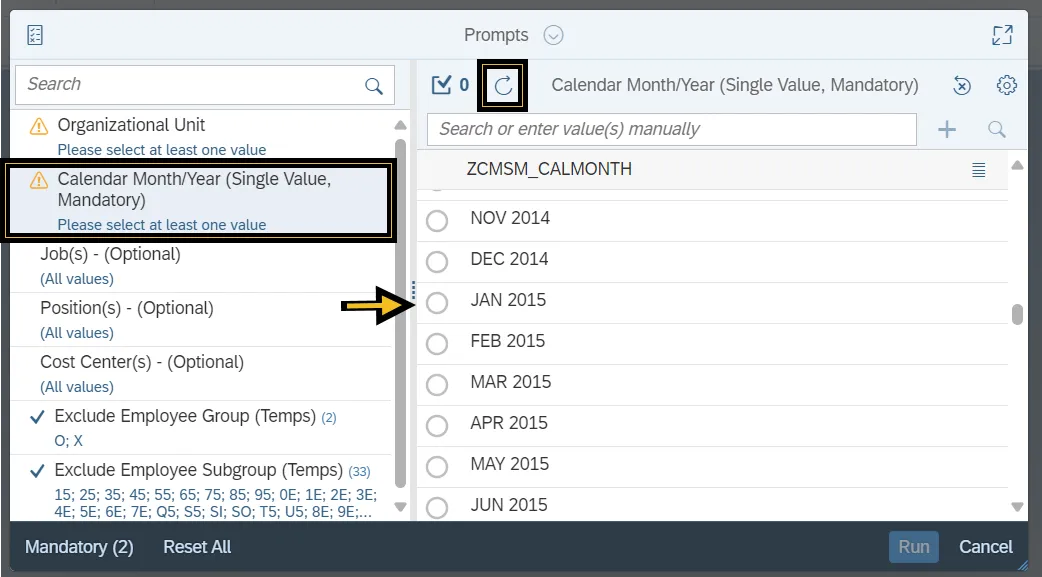
Calendar Month/Year (Single Value)
The Calendar Month/Year (Single Value) prompt selects a single month and year that compiles the data in the report. Follow the steps below to complete the Calendar Month/Year prompt. There are 3 steps to complete this process.
Step 1. Select the Calendar Month/Year (Single Value) prompt.
Step 2. Click the Refresh Values icon to see the list of months and years. Alternatively, use the Search field to enter the desired Month and Year combination. Values for the Calendar Month/Year are displayed as the first three letters of the month and then the year, for example JAN 2015. Values are listed as radio buttons.
Note: Entering a Date Value in the Calendar Month/Year prompt can cause a query error message from the system, or the Run button will be disabled.
Step 3. Select the radio button next to the desired date.
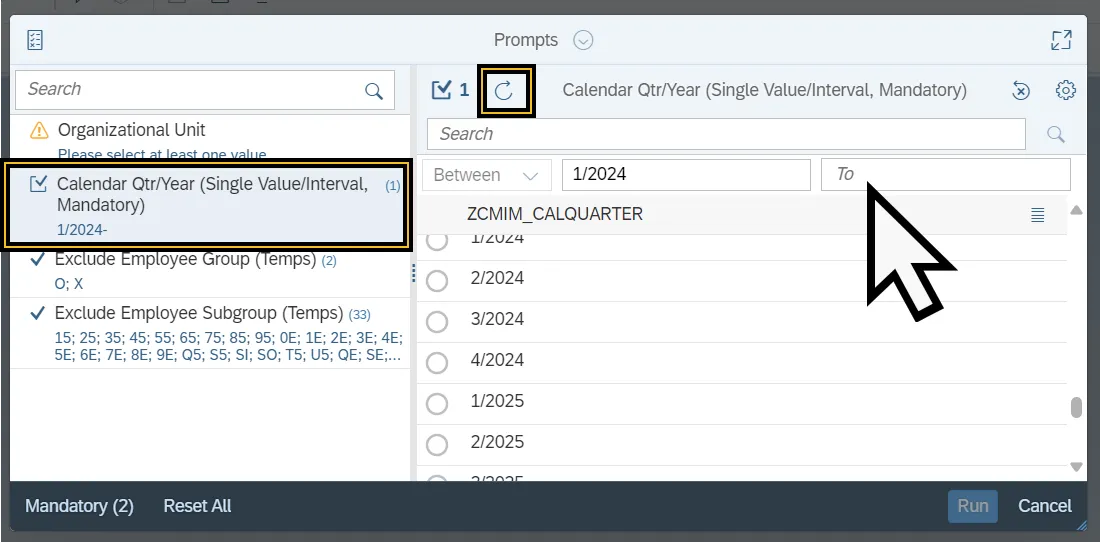
Calendar Qtr/Year (Single Value/Interval)
The Prompt Calendar Qtr/Year (Single Value/Interval) selects a range of yearly quarters to determine the report generation. Follow the steps to complete the Calendar Qtr/Year (Single Value/Interval) Prompt There are 6 steps to complete this process.
Step 1. Select the Calendar Qtr/Year (Single Value/Interval) prompt.
Step 2. Click the Refresh Values icon to view the quarter and the year. Alternatively, use the Search field to enter the desired quarter and the year, then select the Search icon. The format of Quarter/YYYY must be used. For example, the first quarter of 2024 is input as 1/2024.
Step 3. Select the From field.
Step 4. Select the desired quarter and year.
Step 5. Select the To field.
Step 6. Select the desired quarter and year.
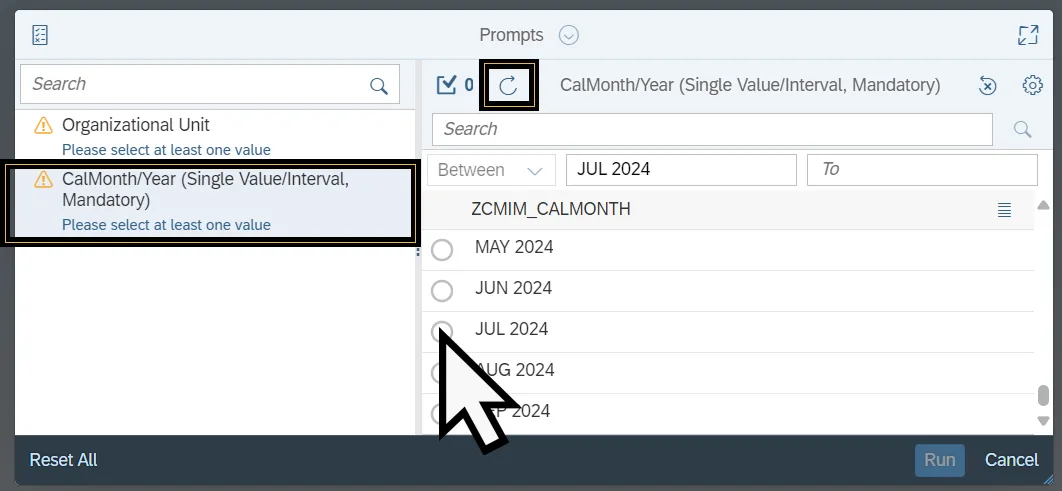
The CalMonth/Year selects a date range to compile data for the generated report. Follow the steps below to complete the CalMonth/Year. There are 6 steps to complete this process.
Step 1. Select the CalMonth/Year prompt.
Step 2. Click the Refresh Values icon to see the list CalMonth/Year. Alternatively, use the Search field to enter a specific Month and Year, using the format of the first three letters of the Month in capital letters followed by the year. Then select the search icon.
Step 3. Select the radio button next to the correct Calendar Month and Year.
Step 4. Select the From field to populate the Start date in the From field.
Step 5. Select the radio button next to the correct Calendar Month and Year.
Step 6. Select the To field to populate the End date in the To field.
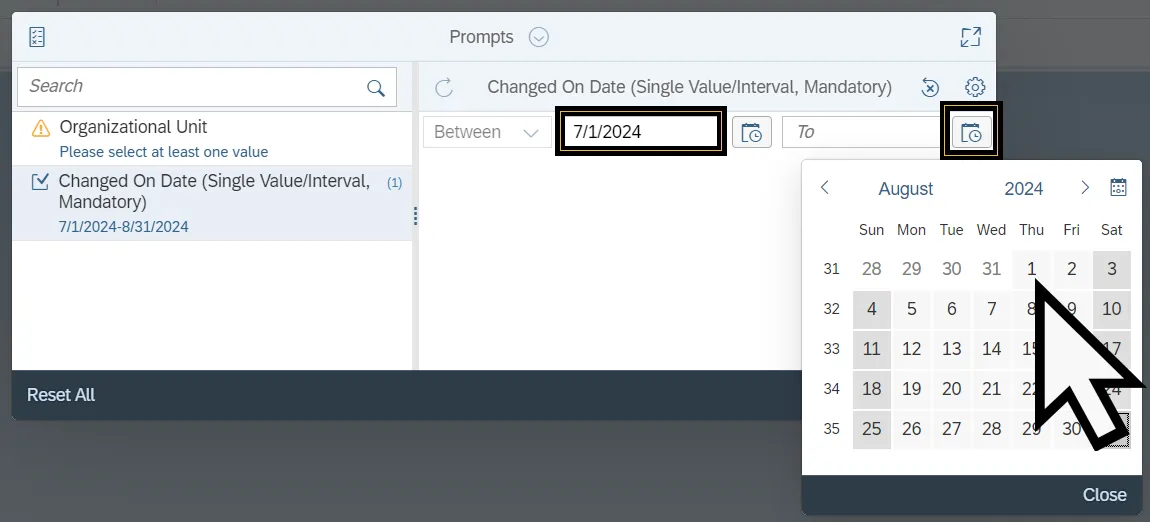
Changed On Date (Single Value/Interval)
The Changed On Date (Single Value/Interval) prompt selects a range of time where a record was changed. This data is then used to generate the report. Follow the steps below to complete the Changed On Date (Single Value/Interval) prompt. There are 5 steps to complete this process.
Step 1. Select the Changed On Date (Single Value/Interval) Prompt
Step 2. Enter the Start date in the From field or select the Start Date icon.
Step 3. Select the date from the calendar.
Step 4. Enter the End date in the To field or select the End Date icon.
Step 5. Select the date from the calendar.
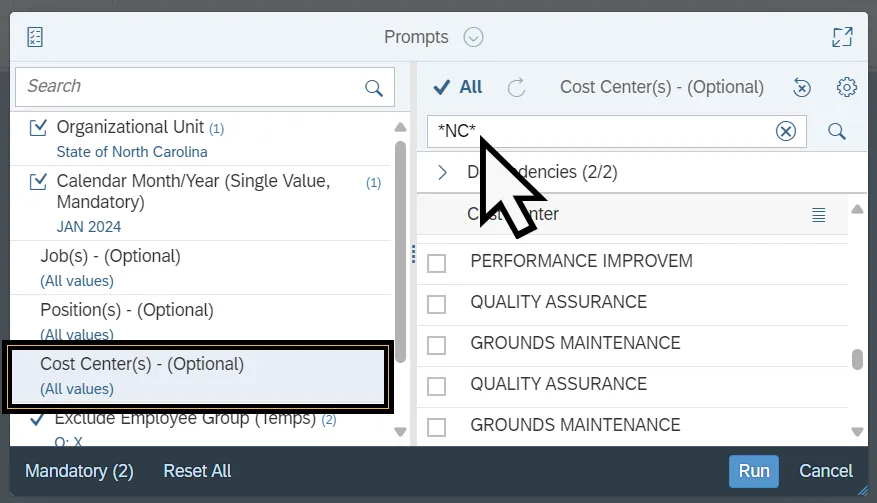
The Cost Center(s) prompt to selects the Cost Center data that compiles the report. Follow the steps below to complete the Cost Center(s). There are 4 steps to complete this process.
Step 1. Select the Cost Center(s) prompt.
Step 2. Use the Search field to enter the desired Cost Center(s). Wildcards (*) can be used to search for values. Alternatively, use the settings to toggle the Search by Keys on and enter the Cost Center number into the search field.
Step 3. Click the Search Icon.
Step 4. Select checkbox next to the desired Cost Center.
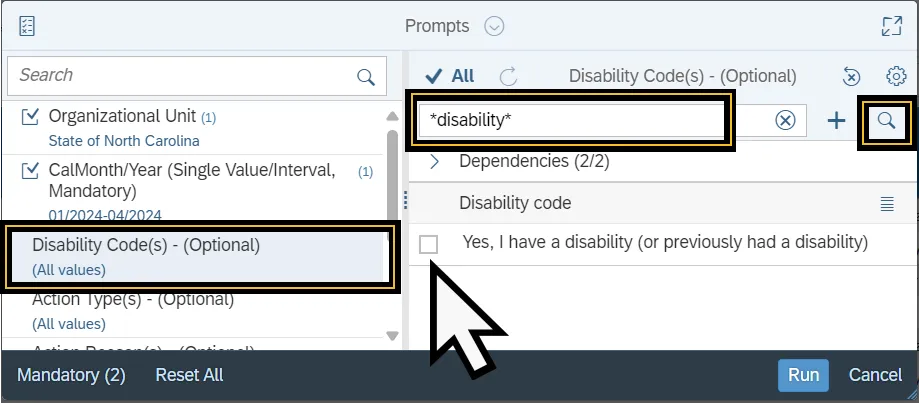
The Disability Code prompt narrows the generated report to include only data that includes the specific disability code entered in the prompt. Follow the steps below to complete the Disability Code prompt. There are 4 steps to complete this process.
Step 1. Select the Disability Code(s) prompt.
Step 2. Use the Search field to enter the desired Disability Code selection. Wildcards (*) can be used to search for partial values.
Step 3. Click the Search Icon.
Step 4. Select checkbox next to the desired Disability Code.
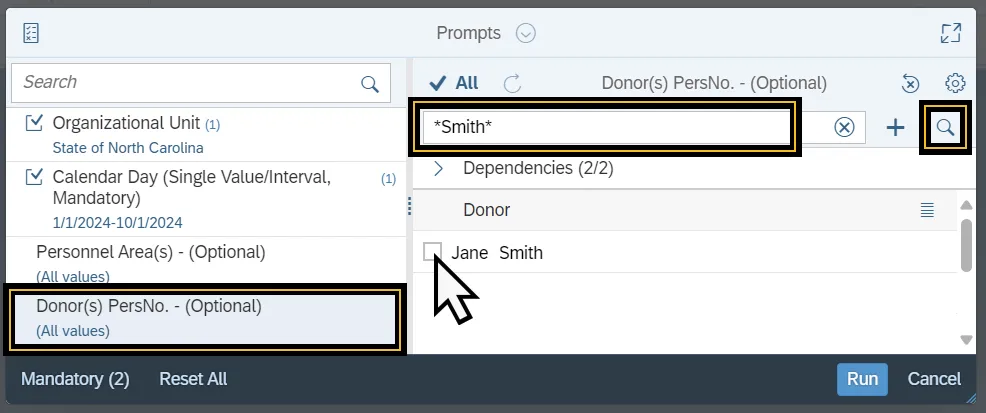
The Donor(s) PersNo. prompt narrows the generated report to include only data that is equal to the Donors selected in the prompt. Follow the steps below to complete the Donor(s) PersNo. prompt. There are 13 steps to complete this process.
Step 1. Select the Donor(s) PersNo. Prompt.
Step 2. Enter the Donors last name in title case in the Search field.
Step 3. Click the Search Icon. Alternatively, toggle the Search by Key in the Settings Page. Then enter the Donor’s personnel number into the search field and click the Add icon.
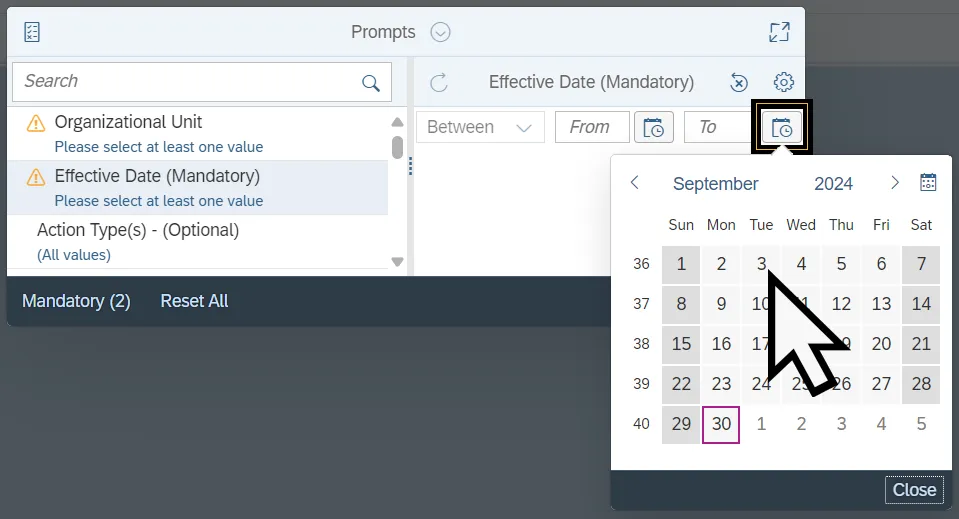
The Effective Date selects a date range to compile data for the generated report. Follow the steps below to complete the Effective Date. There are 3 steps to complete this process.
Step 1. Select the Effective Date prompt.
Step 2. Enter the Start date in the From field or select the Start Date icon and select the date from the calendar.
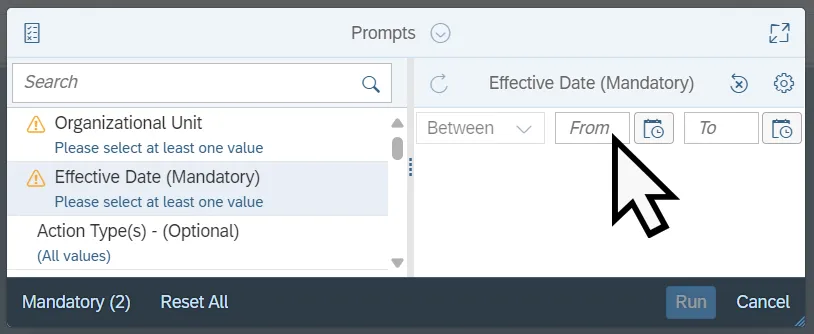
Step 3. Enter the End date in the To field or select the End Date icon and select the date from the calendar.
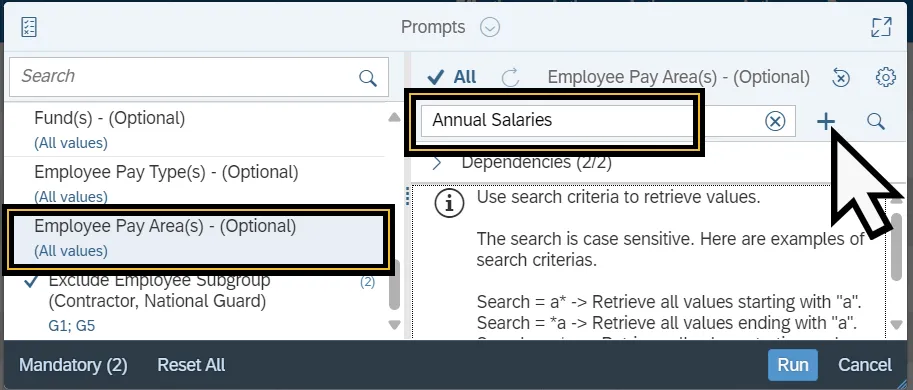
The Employee Pay Area(s) prompt narrows the generated report to include only Employee Pay Areas listed in the selected values. Follow the steps below to complete the Employee Pay Areas prompt. There are 5 steps to complete this process.
Step 1. Select the Employee Pay Area(s) Prompt.
Step 2. Enter the Employee Pay Area in the Search field.
Step 3. Select the Add icon.
Step 4. Repeat steps 2-3 to add additional employee pay areas.
Step 5. The value will be added to the Selected Value list below the Search field.
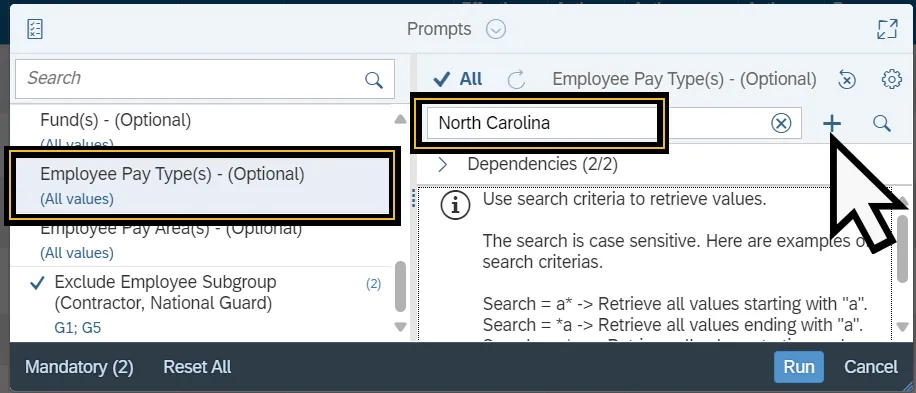
The Employee Pay Type(s) prompt narrows the generated report to include only Employee Pay Types listed in the selected values. Follow the steps below to complete the Employee Pay Type(s) prompt. There are 5 steps to complete this process.
Step 1. Select the Employee Pay Type(s) Prompt.
Step 2. Enter the Employee Pay Type in the Search field.
Step 3. Select the Add icon.
Step 4. Repeat steps 2-3 to add additional employee pay types.
Step 5. The value will be added to the Selected Value list below the Search field.
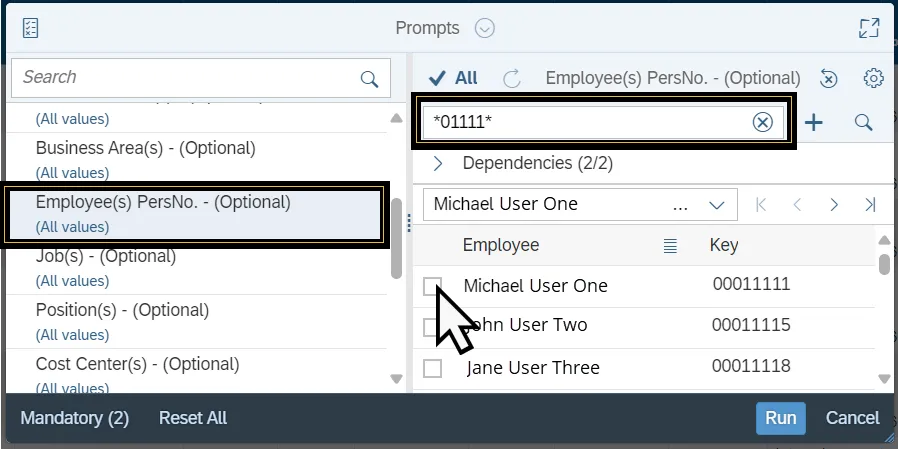
The Employee(s) PersNo. prompt selects the employee whose data is used to compile the report. Follow the steps below to complete the Employee(s) PersNo. prompt. There are 7 steps to complete this process.
Step 1. Select the Employee(s) PersNo. prompt.
Step 2. Enter the Employee’s Name in the Search Field or follow steps 3-4. Alternatively use the wildcard (*) to search for part of the Employee’s name.
Step 3. Click the Search Icon.
Step 4. Use the settings to toggle the Search by Keys on.
Step 5. Enter the Employee(s) PersNo. code into the search field. Alternatively use the wildcard (*) to search for a partial employee personnel number.
Step 6. Click the Search Icon.
Step 7. Select checkbox next to the desired Employee and/or their Personnel Number.
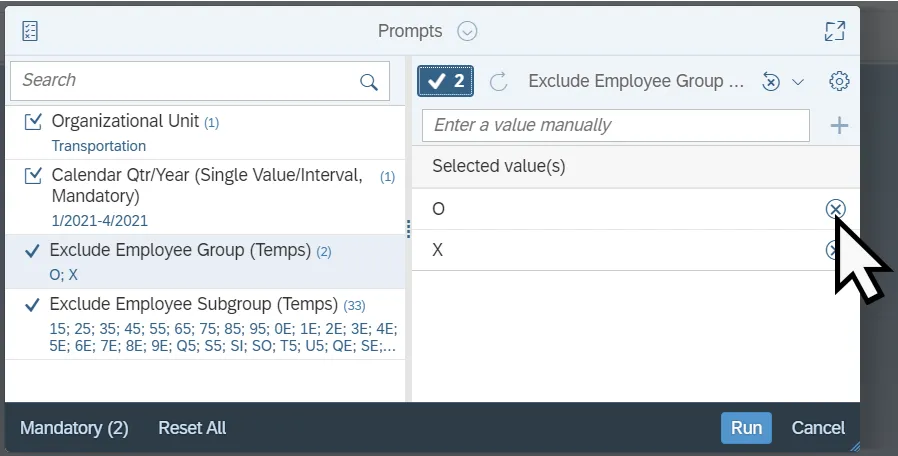
The Exclude Employee Group prompt is generally prefilled with a specific set of data values. Exclusion prompts remove specified data. Upon report generation any rows containing data values in the Exclude Employee Group prompt will not be retrieved into the report. Follow the steps to remove values from the Exclude Employee Group prompt. There are 3 steps to complete this process.
Step 1. Select the Exclude Employee Group prompt.
Step 2. Select the Display Prompt Answers icon.
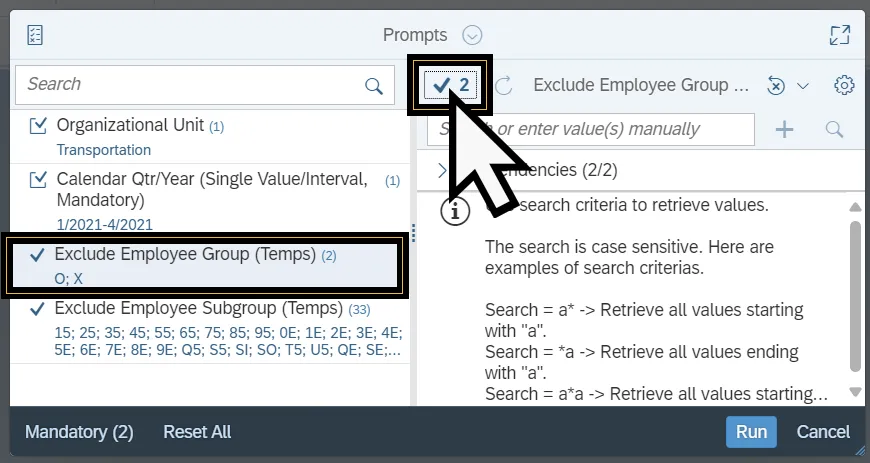
Step 3. Select the Delete icon, to the right of the desired value. This removes the excluded value.
Follow the steps to add values to the Exclude Employee Group prompt. There are 4 steps to complete this process.
Step 1. Select the Exclude Employee Group prompt.
Step 2. Enter the Employee Group Value into the Search field.
Step 3. Select the Add icon.
Step 4. The value will be added to the Selected Value list below the Search field.
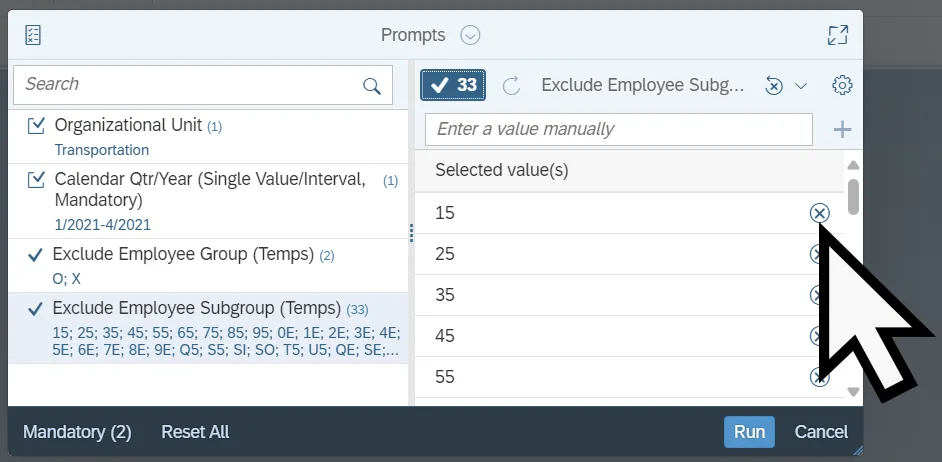
The Exclude Employee Subgroup prompt is generally prefilled with a specific set of data values. Exclusion prompts remove specified data. Upon report generation any rows containing data values in the Exclude Employee Subgroup prompt will not be retrieved into the report. Follow the steps to remove values from the Exclude Employee Subgroup prompt There are 3 steps to complete this process.
Step 1. Select the Exclude Employee Subgroup prompt.
Step 2. Select the Display Prompt Answers icon.
Step 3. Select the Delete icon, to the right of the desired value. This removes the excluded value.
Follow the steps to add values to the Exclude Employee Group prompt. There are 4 steps to complete this process.
Step 1. Select the Exclude Employee Group prompt.
Step 2. Enter the Employee Group Value into the Search field.
Step 3. Select the Add icon.
Step 4. The value will be added to the Selected Value list below the Search field.
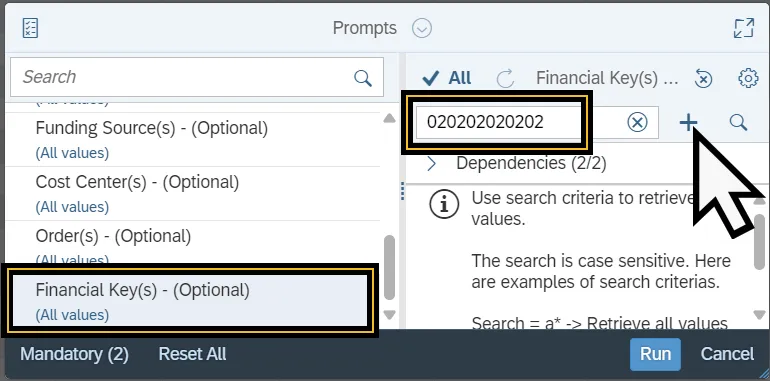
The Financial Key(s) prompt narrows the generated report to include only Financial Keys listed in the selected values. Follow the steps below to complete the Financial Key(s) prompt. There are 4 steps to complete this process.
1. Select the Financial Key(s) Prompt.
2. Enter the Financial Key(s) number in the Search field.
3. Select the Add icon.
4. The value will be added to the Selected Value list below the Search field.
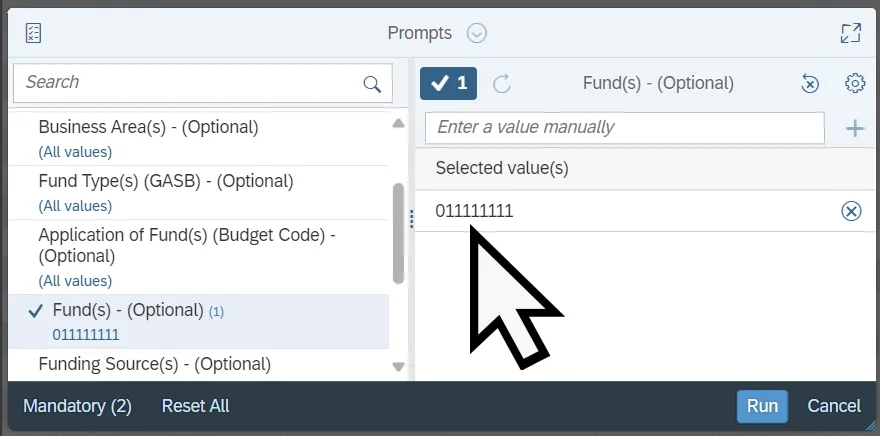
The Fund(s) prompt narrows the generated report to include only Funds listed in the selected values. Follow the steps below to complete the Fund(s) prompt. There are 4 steps to complete this process.
Step 1. Select the Fund(s) Prompt.
Step 2. Enter the Fund code in the Search field.
Step 3. Select the Add icon.
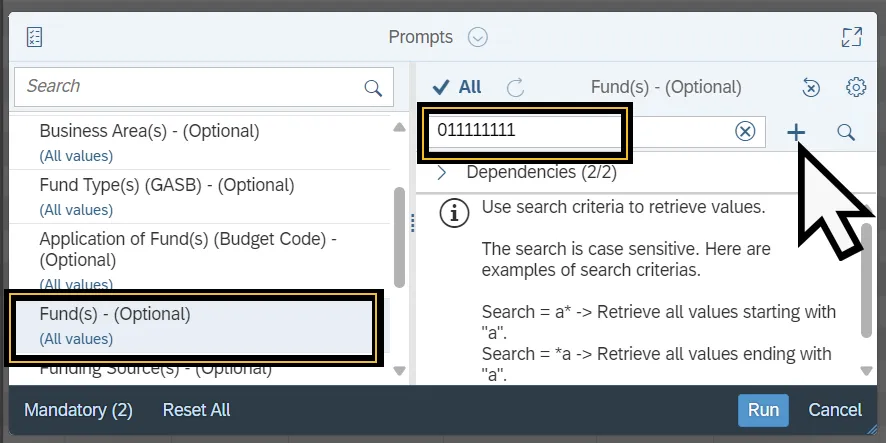
Step 4. The value will be added to the Selected Value list below the Search field.
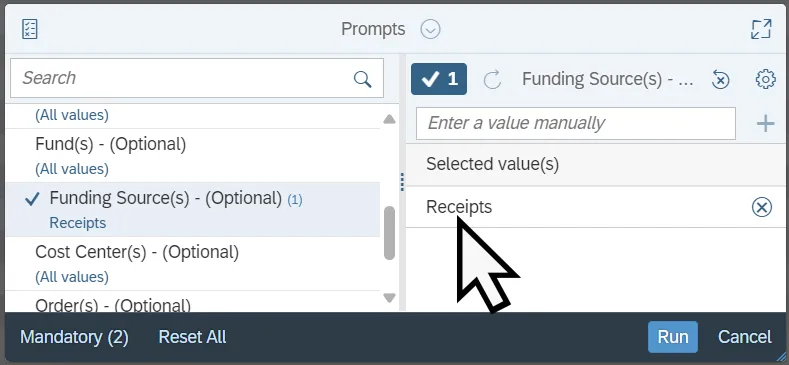
The Application of Funding Source(s) prompt narrows the generated report to include only Funding sources listed in the selected values. Follow the steps below to complete the Funding Source(s) prompt. There are 4 steps to complete this process.
Step 1. Select the Funding Source(s) Prompt.
Step 2. Enter the Funding Source(s) code in the Search field.
Step 3. Select the Add icon.
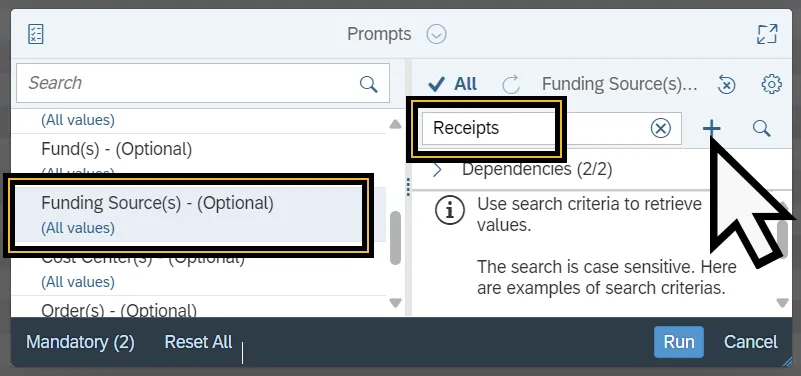
Step 4. The value will be added to the Selected Value list below the Search field.
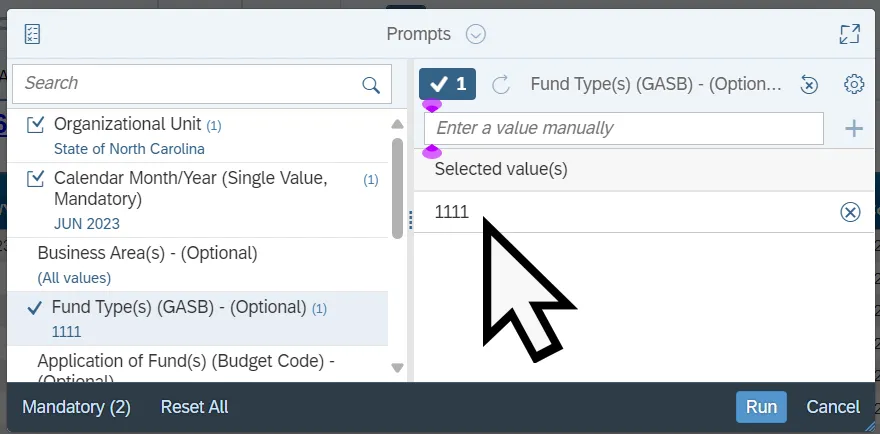
The Fund Type(s) (GASB) prompt locates specific fund types. This prompt can be populated by searching for the fund name or by searching for the fund code. The fund code is the key. Toggling on the Search by Keys Setting will allow for the search to be done by key verses the text name. Follow the steps below to complete the Fund Type(s) (GASB) Prompt. There are 5 steps to complete this process.
Step 1. Select the Fund Type(s) (GASB) Prompt.
Step 2. Enter the Fund Type in the Search field.
Step 3. Select the Add icon.

Step 4. If only part of the Fund name or code is known use the wildcards (*) to search.
Step 5. The value will be added to the Selected Value list below the Search field.
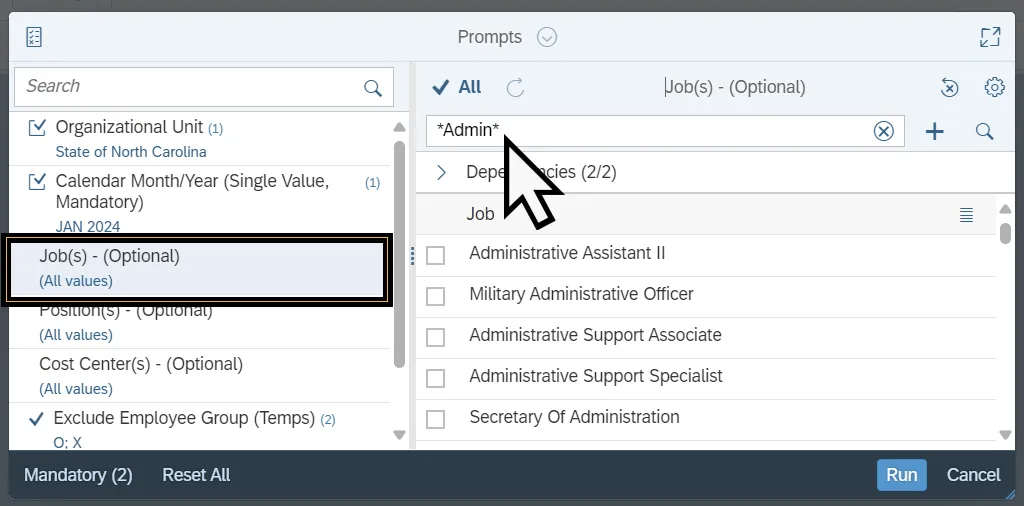
The Job(s) prompt selects Job data to compile the report. Follow the steps below to complete the Job(s) prompt. There are 4 steps to complete this process.
Step 1. Select the Job(s) prompt.
Step 2. Use the Search field to enter the desired Job name. Wildcards (*) can be used to search for values. Alternatively, use the settings to toggle the Search by Keys on and enter the Job number into the search field.
Step 3. Click the Search Icon.
Step 4. Select checkbox next to the desired Job(s).
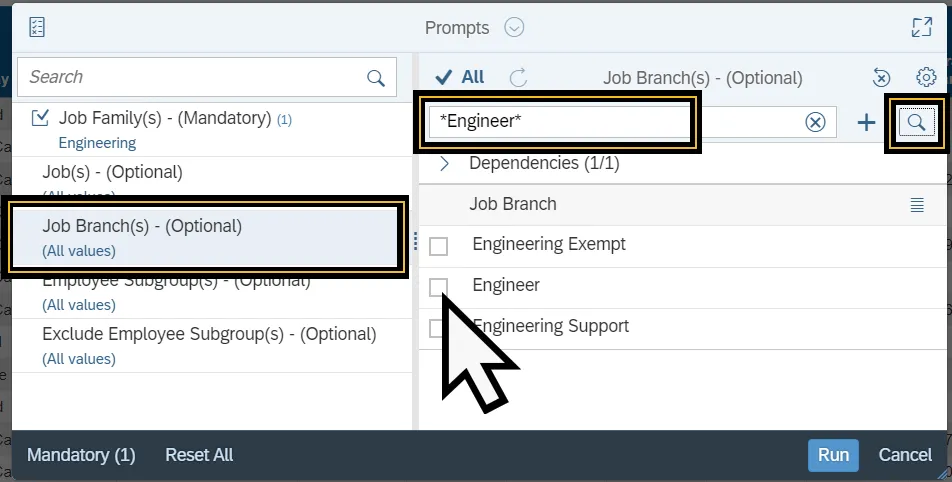
The Job Branch prompt selects Job Branch data to compile the report. Follow the steps below to complete the Job Branch prompt. There are 4 steps to complete this process.
Step 1. Select the Job Branch(s) prompt.
Step 2. Use the Search field to enter the desired Job Branch. Wildcards (*) can be used to search for partial values.
Step 3. Click the Search Icon.
Step 4. Select checkbox next to the desired Job Branch(s).
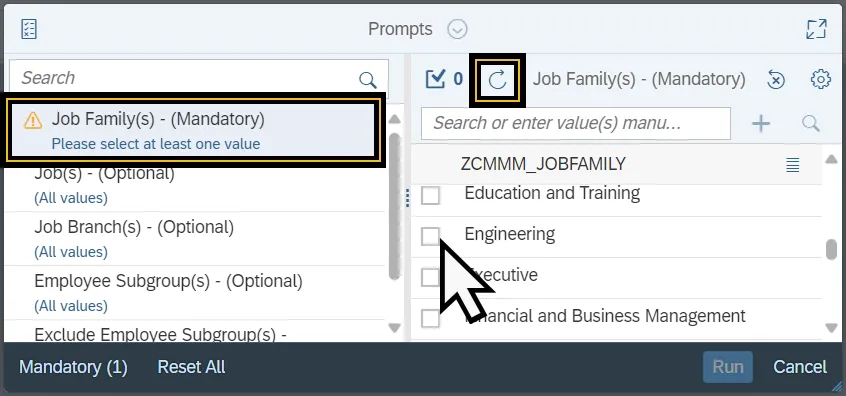
The Job Family(s) prompt selects the Job Family to compile the report data. Follow the steps below to complete the Job Family prompt. There are 3 steps to complete this process.
Step 1. Select the Job Family(s) prompt.
Step 2. Click the Refresh Values icon to see the list of Job Families. Alternatively, use the Search field to enter the desired Job Family, then select the search icon.
Step 3. Select the check box next to the desired Job Family.
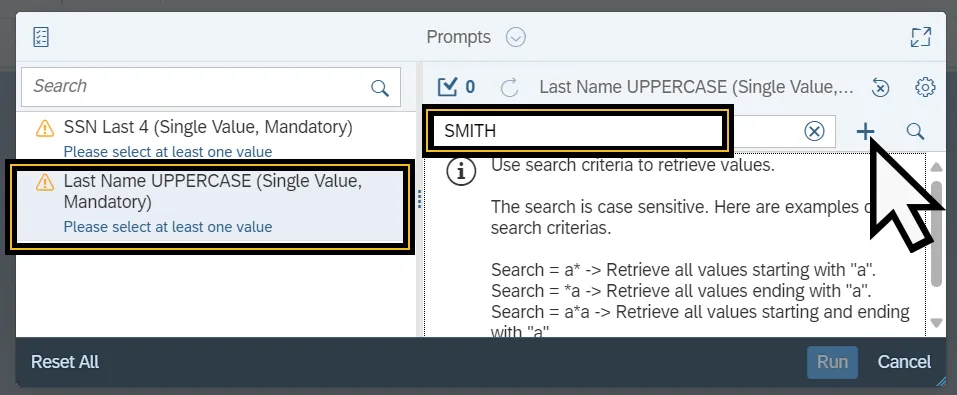
Last Name UPPERCASE (Single Value)
The Last Name UPPERCASE (Single Value) prompt locates individuals based on their last name. This prompt is case sensitive and requires that any searched value be in Upper case. Any searches for last names in title case or lower case will not return any results. Follow the steps below to complete the Last Name UPPERCASE (Single Value) Prompt. There are 6 steps to complete this process.
Step 1. Select the Last Name UPPERCASE (Single Value) Prompt.
Step 2. Enter the Last Name, using all uppercase letters, in the Search field.
Step 3. Select the Add icon.
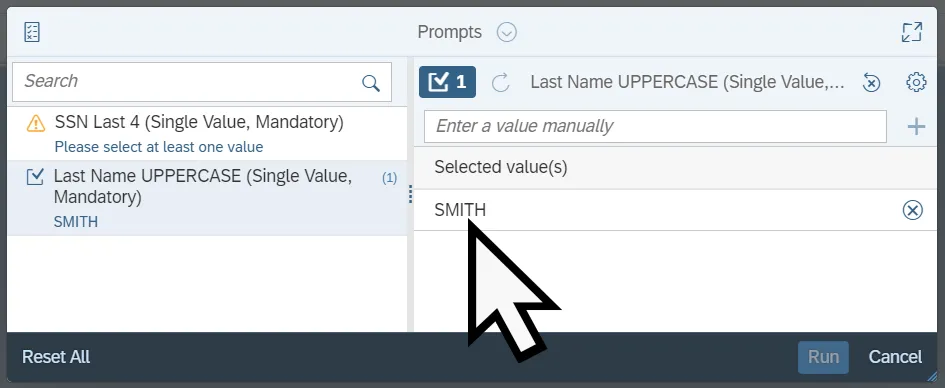
Step 4. If only part of the last name is known use the wildcards (*) to search for the last name.
Step 5. Click the Search Icon.
Step 6. The value will be added to the Selected Value list below the Search field.
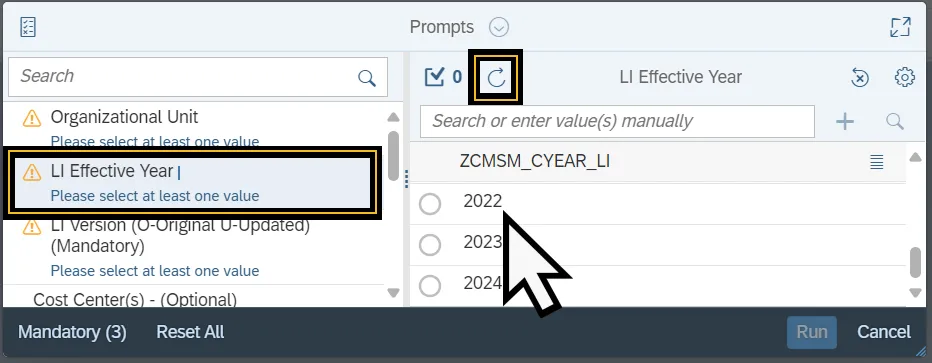
The LI Effective Year prompt selects the year where a legislative increase took effect and compiles the report from that data. Follow the steps below to complete the LI Effective Year prompt. There are 3 steps to complete this process.
1. Select the LI Effective Year prompt.
2. Click the Refresh Values icon to see the list of years when a Legislative Increase took effect. Alternatively, use the Search field to enter the desired year, then select the Search icon.
3. Select the check box next to the desired Year.
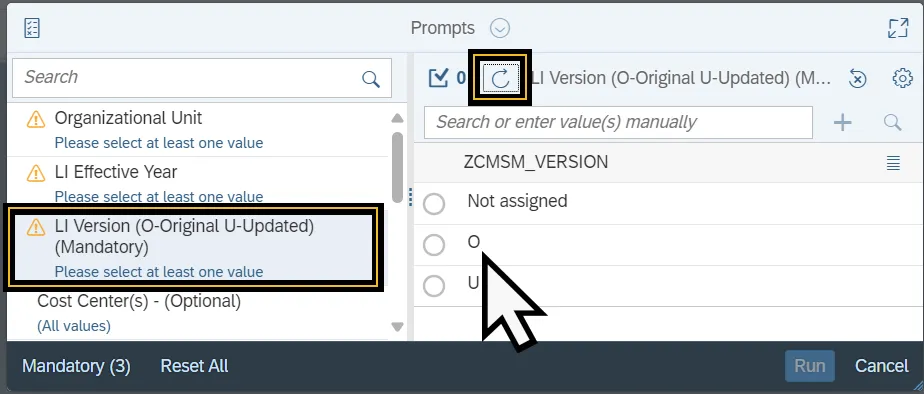
LI Version (O-Original U-Updated)
The LI Version (O-Original U-Updated) prompt selects if a LI Version is original or updated to compile the report data. Follow the steps below to complete the LI Version (O-Original U-Updated) prompt. There are 3 steps to complete this process.
Step 1. Select the LI Version (O-Original U-Updated) prompt.
Step 2. Click the Refresh Values icon to see the list Original or Updated options.
Step 3. Select the check box next to the desired LI version option.
The Min# Days Retro prompt narrows the generated report to include only data that are equal to the minimum number of days retroactive. Follow the steps below to complete the Min# Days Retro prompt. There are 4 steps to complete this process.
Step 1. Select the Min# Days Retro Prompt.
Step 2. Enter the number of minimum days retroactive in the Search field.
Step 3. Select the Add icon.
Step 4. The value will be added to the Selected Value list below the Search field.

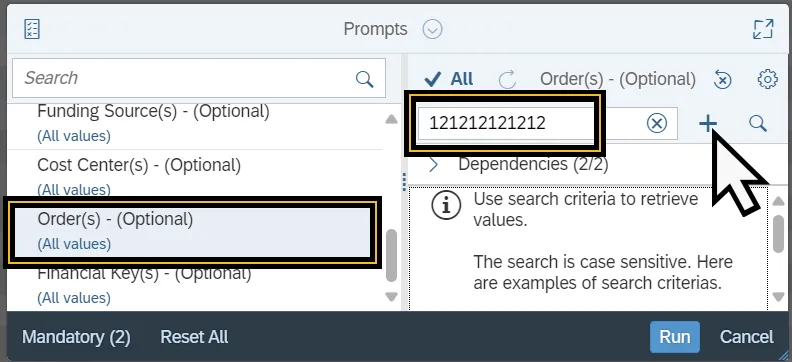
The Order(s) prompt narrows the generated report to include only orders listed in the selected values. Follow the steps below to complete the Order(s) prompt. There are 4 steps to complete this process.
1. Select the Order(s) Prompt.
2. Enter the Order(s) number in the Search field.
3. Select the Add icon.
4. The value will be added to the Selected Value list below the Search field.
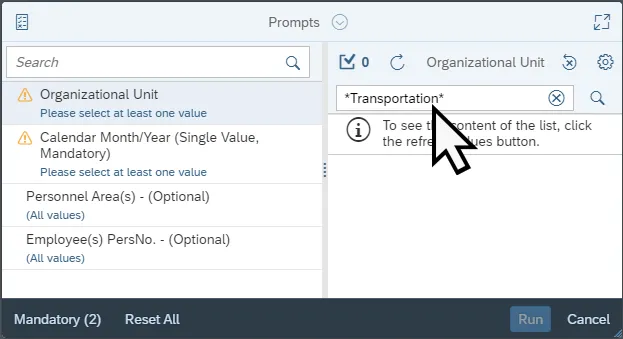
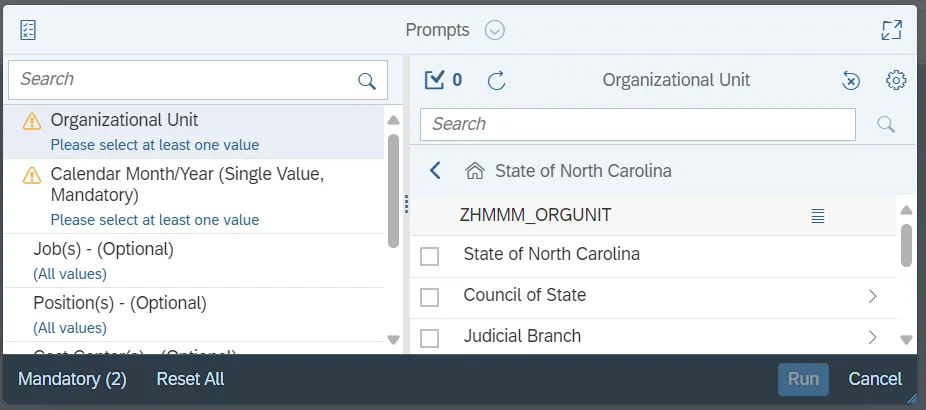
The Organizational Unit prompt selects the organizational unit that compiles the report data. Follow the steps below to complete the Organizational Unit prompt. There are 3 steps to complete this process.
Step 1. Select the Organizational Unit prompt.
Step 2. Click the Refresh Values icon to see the list of Organizational Units. Alternatively, use the Search field to enter the desired Organizational Unit, then select the Search icon.
Step 3. Click the expand node to view additional Organizational Units.
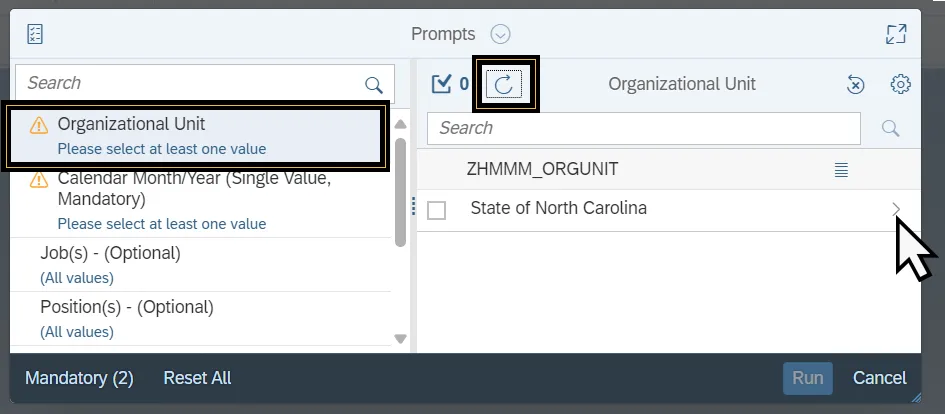
Step 4. Select the check box next to the desired Organizational Unit.
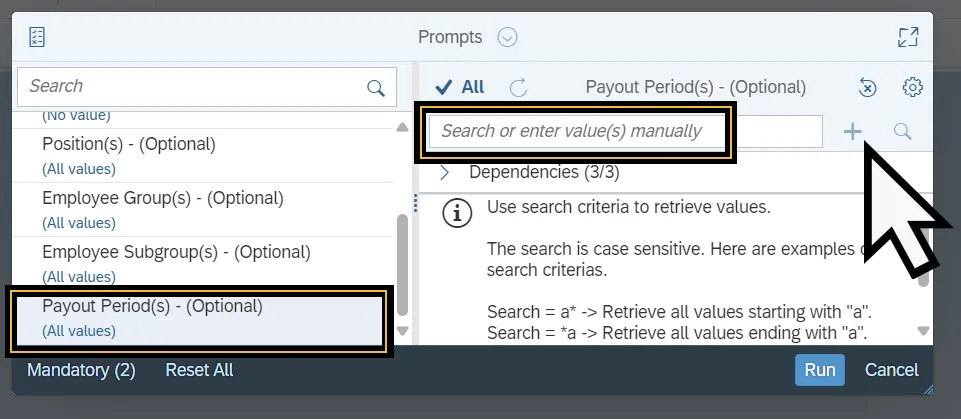
The Payout Period(s) prompt narrows the generated report to include only Payout Periods listed in the selected values. Follow the steps below to complete the Payout Periods prompt. There are 5 steps to complete this process.
Step 1. Select the Payout Period(s) Prompt.
Step 2. Enter the Payout Period in the Search field.
Step 3. Select the Add icon.
Step 4. Repeat steps 2-3 to add additional periods.
Step 5. The value will be added to the Selected Value list below the Search field.
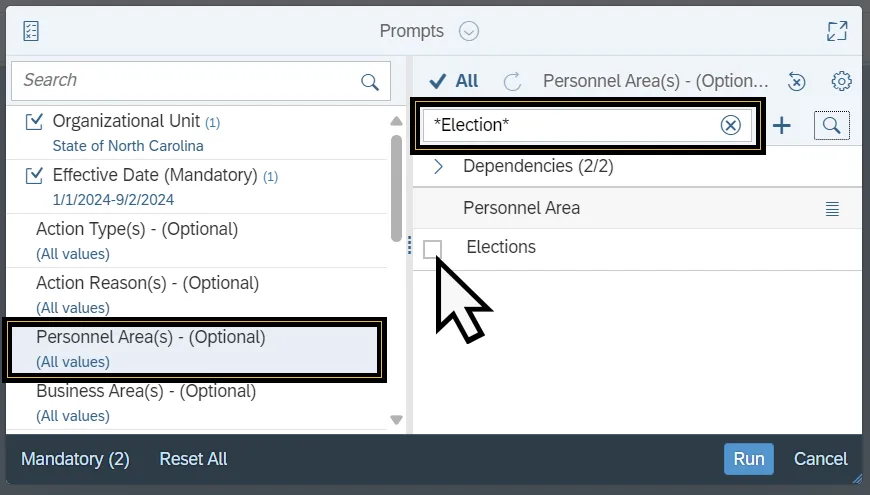
The Personnel Area(s) prompt selects personnel areas to compile the report. Follow the steps below to complete the Personnel Area(s) prompt. There are 4 steps to complete this process.
Step 1. Select the Personnel Area(s) prompt.
Step 2. Use the Search field to enter the desired Personnel Area(s). Wildcards (*) can be used to search for values. Alternatively, use the settings to toggle the Search by Keys on and enter the Personnel Area(s) number into the search field.
Step 3. Click the Search Icon.
Step 4. Select checkbox next to the desired Personnel Area(s).
The Plan(s) prompt selects the benefit plans that are compiled in the report data. Follow the steps below to complete the Plan(s) prompt. There are 4 steps to complete this process.
Step 1. Select the Plan(s) prompt.
Step 2. Enter the specific desired benefit plan into the Search field. Wildcards (*) can be used to search for partial plan names.
Step 3. Click the Search Icon.
Step 4. Select the check box(es) next to the desired Plan.
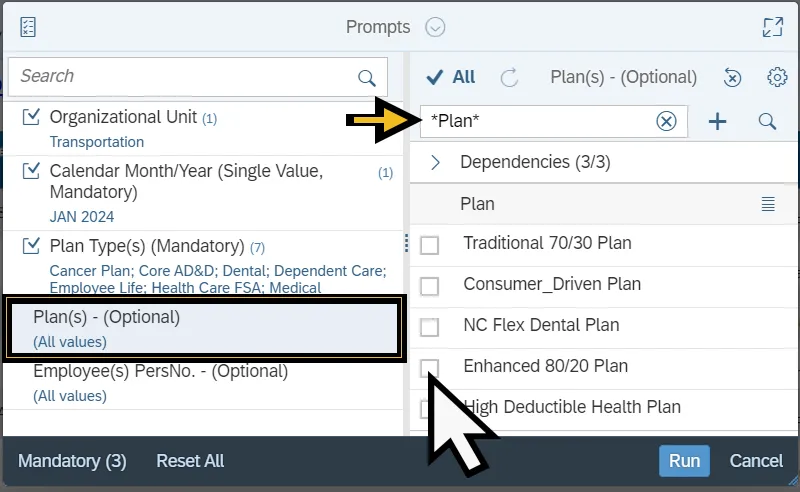
Note: Many of the benefit plans and benefit plan options have the same text values. Use the Settings icon to toggle on Show keys, to distinguish between the values.
The Plan Option(s) prompt selects the specific options within a benefit plan and generates the report data based on those values. Follow the steps below to complete the Plan Options(s) prompt. There are 3 steps to complete this process.
Step 1. Select the Plan Option(s) prompt.
Step 2. Click the Refresh Values icon to see the list of specific options within a benefit plan. Alternatively, use the Search field to enter the specific option within a benefit plan, then select the Search icon.
Step 3. Select the check box(es) next to the desired Benefit Plan Option(s).
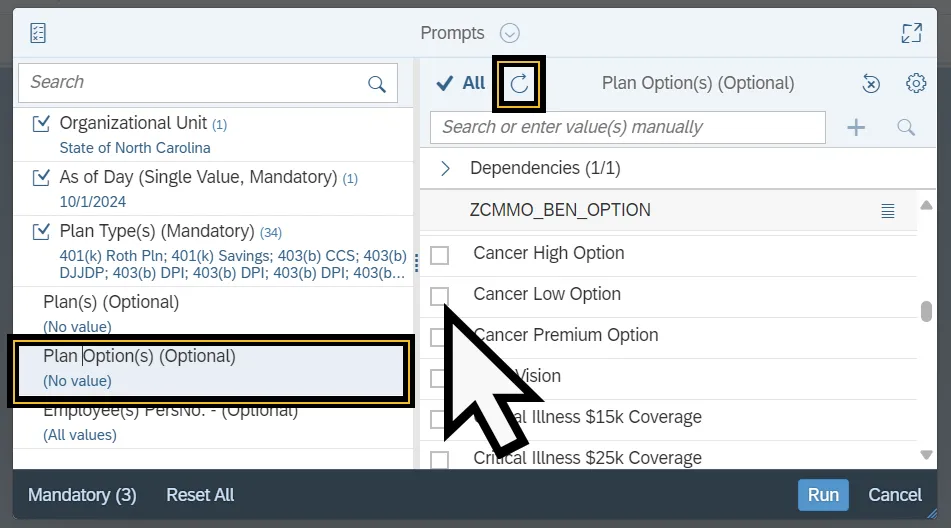
NOTE: Many of the benefit plans and benefit plan options have the same text values. Use the Settings icon to toggle on Show keys, to distinguish between the values.
The Plan Type(s) prompt selects the benefit plan types that are compiled in the report data. Follow the steps below to complete the Plan Type(s) prompt. There are 4 steps to complete this process.
Step 1. Select the Plan Type(s) prompt.
Step 2. Click the Refresh Values icon to see the list of benefit plan types.
Step 3. Alternatively, use the Search field to enter the desired benefit plan, then select the Search icon.
Step 4. Select the check box(es) next to the desired Plan Type(s).

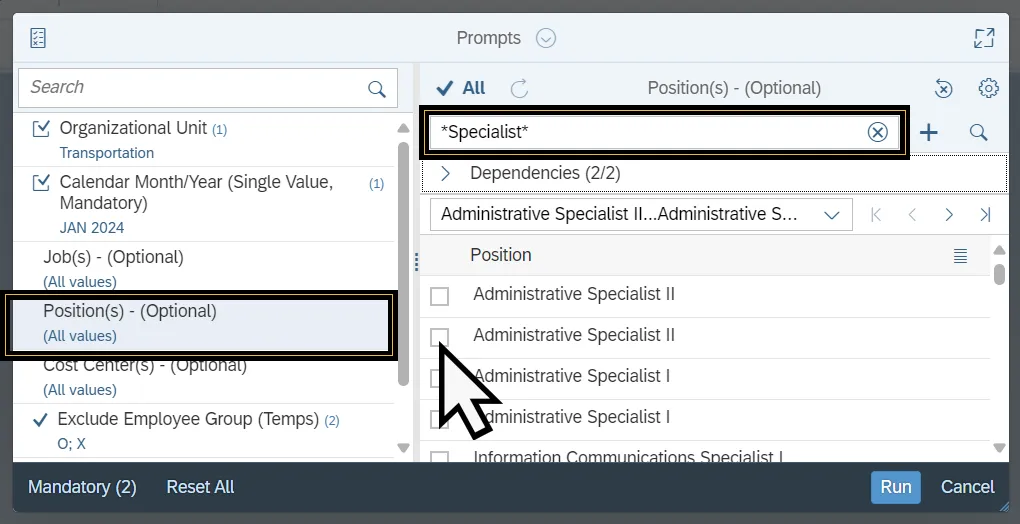
The Position(s) prompt selects position data to compile the report. Follow the steps below to complete the Position(s) prompt. There are 4 steps to complete this process.
Step 1. Select the Position(s) prompt.
Step 2. Use the Search field to enter the desired Position name. Wildcards (*) can be used to search for values. Alternatively, use the settings to toggle the Search by Keys on and enter the position number into the search field.
Step 3. Click the Search Icon.
Step 4. Select checkbox next to the desired Position(s).
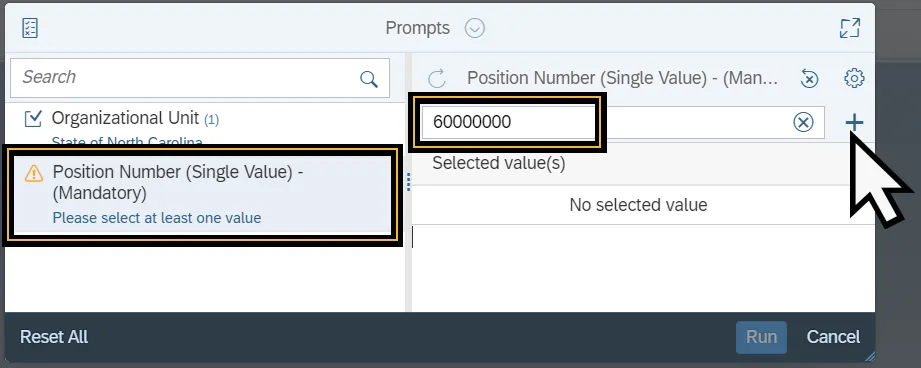
Position Number (Single Value)
The Position Number (Single Value) prompt narrows the generated report to include only the position listed in the selected values. Follow the steps below to complete the Position Number prompt. There are 4 steps to complete this process.
Step 1. Select the Position Number (Single Value) Prompt.
Step 2. Enter the Position Number the Search field.
Step 3. Select the Add icon.
Step 4. The value will be added to the Selected Value list below the Search field.
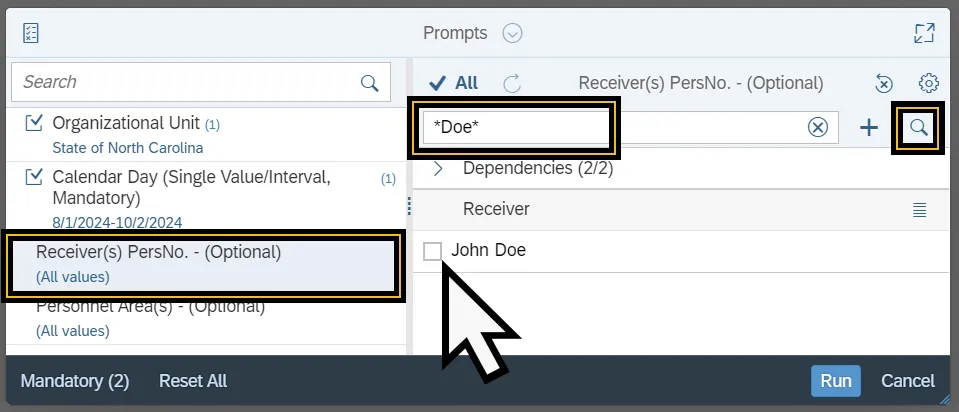
The Receiver(s) PersNo. prompt narrows the generated report to include only data that is equal to the receivers selected in the prompt. Follow the steps below to complete the Receiver(s) PersNo. prompt. There are 4 steps to complete this process.
1. Select the Receiver(s) PersNo. Prompt.
2. Enter the Receivers last name in title case in the Search field.
3. Click the Search icon.
4. Alternatively, toggle on the Search by Key in the Settings Page. Then enter the receiver’s personnel number into the search field and click the Add icon.
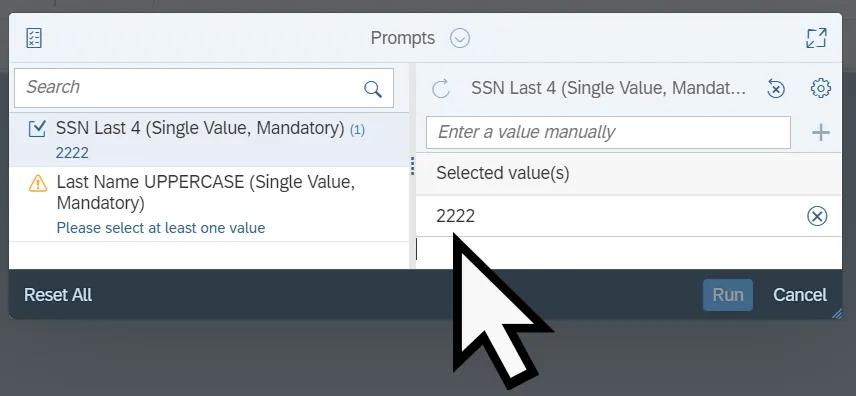
The SSN Last 4 (Single Value) prompt selects a set of four numbers which correspond to the last four digits of an individuals Social Security number. This data is then used to generate the report. Follow the steps below to complete the SSN Last 4 (Single Value) prompt. There are 4 steps to complete this process.
Step 1. Select the SSN Last 4 (Single Value) Prompt.
Step 2. Enter the last four digits of the individual’s social security number into the Search field.
Step 3. Select the Add icon.
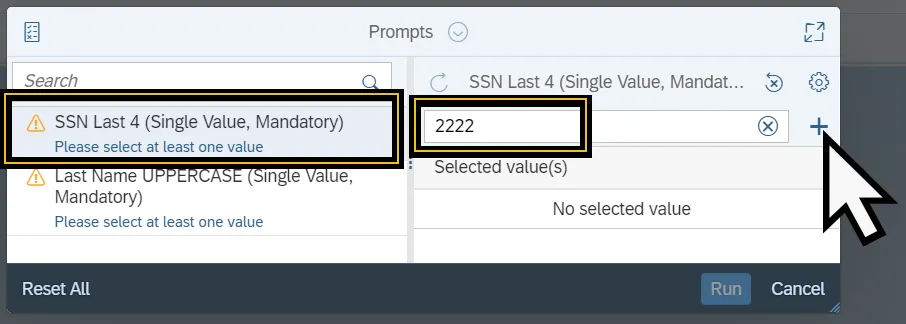
Step 4. The value will be added to the Selected Value list below the Search field.
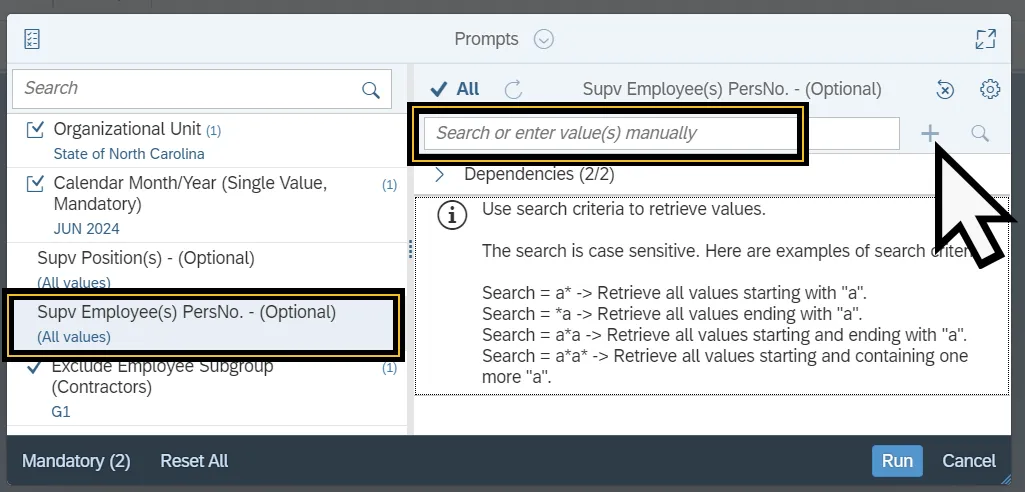
The Supv Employee(s) prompt narrows the generated report to only include information that has the Supervisor listed in the selected values. Follow the steps below to complete the Supv Employee(s) PersNo. prompt. There are 4 steps to complete this process.
Step 1. Select the Supv Employee(s) PersNo. Prompt.
Step 2. Enter the Supervisor Name in the Search field. Alternatively, select the settings to toggle on the Search by key and enter the Supervisor’s Personnel number.
Step 3. Select the Add icon.
Step 4. The value will be added to the Selected Value list below the Search field.
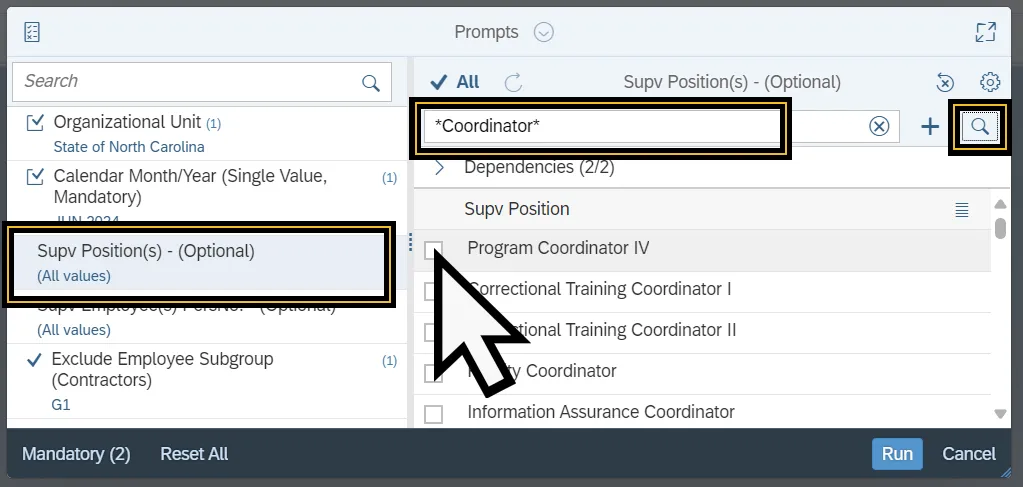
The Supv Position(s) prompt narrows the generated report to only include information that has the Supervisor listed in the selected values. Follow the steps below to complete the Supv Position(s) prompt. There are 4 steps to complete this process.
Step 1. Select the Supv Position(s) prompt.
Step 2. Use the Search field to enter the desired Supervisor Position. Wildcards (*) can be used to search for partial values.
Step 3. Click the Search Icon.
Step 4. Select checkbox next to the desired Supervisor Position.