Purpose
The purpose of this Business Process Procedure is to explain how to enter time for employees using CAT2 in the Integrated HR-Payroll System.
Trigger
A time administrator needs to enter time for employees. CAT2 is used only by time administrators. Employees with ESS time recording access will record their own time in ESS only.
Business Process Procedure Overview
State employees, including temporary employees, are required to account for their planned hours by recording time in the Integrated HR-Payroll System. Contractors may also be required to enter time data in the HR-Payroll System. Additionally, some agencies will require that employees record the distribution of their time to Charge Objects. Transaction CAT2 is the entry point of all time data. The Integrated HR-Payroll System will support three methods for time data recording.
- Employees entering their own time via ESS.
- The Department of Transportation, Employment Security Commission, State Auditors and some Divisions at HHS will send a time file that will be loaded automatically in the HR-Payroll System via CAT2.
- Time Administrators with the responsibility for entering time for others will do so directly in the Integrated HR-Payroll system using transaction CAT2.
When Time Administrators enter time in CAT2, a data entry profile determines which fields are available for entry on the CAT2 time sheet. The data entry profile also determines whether the time sheet will support a single employee or multiple employees. It also drives whether time is approved when saved. In most cases, a Time Administrator will be using the list profiles to enter time records for multiple employees on a single screen.
All CAT2 profiles require that an Attendance/Absence Type (A/A Type) and number of hours be specified for each time record. All profiles also will support the explicit entry of premium values associated with a time record.
A Time Administrator's responsibilities in CAT2 are dependent upon the time recording philosophy the agency has adopted. Agencies on a negative time basis only require the recording of exceptions to the employee's planned schedule (as indicated in the employee's assigned Work Schedule Rule), such as leave usage, work on a holiday and overtime worked. Agencies on a positive time basis require complete time recording, including all hours worked and leave taken.
This BPP will detail:
- Recording time records (not distributed to charge objects) using list entry for negative employees
- Recording time records (not distributed to charge objects) using list entry for positive employees
- Recording time records distributed to charge objects using list entry
- Indicating premiums associated with time records
Additional profile information:
- All data entry profiles show a seven-day period that starts on Sunday, unless otherwise noted.
- All profiles include columns for A/A Type, Premium Number, and Hours by day. Other profiles include additional columns, as noted below.
- The Worklist section shows the short and long text fields for each charge object. The Data Entry Area (timesheet section) shows only the short text fields. The long text will be saved with the time records only if the user copies the row from the Worklist to the Data Entry Area by using the Copy icon.
Profiles appropriate for entry by Time Administrators:
These profiles save records in "Approved" status.
- CHARGE1 through CHARGE4 profiles show a corresponding number of the charge object columns in the Data Entry Area. The Worklist is displayed above the Data Entry Area. Only one employee at a time can be selected.
- CHARGE1L through CHARGE4L profiles show a corresponding number of the charge object columns. The Worklist is not displayed. Multiple employees can be selected and displayed at the same time (list entry).
- NORML-FR - Normal - list entry (same as ESS), Friday start
- NORML-MO - Normal - list entry (same as ESS), Monday start
- NORML-SA - Normal - list entry (same as ESS), Saturday start
- NORML-SU - Normal - list entry (same as ESS), Sunday start
- NORML-TH - Normal - list entry (same as ESS), Thursday start
- NORML-WE - Normal - list entry (same as ESS), Wednesday start
- TEMPSOLN - This profile is for use by Temporary Solutions. It includes "Position" column.
Profiles appropriate for entry by ESS users:
These profiles save records in "Unreleased" status.
- CHG1ESS and through CHG4ESSA profiles show a corresponding number of the charge object columns in the Data Entry Area. The Worklist is displayed above the timesheet.
- ESS - Employee Self Service - Sunday start
- ESS-FRI Employee Self Service - Friday start
- ESS-MON - Employee Self Service - Monday start
- ESS-SAT Employee Self Service - Saturday start
- ESS-WED Employee Self Service - Wednesday start
Profile appropriate for entry by Time interface program only: - INTERFAC - Interface profile
Access Transaction Via Transaction Code: CAT2
Procedure
The following steps detail the process of selecting the transaction CAT2 on the SAP Easy Access screen, selecting the appropriate Data Entry Profile and Key date, and selecting the Personnel Number(s).
There are 70 steps to complete this process.
Step 1. Enter CAT2 in the Command field on the SAP Easy Access screen.
Step 2. Click Enter.
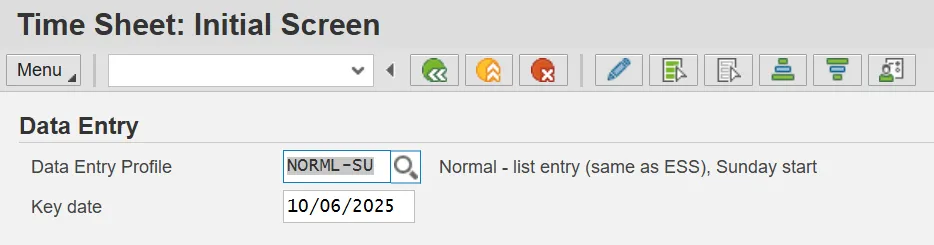
Step 3. On the Data Entry Profile field, click on the magnifying glass icon and select the appropriate Data Entry Profile from the list.
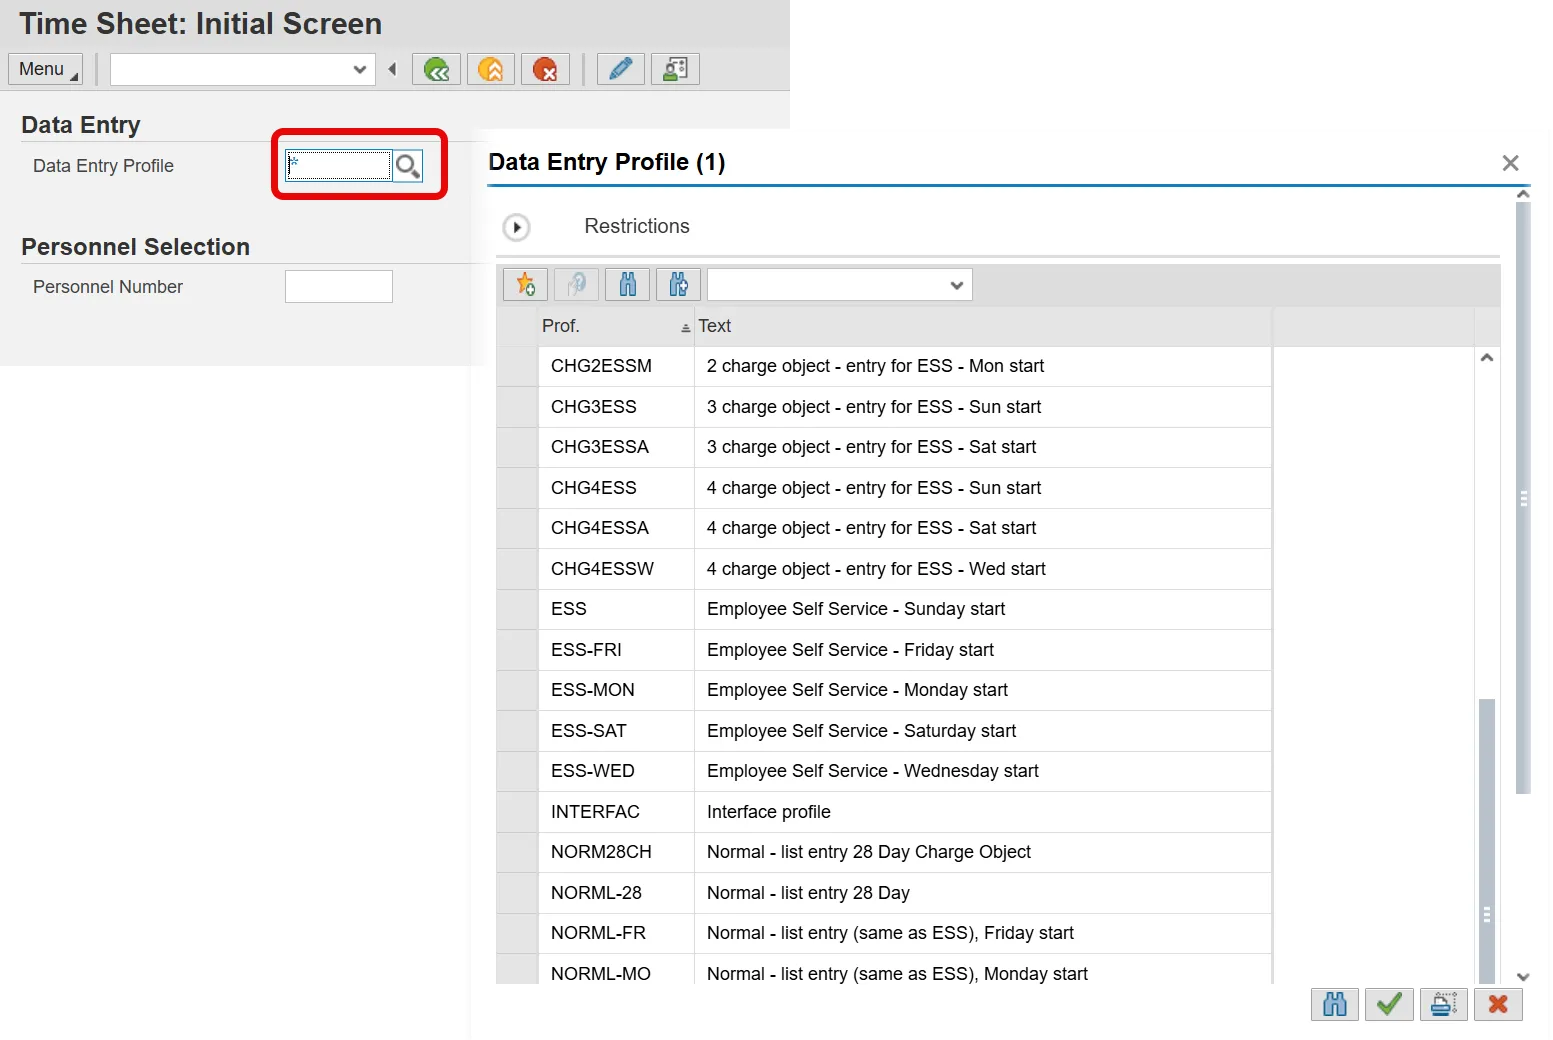
Step 4. Click Copy (green check).
You must click [Enter] to change the screen display to reflect the [NORML-SU] data entry profile.
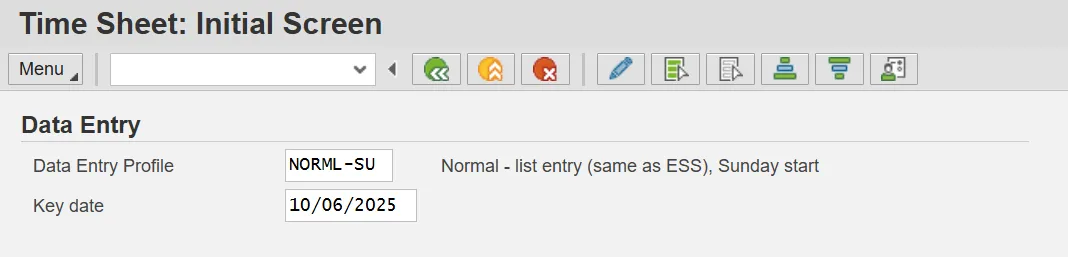
Step 5. The current date will default in the Key date field. This field may be changed to define a specific date.
The key date is important. It determines the pay period you will view to enter time. If you choose a date within a specific pay period, you will be able to scroll between the weeks within the pay period. If you need to enter time for a date within another pay period (the next month, for example), enter a date within that pay period.
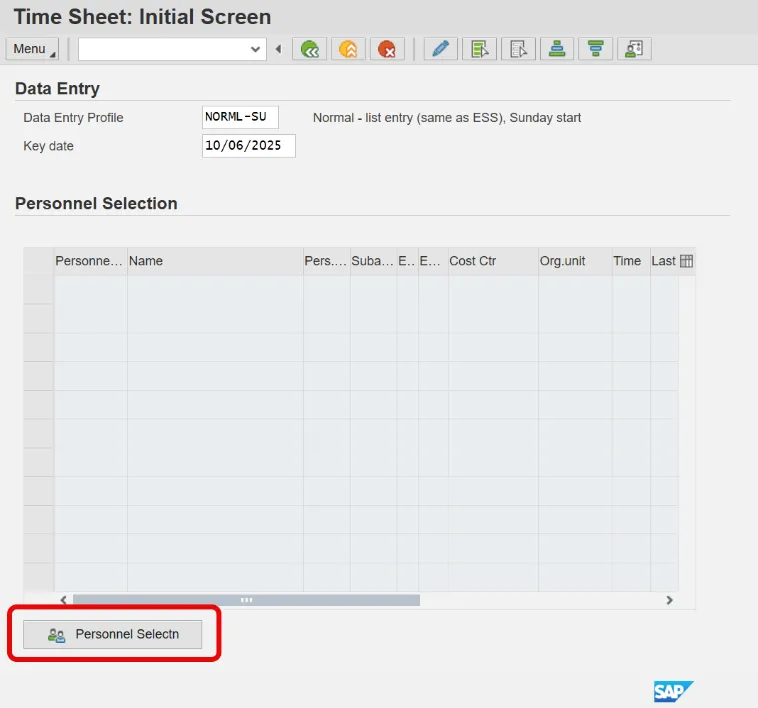
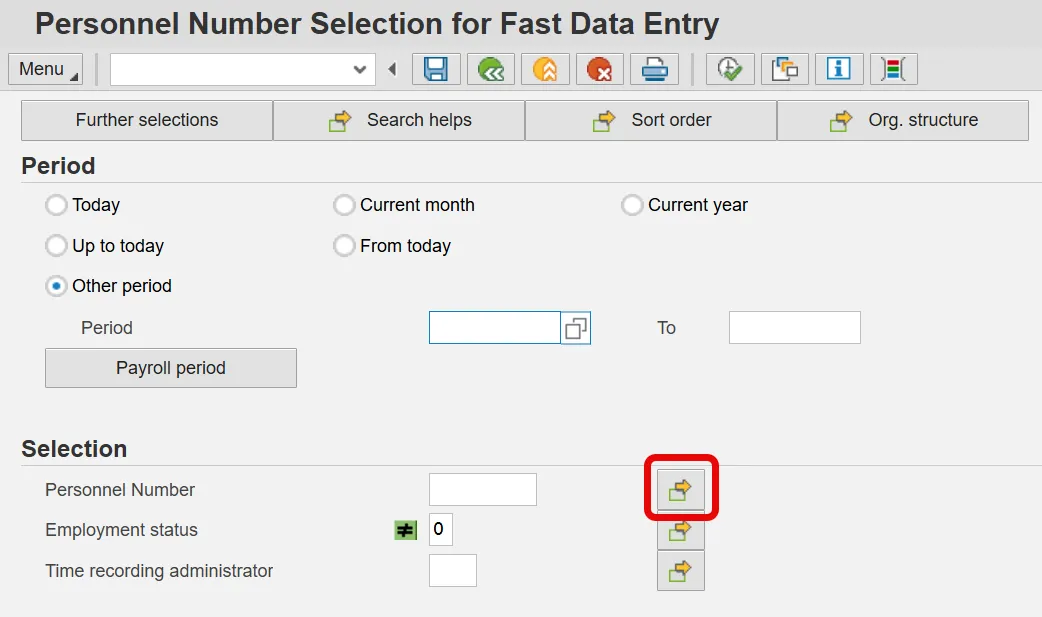
Step 6. Click Personnel Selectn button.
Step 7. On the Personnel Number field, click the Multiple selection icon.
If you are going to enter time for more than one person, click the Multiple Selection icon to the right of the Personnel Number field. If you only need to enter time for one person, enter their personnel number in the field on the Personnel Number Selection for Fast Data Entry screen. This example walks you through entering time for two people.
Step 8. The Multiple Selection for Personnel Number pop-up box will display.
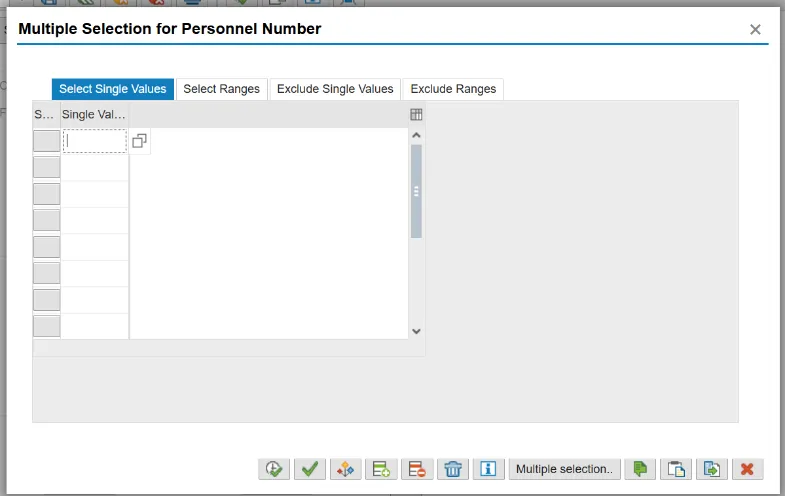
Step 9. Update the Select Single Value fields with the Personnel Numbers.
Step 10. Click Copy (F8) icon.
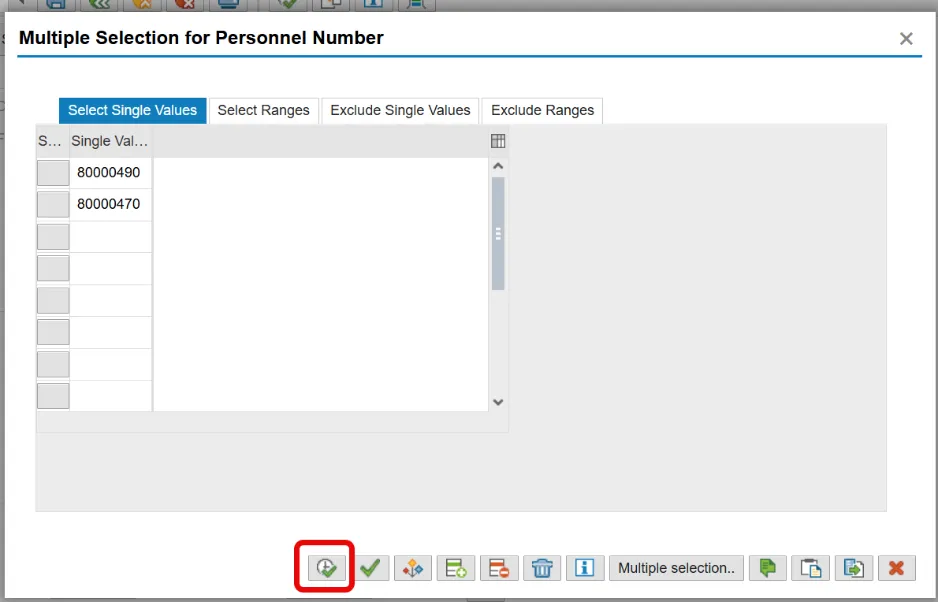
Multiple personnel numbers can be chosen here, which allows a time administrator to enter hours for multiple people on one screen. In this example multiple personnel numbers have been used.
Step 11. Click Execute (F8) icon.
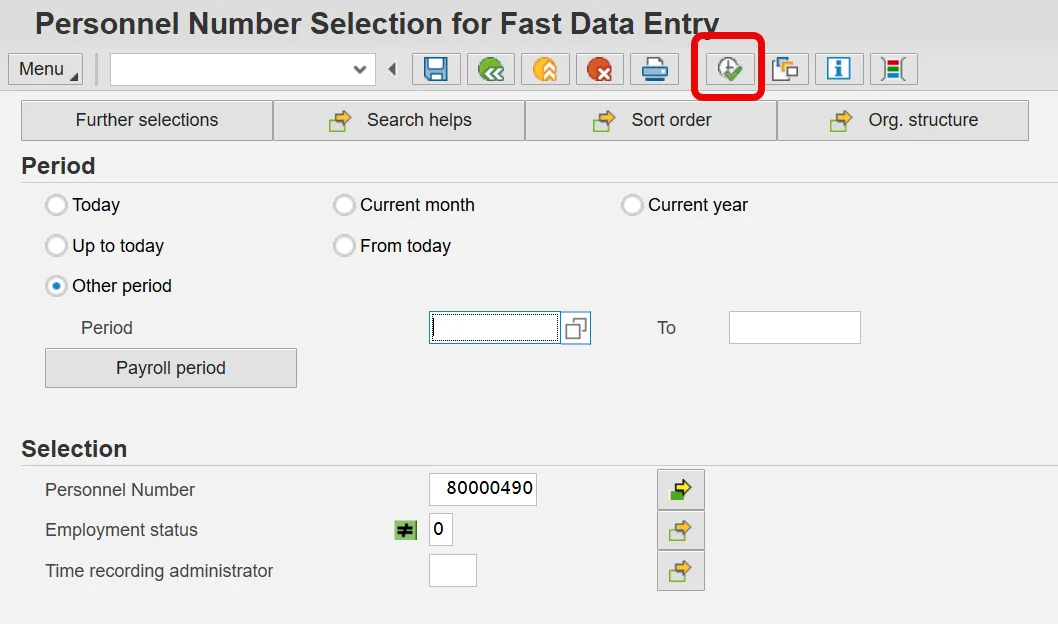
If you will be entering time for these people in the future, save the list of personnel numbers you just entered as a variant. Click the Save icon, enter a variant name and description, and click Save again. Next time you come to this screen, click the Get Variant icon, and you can retrieve your variant, instead of entering the list of numbers again.
Step 12. Click Select All Persons (Shift+F7) icon.
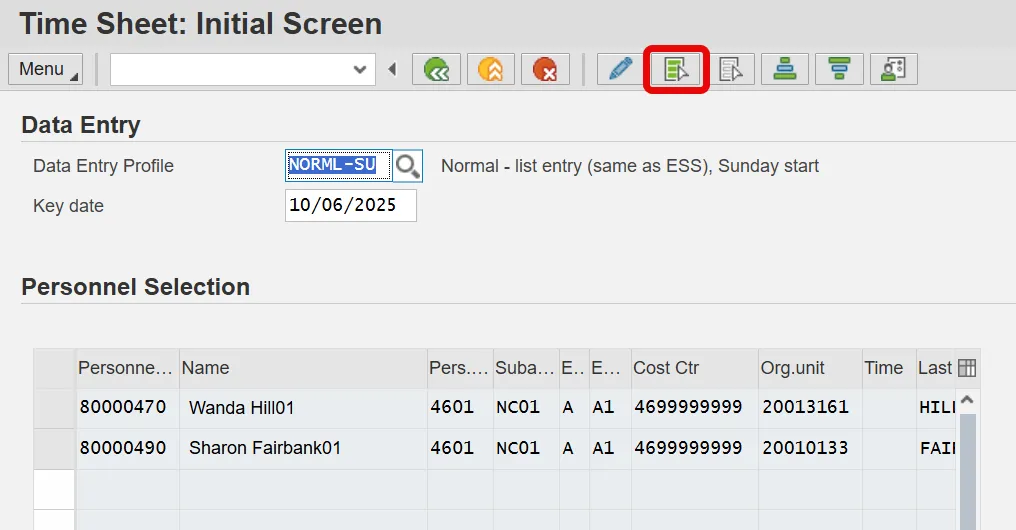
Also, you can choose to view the timesheets of one or more individuals within the list by highlighting individual lines. Click on the gray square to the left of the line item to highlight one or more lines.
Step 13. Click Enter Times (F5) icon.
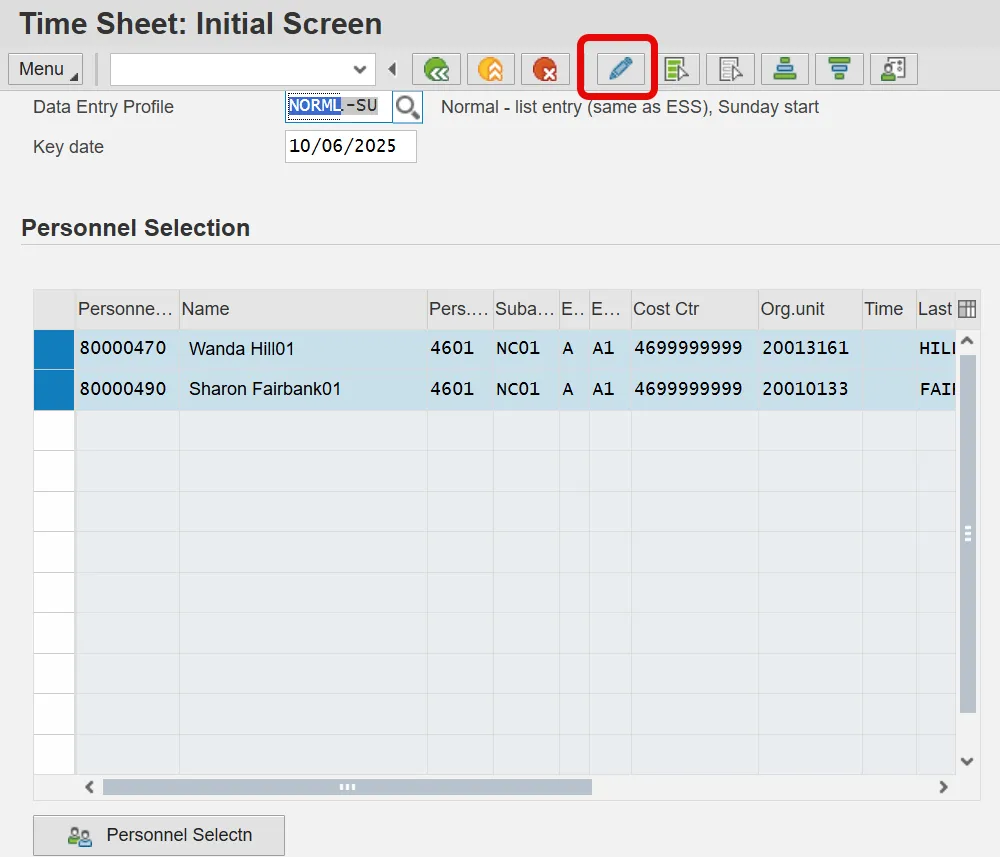
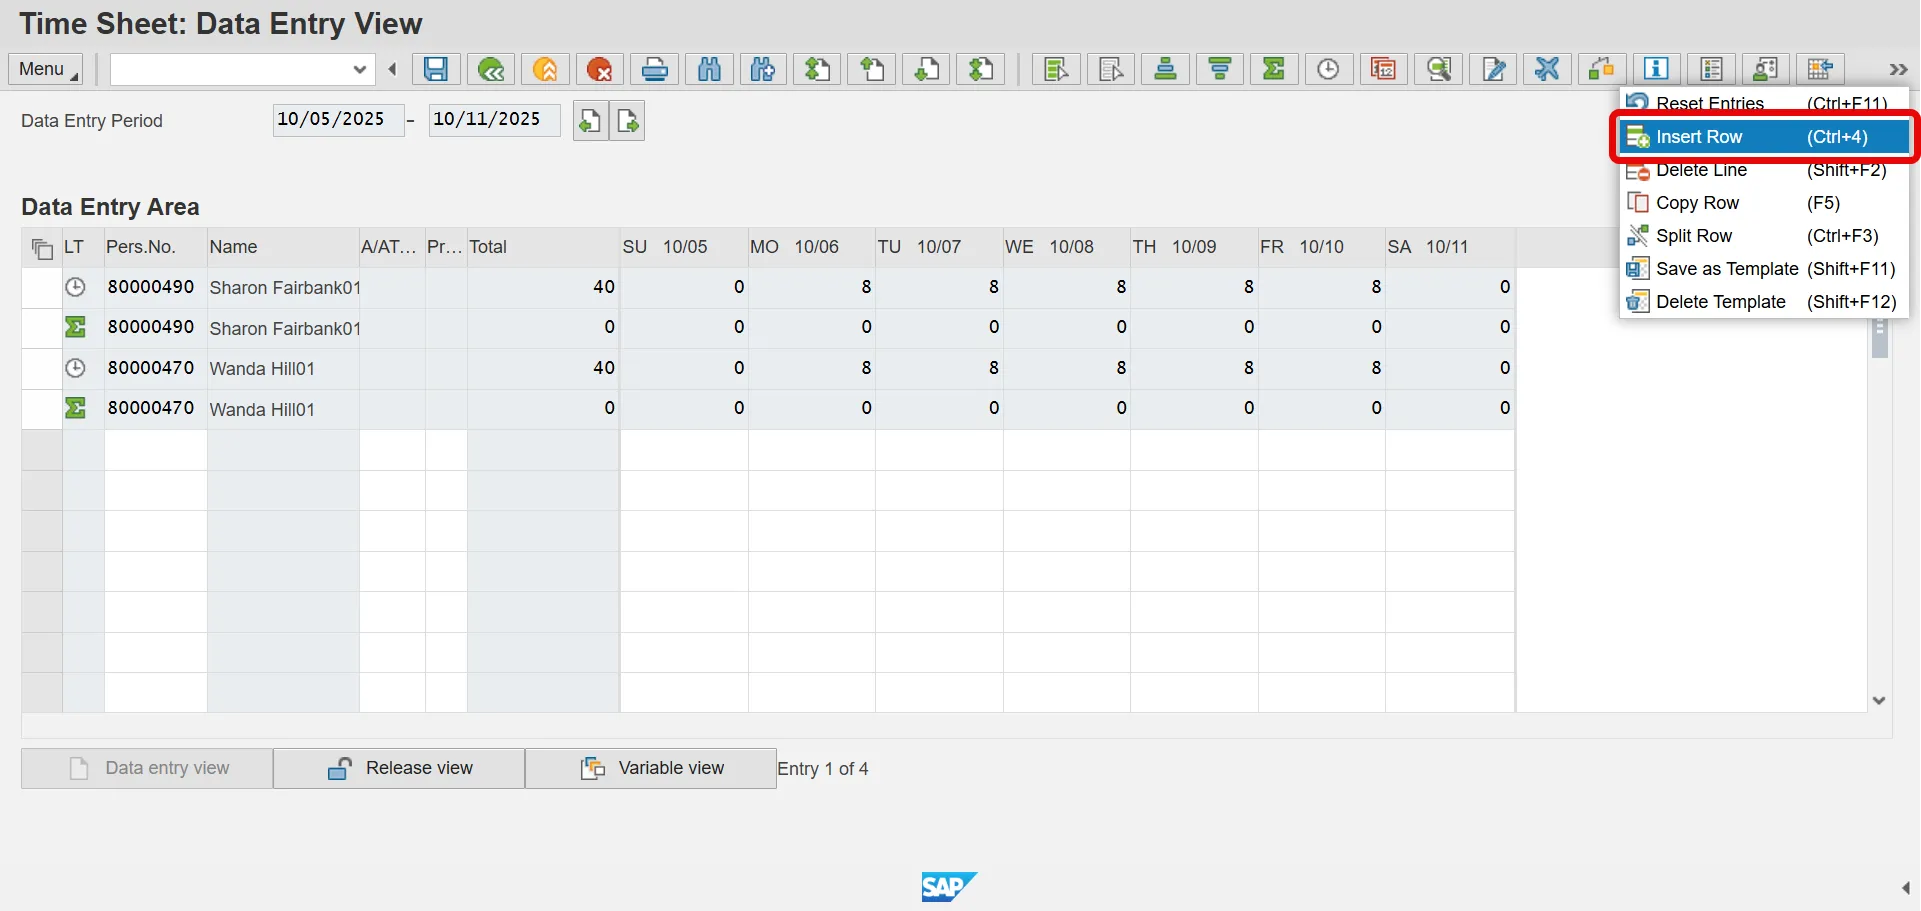
Step 14. Click one of the employee's Personnel Number.
Step 15. Click the Insert Row (Ctrl+F4) icon.
Before time can be entered for the selected employees, data entry lines need to be added for each employee. To add a data entry row for an employee, click anywhere in an employee line and insert a row. Repeat the following steps each time additional rows are needed.
Step 16. Select one of the following options:
|
If: |
Then: |
|---|---|
| You want to enter time for 2 Negative time employees with leave | Click Here |
| You want to enter time for 2 Positive time employees with leave | Click Here |
| You want to enter time against Charge Objects (specific Agencies only) | Click Here |
| You want to enter premium indicators with time records | Click Here |
| You want to enter On-Call hours and Callback hours | Click Here |
The following steps detail Time Entry for negative time employees with leave.
Scenario
Sharon Fairbank (PERNR 80000940) took 8 hours of approved leave on 10/8.
Wanda Hill (PERNR 80000470) took 8 hours of approved leave on 10/8 and 8 hours of sick leave on 10/9.
Both employees are Negative Time Employees.
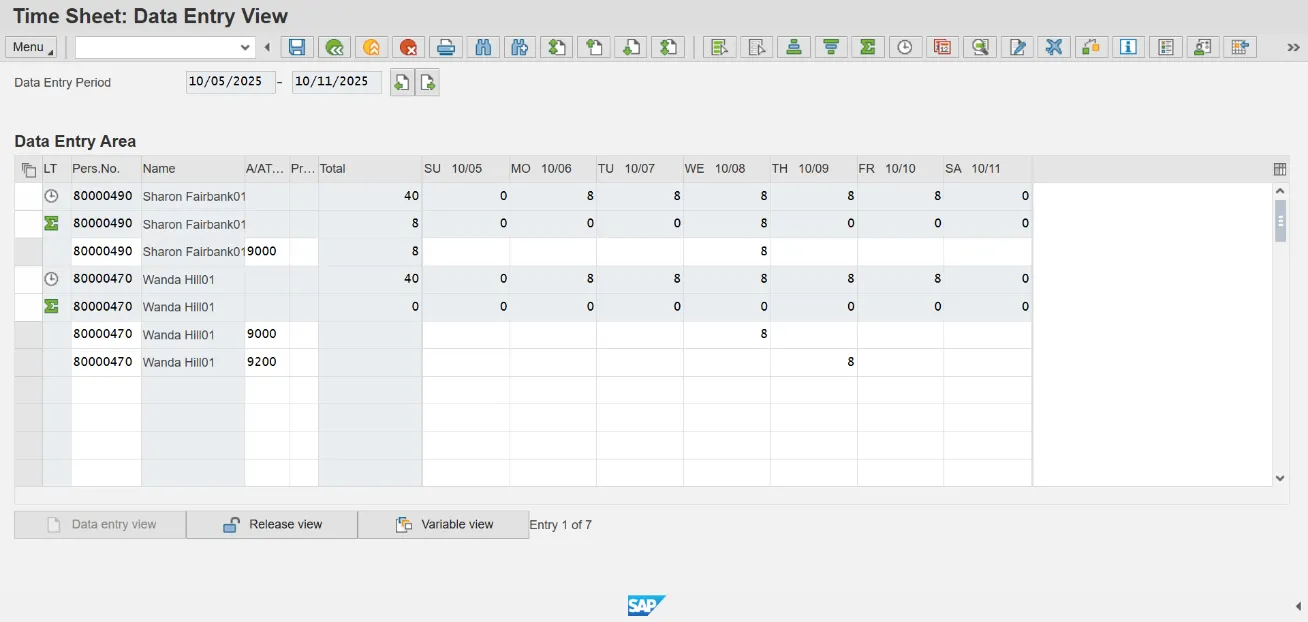
Step 17. Click on Sharon’s Personnel Number
Step 18. Click Insert Row (Ctrl+F4) icon.
Step 19. Update the following required fields in the new row added for Sharon Fairbank.
- A/A Type (Example: 9000)
- Date (Wednesday/8 hours)
Step 20. Click on Wanda’s Personnel Number.
Step 21. Click Insert Row (Ctrl+F4) icon. (Note: Insert two rows)
Step 22. Update the following required fields in the new rows added for Wanda Hill:
- A/A Type (Example: 9200)
- Date (Wednesday/8 hours)
Step 23. Click Enter on your keyboard
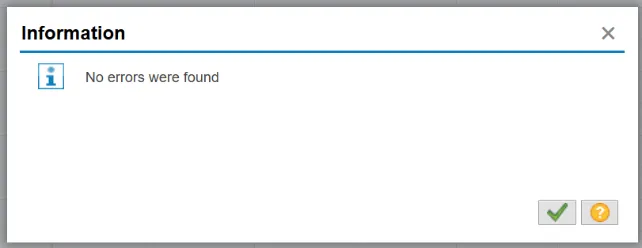
Step 24. Click Check Entries icon to check for errors before saving. The information pop-up box will display the message “No errors were found.” If an error exists, the error must be corrected before saving.
Step 25. Click the Continue (Enter) button.
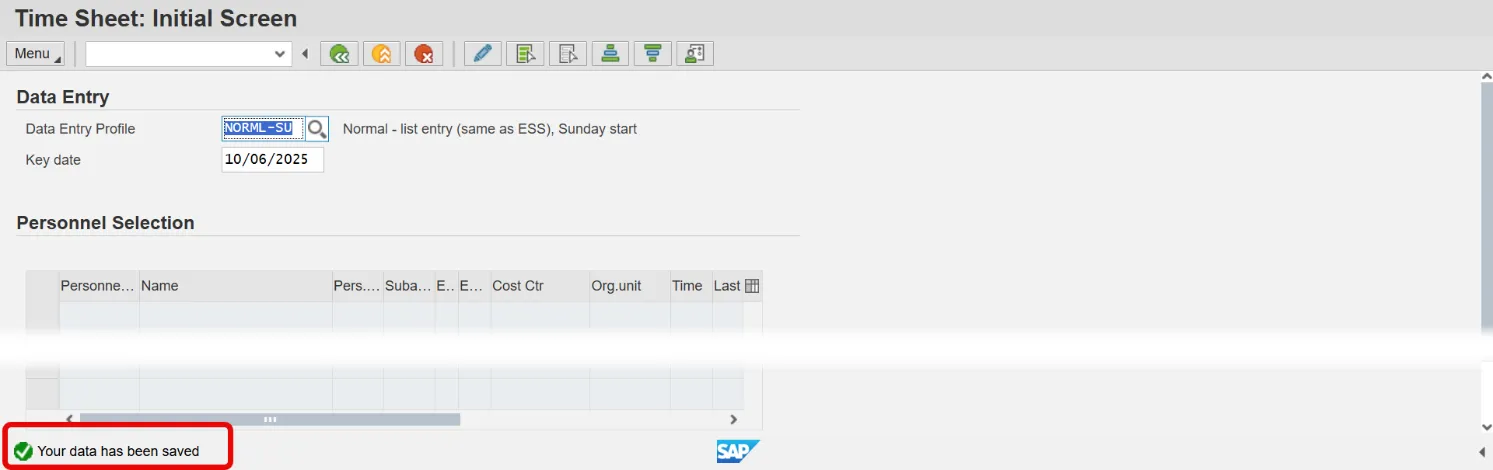
Step 26. Click Save.
Upon Save, a message generates letting you know your data has been saved in the bottom left hand corner of the screen.
The following steps detail Time Entry for positive time employees with leave.
Scenario
Rita Henry (PERNR 80000450) took 10 hours of approved leave on 10/8 and worked her remaining expected target hours for the week; therefore, the target hours must be applied.
Sarah Beckham (PERNR 80000410) took two hours of sick leave on 10/9 and worked her remaining expected target hours for the week; therefore, the target hours must be applied.
Both employees are Positive time employees.
Follow the steps provided earlier to enter Personnel Numbers on the Personnel Number Selection for Fast Data Entry screen and click Enter Times icon.
Step 27. Click on Rita Henry’s Personnel Number
Step 28. Click the Insert Row (Ctrl+F4) icon.
Step 29. Update the following required fields for Rita Henry:
- A/A Type (Example: 9500)
- Date (Example Wednesday/10 hours)
Step 30. Select Rita’s Personnel Number and click Insert Row icon.
Step 31. Highlight the inserted row by clicking in the far-left column.
If new inserted row is not highlighted before clicking the Target Hours icon, target hours will be added for each employee listed on time sheet.
Step 32. Click Target Hours icon to apply the remaining target hours

Notice the 9500 A/A type has been applied along with the employee’s expected remaining target hours, and the column reflects cumulative hours recorded.
Step 33. Click Sarah Beckham’s Personnel Number
Step 34. Click Insert Row (Ctrl+F4) icon.
Step 35. Update the following required fields for Sarah Beckham:
- A/A Type (Example: 9200)
- Date (Example Friday/ 3 hours)
Step 36. Click Enter.
Step 37. Select Rita’s Personnel Number and click Insert Row icon.
Step 38. Highlight the inserted row by clicking in the far-left column.
Step 39. Click Target Hours icon to apply the remaining target hours.
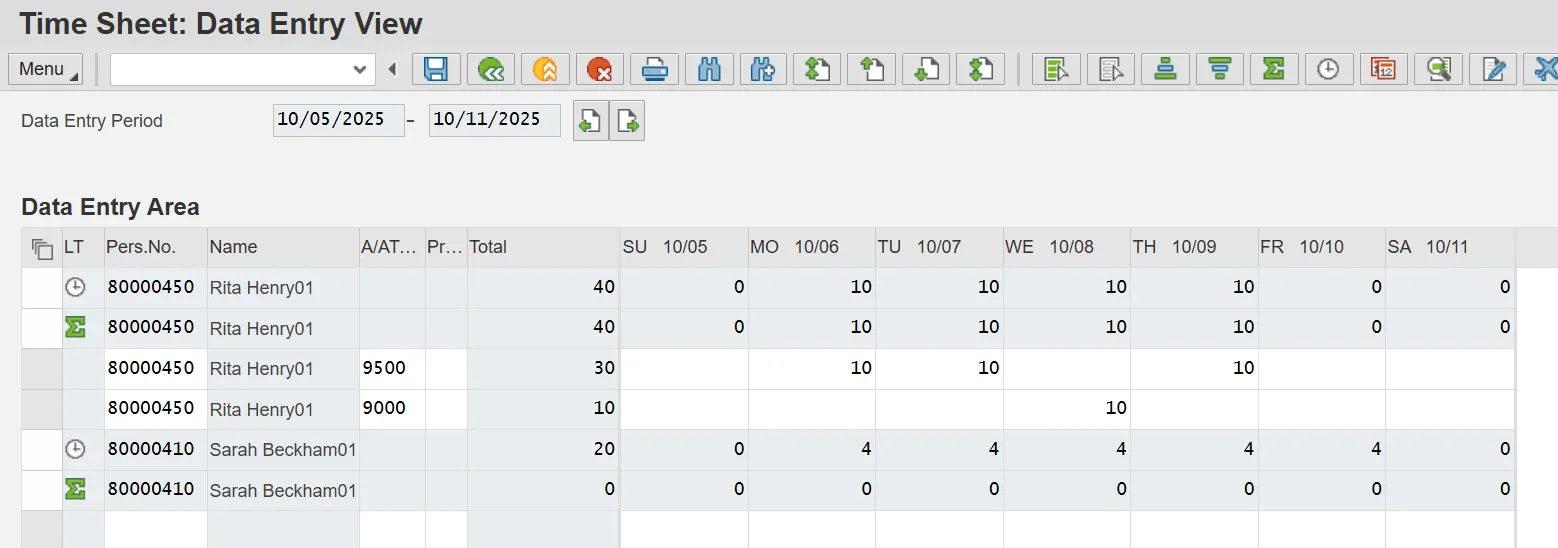
Notice the 9500 A/A type has been applied along with the employee’s expected remaining target hours, and the column reflects cumulative hours recorded.
Step 40. Click the Check Entries icon to check for errors before saving. The information pop-up box will display the message “No errors were found.” If an error exists, the error must be corrected before saving.
Step 41. Click the Enter button.
Step 42. Click Save.
Upon Save, a message generates letting you know your data has been saved in the bottom left hand corner of the screen.
The following steps detail distributing time records to Charge Objects.
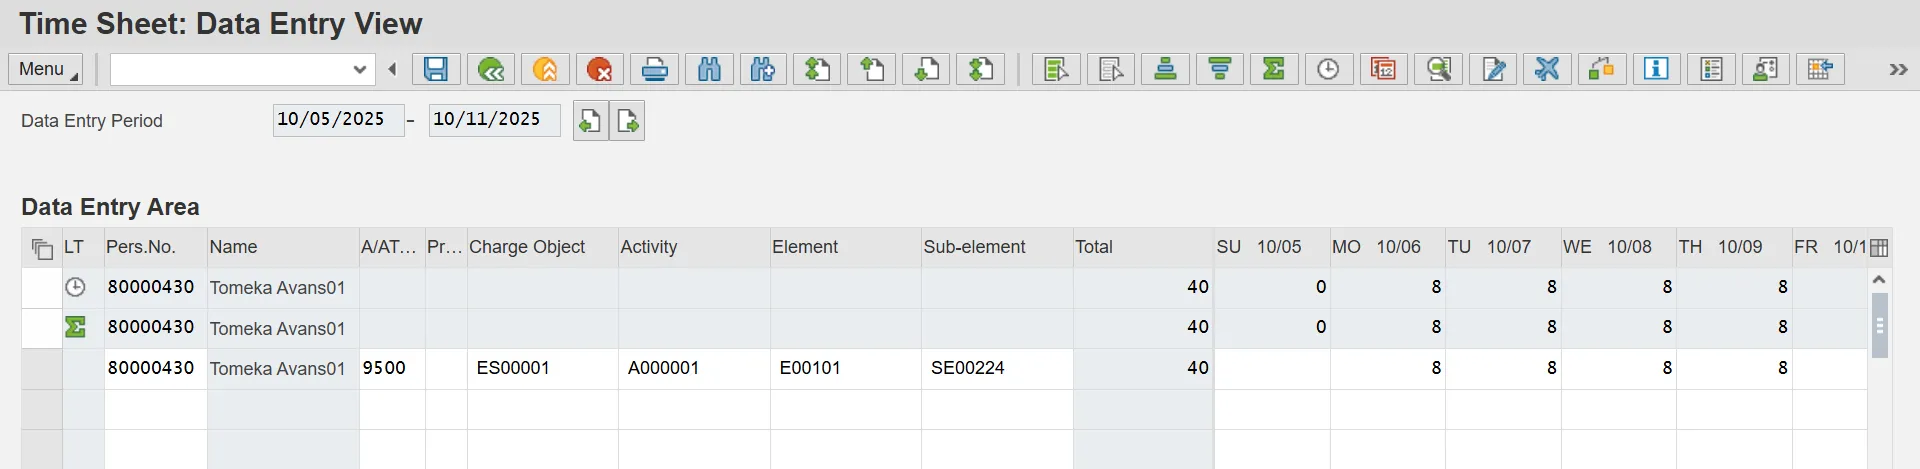
Scenario
Tomeka Avans (PERNER 80000430) is a positive time employee who worked her target hours based on her planned working time. Tomeka must charge time against specific projects using charge objects so that the hours may be tracked for reporting purposes only. A maximum of four level of charge objects are available in the Integrated HR-Payroll System-Charge Object, Activity, Element, and Sub-Element.
Step 43. Update the following fields on the Time Sheet: Initial Screen:
- Data Entry Profile (Example: CHARGE4L)
- Key Date: Choose either today, or define a specific date.
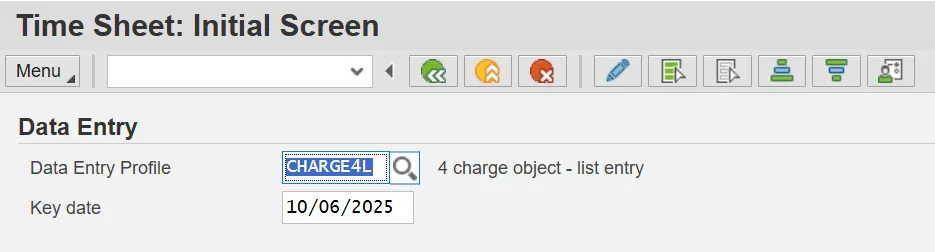
You must click [Enter] to change the screen display to reflect the [CHARGE4L] data entry profile. The charge object field is free form. It is helpful to keep an Excel list of valid charge objects that may be used during time entry. Each agency has a designated Charge Object Maintainer who manages the agency’s list of usable charge objects.
Step 44. Click the Enter icon.
Follow the steps provided earlier to enter Personnel Numbers on the Personnel Number Selection for Fast Data Entry screen and click Enter Times icon.
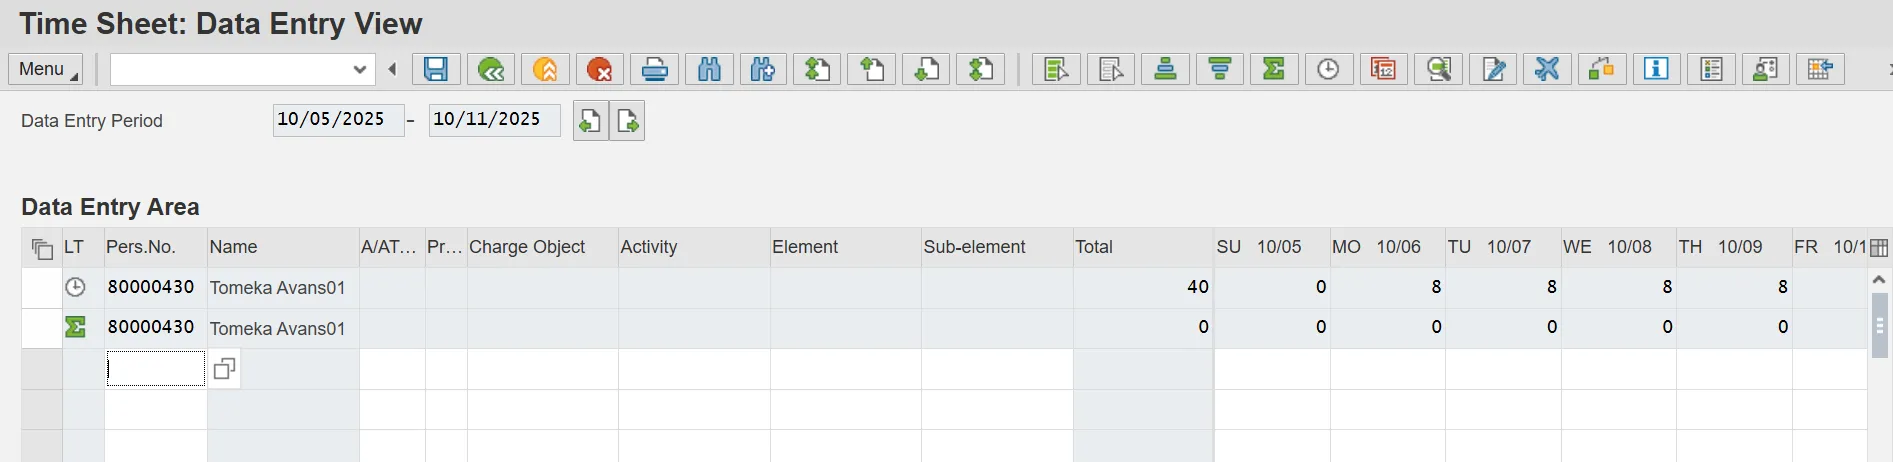
Step 45. Click the Target Hours icon to apply the working hours.
Step 46. Update the following required fields.
- Charge Object: A charge obect can be assigned to an organizational unit to charge time against. (Example: ES00001)
- Activity: Second field of the Charge Object. (Example: A000001)
- Element: Third field of the Charge Object. (Example: E00101)
- Sub-Element: Fourth field of the Charge Object (Example SE00224)
Step 47. Press Enter on your keyboard.
Step 48. Click Check Entries icon to check for errors before saving. The information pop-up box will display the message “No errors were found.” If an error exists, the error must be corrected before saving.
Step 48. Click Continue (Enter) button.
Step 49. Click Save.
Upon Save, a message generates letting you know your data has been saved in the bottom left hand corner of the screen.

Each separate charge object that an employee charges time to in a given week will represent a separate line on the time sheet. To insert additional lines for an employee, click anywhere on an existing line and click the Insert Row icon.
The following section details entering premium indicators with time records.
The premium indicators in the Integrated HR-Payroll System are relevant only for work on evening and night shifts.
- Premium indicator ‘01’ pushes a night premium on the associated hours.
- Premium indicator ‘02’ pushes an evening premium on the associated hours.
- Premium indicator ‘06’ will stop the payment of premiums for an employee assigned an Evening or Night work schedule.
There is not a premium indicator that pushes weekend premium. The weekend premium is derived based on the day of the week – Saturday and Sunday. A night shift on Friday will also carry weekend premium.
Step 50. Update the following fields on the Time Sheet: Initial Screen:
- Data Entry Field (Example: NORML-SU)
- Key Date
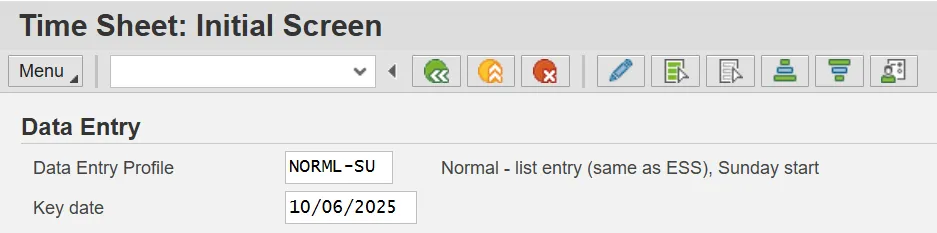
Step 51. Click Enter.
Follow the steps provided earlier to enter Personnel Numbers (80001037 and 80001035) on the Personnel Number Selection for Fast Data Entry screen and click Enter Times icon.
Scenario
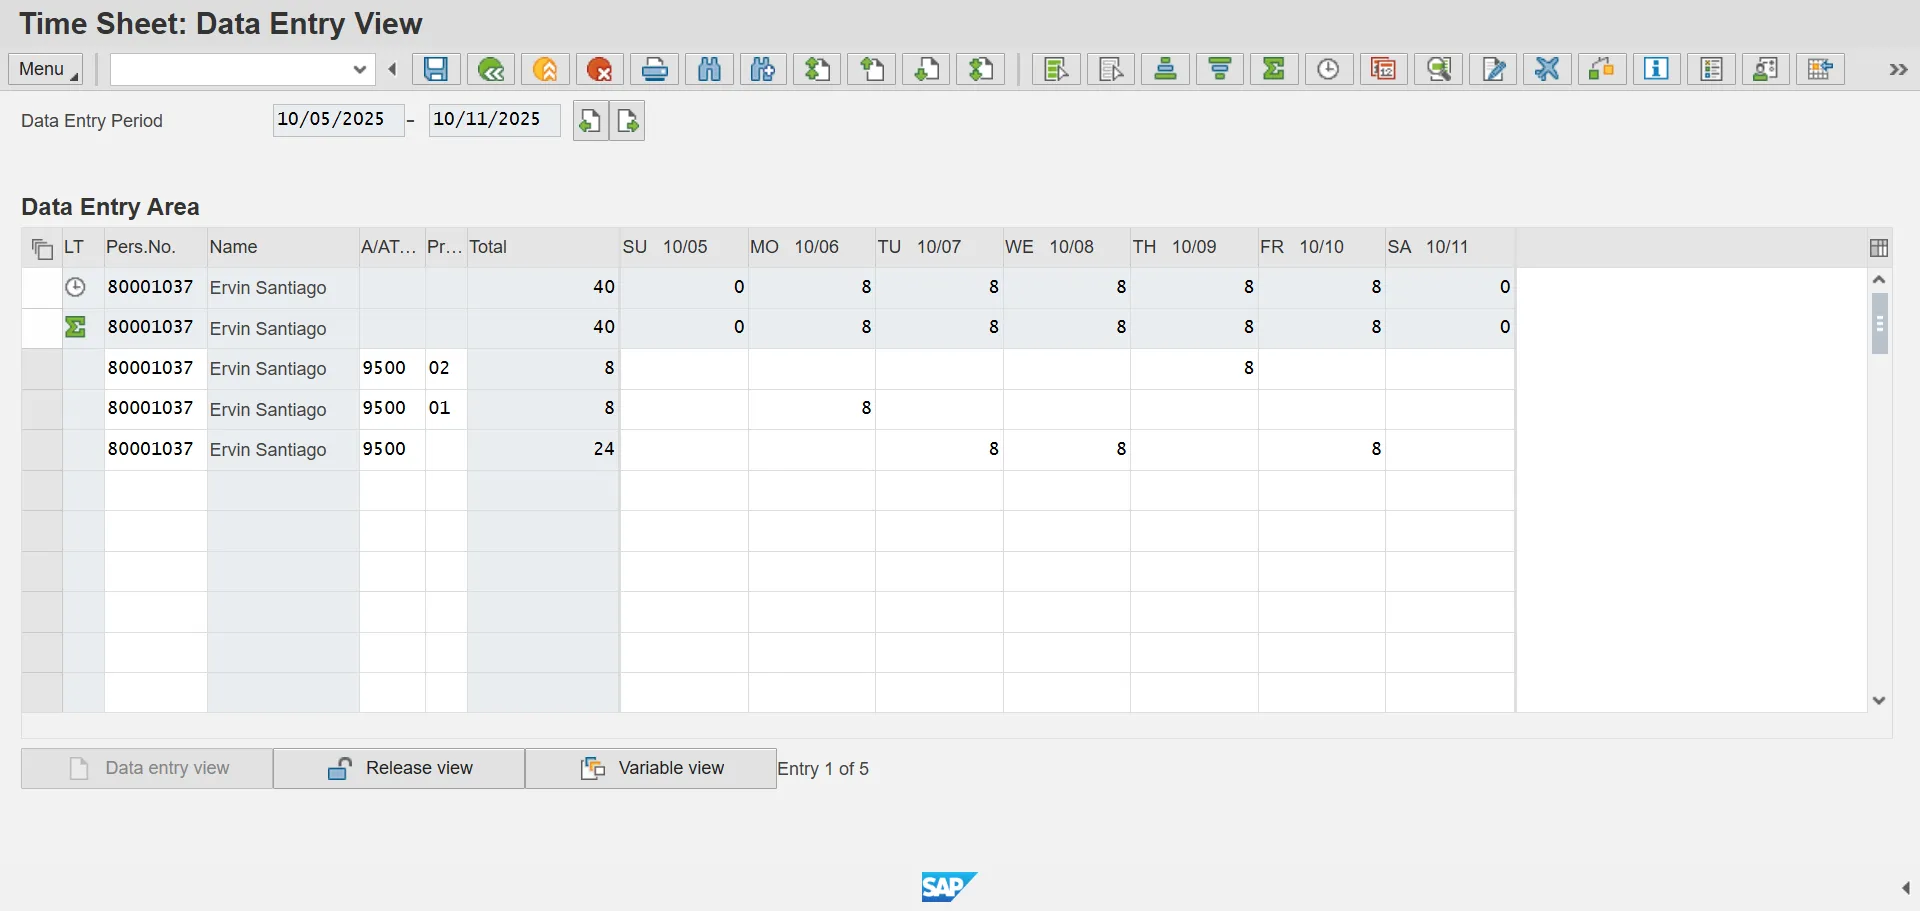
Ervin Santiago (PERNER 80001037) is a positive time employee who worked 8 hours of night shift premium time on Monday, 10/6, and worked 8 hours of evening shift premium time on Thursday 10/9. He worked his planned working time based on IT0007 for the remainder of the week.
Step 52. Select Ervin’s Personnel Number and click Insert Row icon
Step 53. Update the following required fields for Ervin Santiago:
- A/A Type (Example: 9500)
- Prem. No. (Example: 01)
- Date
Step 54. Select Ervin’s Personnel Number and click Insert Row icon.
Step 55. Update the following required fields for Ervin Santiago:
- A/A Type (Example: 9500)
- Prem. No. (Example: 02)
- Date
Step 56. Select Ervin’s Personnel Number and click Insert Row icon.
Step 57. Highlight the inserted row by clicking in the far-left column.
If new inserted row is not highlighted before clicking the Target Hours icon, target hours will be added for each employee listed on time sheet.
Step 58. Click Target Hours icon to apply the remaining target hours.
Step 59. Click Check Entries icon to check for errors before saving. The information pop-up box will display the message “No errors were found.” If an error exists, the error must be corrected before saving.
Step 60. Click Continue (Enter) button.
Step 61. Click Save.
An employee's shift assignment as determined by his/her work schedule rule will take priority over any premium indicators associated with recorded hours. Substitutions also can be used to ensure the appropriate premium is associated with an employee's recorded hours. For example, a substitution would provide the appropriate premium for an employee on an evening shift that worked a night shift instead. Push codes are reserved for use when the work schedule rule is designated as a Day shift.
Shift premiums generated from the work schedule rule or premium indicators will not be processed unless the employee's position is flagged as eligible for the relevant premiums.
Shift premiums will not be generated for negative time employees even if the employee is assigned a night or evening work schedule rule. An employee must be positive time to receive automatic premiums from the assigned work schedule rule.
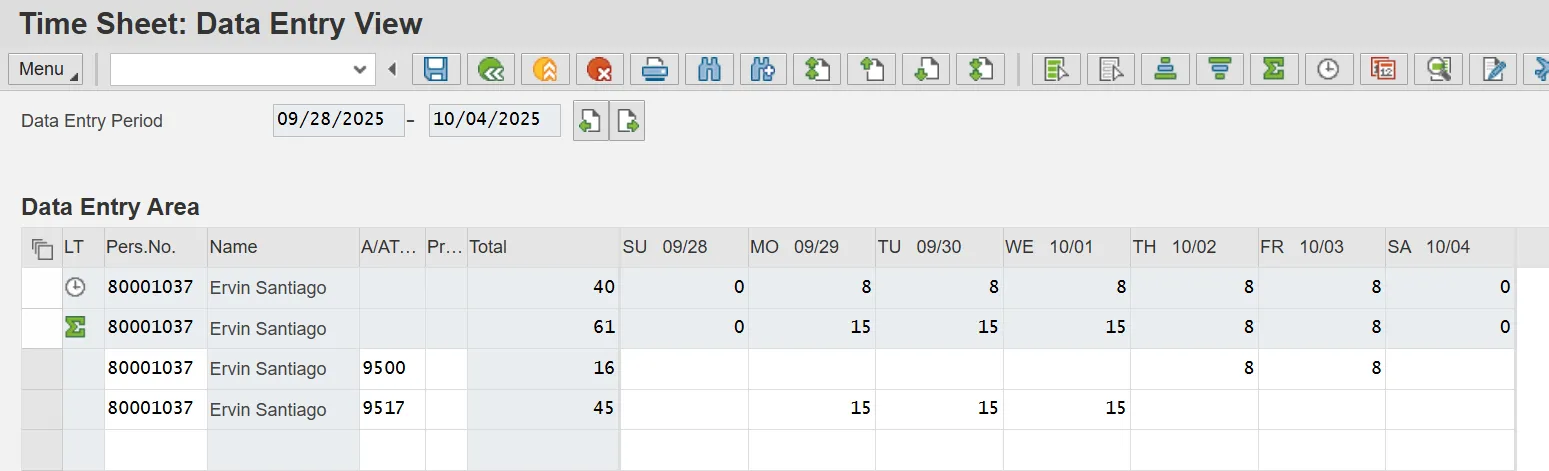
The following section details entering On-Call hours and Callback hours.
Scenario
Ervin Santago (PERNR 80001037) is a positive time employee who was on-call overnight from 5:00pm to 8:00am (15 hours) on Monday (02/06), Tuesday (02/07) and Wednesday (02/08). He worked his planned working time based on IT0007 for the week.
An employee’s position must be eligible for On-Call and Callback in order for the Integrated HR-Payroll System to process on-call and callback hours. If a position is eligible for on-call, then the position will be set to either accrue on-call comp or have on-call hours paid at a specified rate. If a position is eligible for callback, the hours will be counted either as hours worked (for the calculation of overtime) or accrued as callback comp.
If an employee is on-call, the on-call hours are to be reported as a separate line item on the time sheet using A/A Type 9517.
If an employee is called back to work while on-call, the callback hours are to be recorded using A/A Type 9516 (Callback) or A/A Type 9511 (Remote Callback). If an employee is called back (physically or remotely) while on-call, the hours for which the employee was called back should be deducted from the on-call hours reported.
- Example: An employee is assigned a 15-hour on-call shift and is called back for four hours. The employee should report A/A 9517 (On-Call) for 11 hours and A/A 9516 (Callback) for 4 hrs. Note: separate line items must be recorded on the time sheet.
If an employee is eligible for imputed hours (by reporting less than four hours for callback and less than 30 minutes for remote callback), then the employee should report only the callback hours. The Integrated HR-Payroll System will process any imputed time automatically.
Step 62. Update the following fields on the Time Sheet: Initial Screen:
- Data Entry Profile (Example: NORML-SU)
- Key Date
Step 63. Click Enter.
Follow the steps provided earlier to enter Personnel Numbers (80001037) on the Personnel Number Selection for Fast Data Entry screen and click Enter Times icon. (Click Here for Steps)
Step 64. Select Ervin’s Personnel Number and click Insert Row.
Step 65. Update the following required fields for Ervin Santiago:
- A/A Type (Example 9517)
- Date(s)/Hours
Step 66. Select Ervin’s Personnel Number and click Insert Row.
Step 67. Select A/A Type 9500 and enter 8 hours for each day he is scheduled to work based on IT007, Planned Working Time.
Step 68. Click Enter on your keyboard.
Step 69. Click Check Entries to check for errors before saving. The information pop-up box will display warning messages – “Number of hours recorded 15.00 exceeds target hours 8 hours.” This is only a warning and you can proceed. If an error exists, the error must be corrected before saving.
Step 70. Click Continue (Enter) if hours are recorded correctly.
Step 71. Click Save.
The Display Message pop-up box will display warning messages once again. Click the Continue (Enter) button if hours are recorded correctly.
A message generates letting you know your data has been saved in the bottom left hand corner of the screen.
The system task is complete.