View My Bank Details Tutorial Video
Purpose
The purpose of this Business Process Procedure is to explain how to create and change your direct deposit information with the Fiori My Bank Details application.
- Main Bank – Employees must have one valid record for direct deposit.
- Other Bank – Employees can maintain up to three additional accounts to direct deposit a portion of their paycheck separately from their Main Bank.
- Travel Expense – Employees who are authorized to receive accounts payable travel reimbursements. Employees can create and change their AP reimbursement bank (travel reimbursements).
IMPORTANT NOTICE: The Office of the State Controller (OSC) transmits your payroll payment electronically based on the information you provide. It is important that you enter correct account and bank routing numbers. If the payment transmission fails because you have incorrect or outdated information, OSC can only provide a replacement payment AFTER a refund from the financial institution has been received. Direct Deposits must comply with US law and requirements of the Office of Foreign Assets Control (OFAC). By entering bank data here, you are affirming that the entire payment amount you receive IS NOT subject to being transferred to a foreign bank account. OSC has the right to retract and correct direct deposit payments, as necessary.
Critical Information: Employees CANNOT change their Bank Information until their Agency HR has entered their original bank details into the system. If your Bank Information screen displays as blank, contact your Agency HR. The Direct Deposit Enrollment & Change Form can be found on the OSC website.
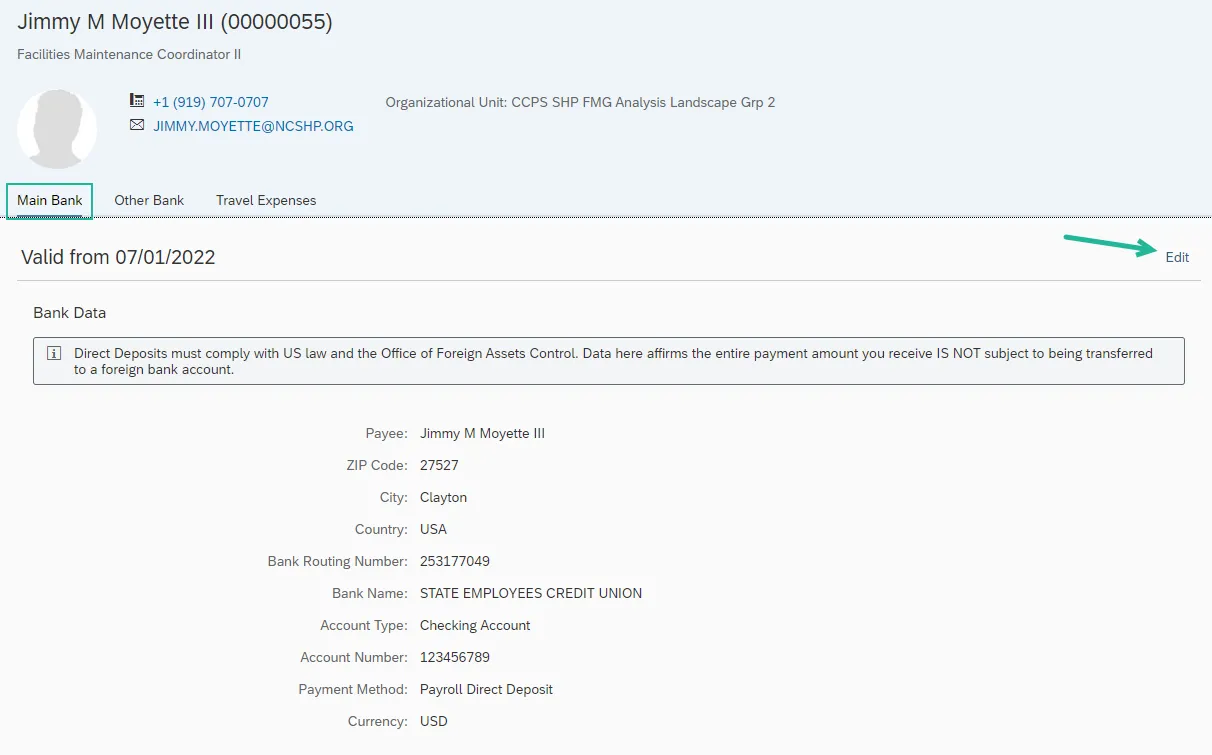
Edit Main Bank Details
There are 6 steps to complete this process.
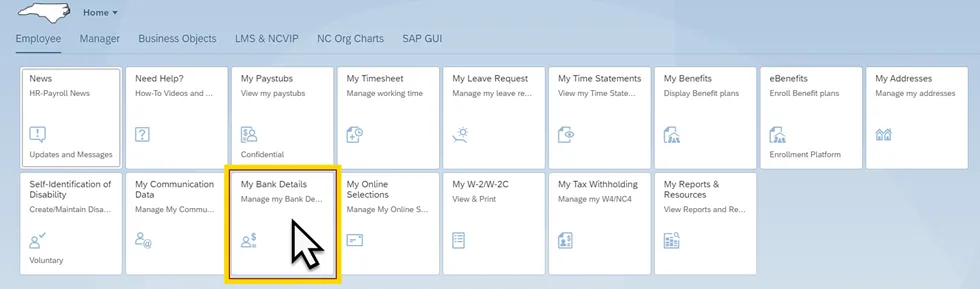
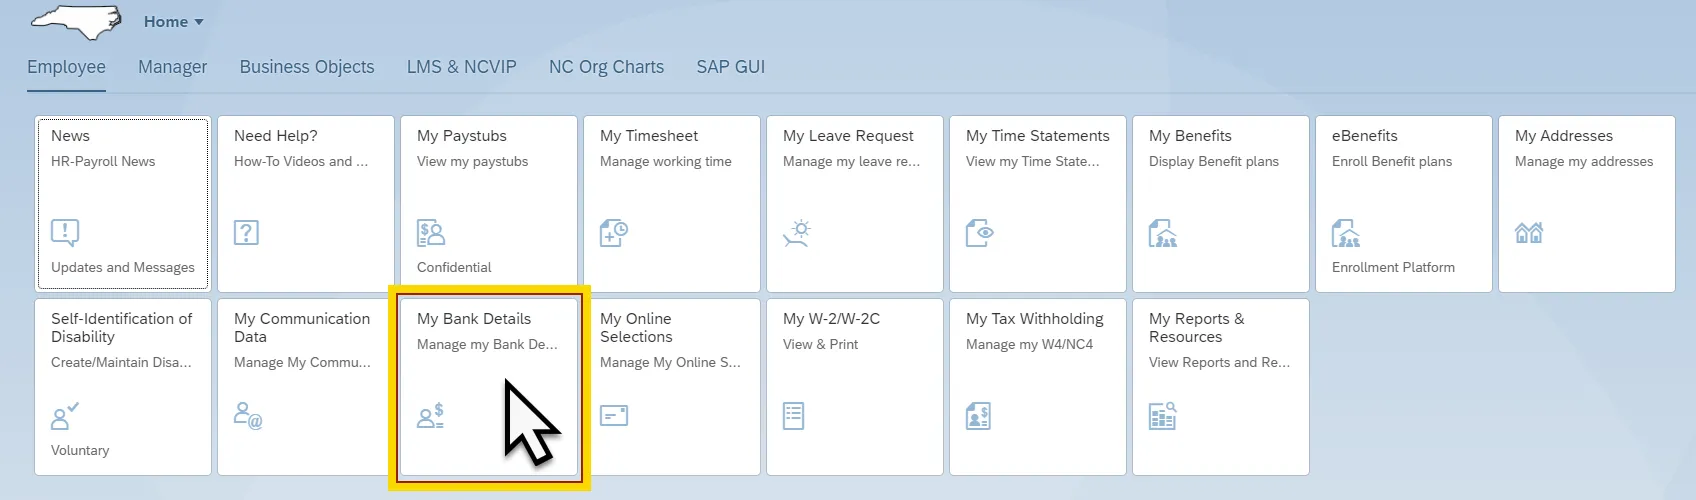
Step 1. Within the Employee tab, click on the My Bank Details card/application.

Step 2. Your current Main Bank details will be displayed. Click on the Edit button.
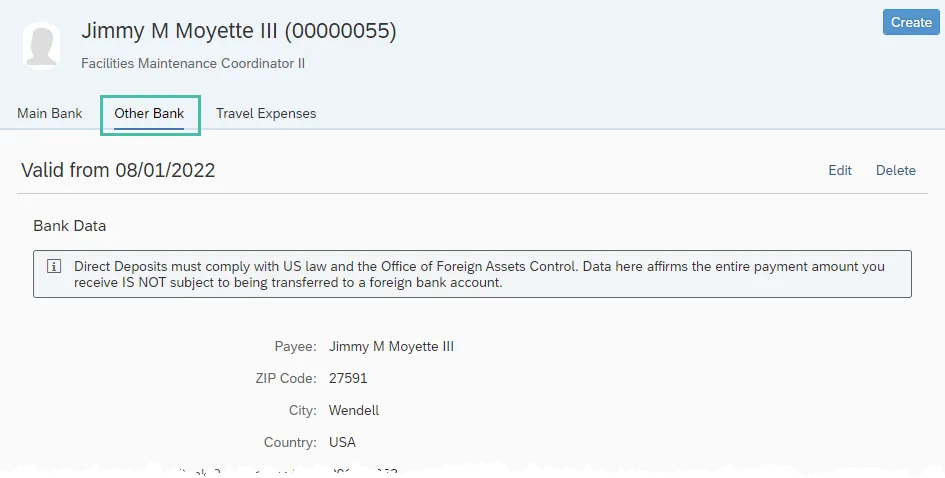
Note: Direct Deposits must comply with US Law and the Office of Foreign Assets Control. Data here affirms the entire payment amount you receive IS NOT subject to being transferred to a foreign bank account.
Step 3. Some of the fields default from your personnel record and cannot be changed. In the Bank Data section, you can change the Bank Routing Number, Account Type, and Account Number fields. The Account Number will need to be entered twice to help prevent typos. See the screen shot and chart below for more information on these fields.
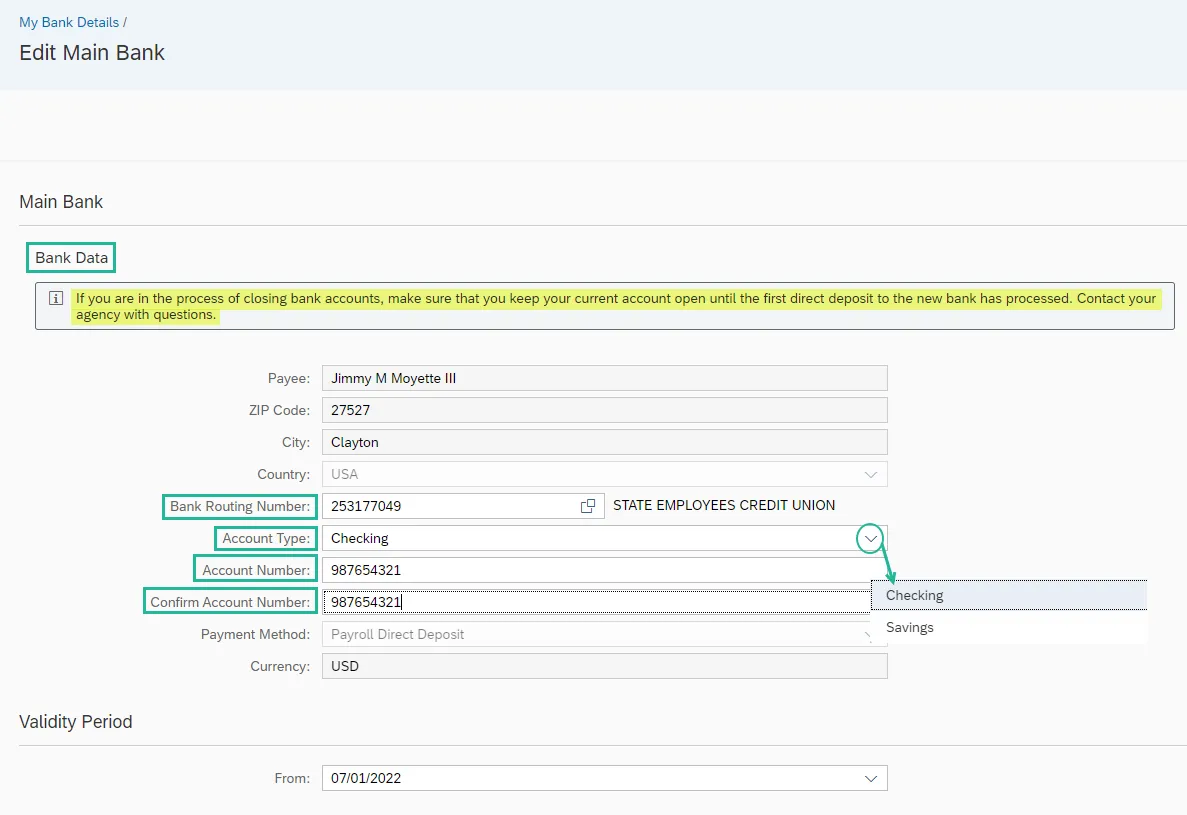
| Field Name | Description |
|---|---|
| Bank Routing Number | The ABA routing number for your financial institution. This number is nine (9) digits long. |
| Account Type | Indicates whether the account is a checking or a savings account. |
| Account Number | Number of your Bank account. The length can vary depending on the bank. |
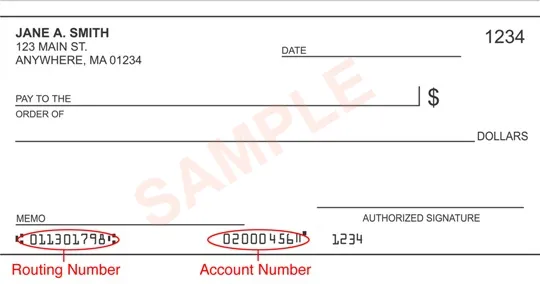
Note: You can find the Bank Routing Number and Account Number on a check provided by your bank as shown in the screen shot below. Please ensure you have one of your checks readily available when maintaining this information in Fiori.
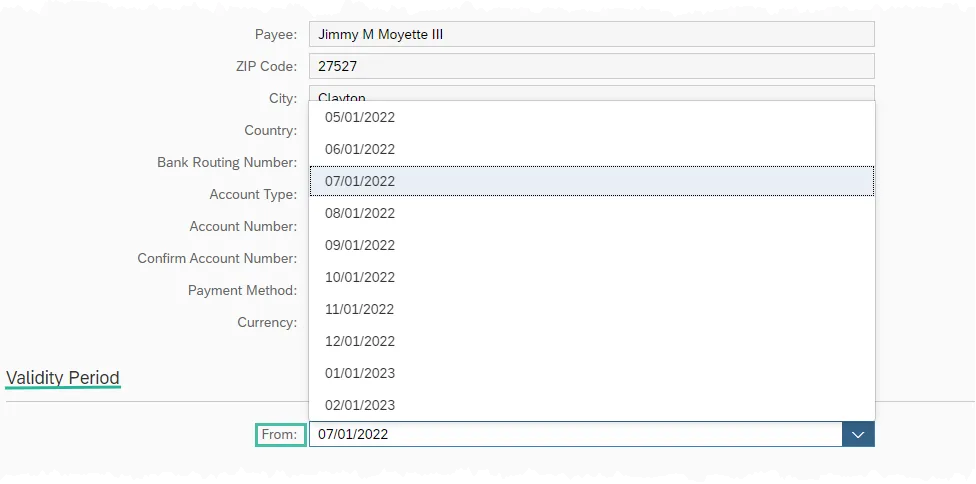
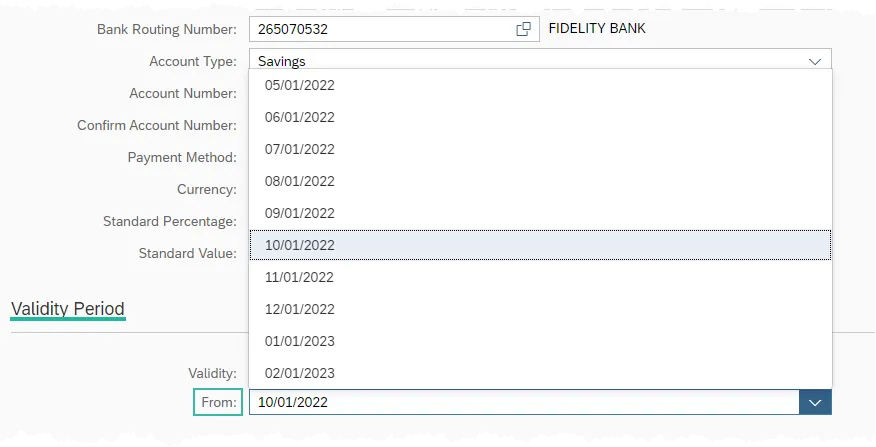
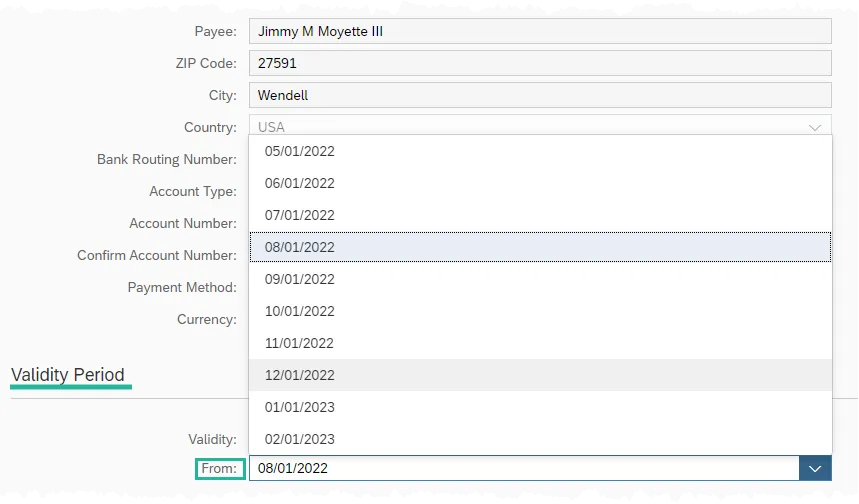
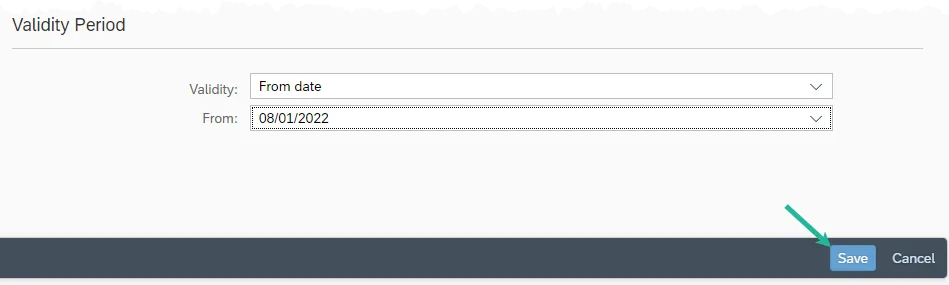
Step 4. Within the Validity Period section, click in the From field to activate the drop-down menu. You will be restricted to dates that match the first day of a pay period and you should only choose a future date.
Change bank information as soon as possible to ensure the change will happen correctly. If payroll has finalized for a pay period, the change will be effective for the next pay period.
IMPORTANT: If you are in the process of closing bank accounts, make sure that you keep your current account open until the first direct deposit to the new bank has processed. Contact your agency with any questions.
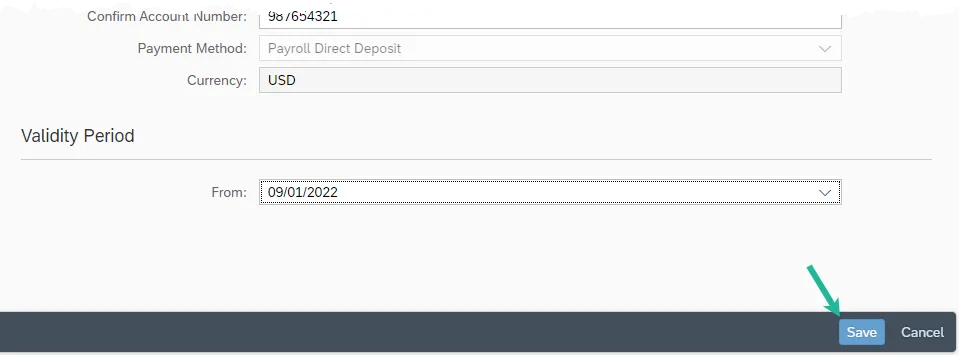
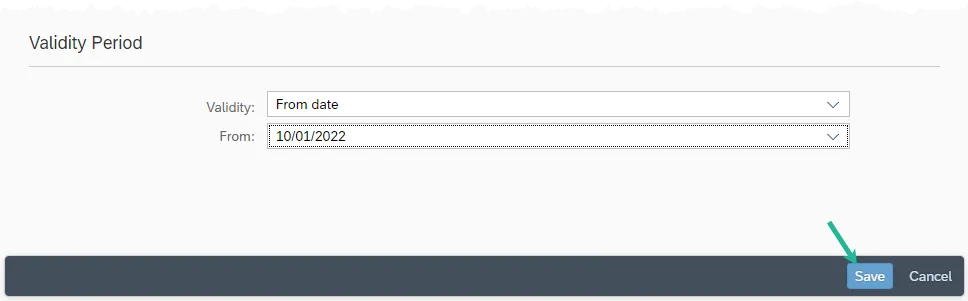
Step 5. Review your data for accuracy and then click the Save button at the bottom of the screen.
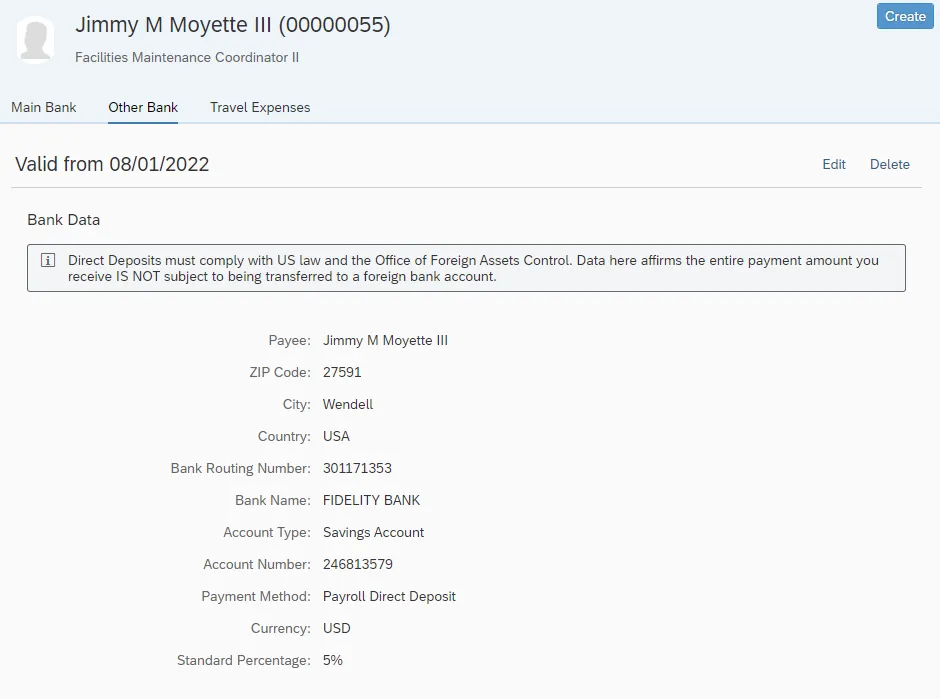
Step 6. After saving, the system will return to the Main Bank tab. It will now display your current and newly created bank account data. Use this opportunity to check for accuracy one more time. If a mistake is discovered, use the Edit button on the new record to make the necessary correction(s).
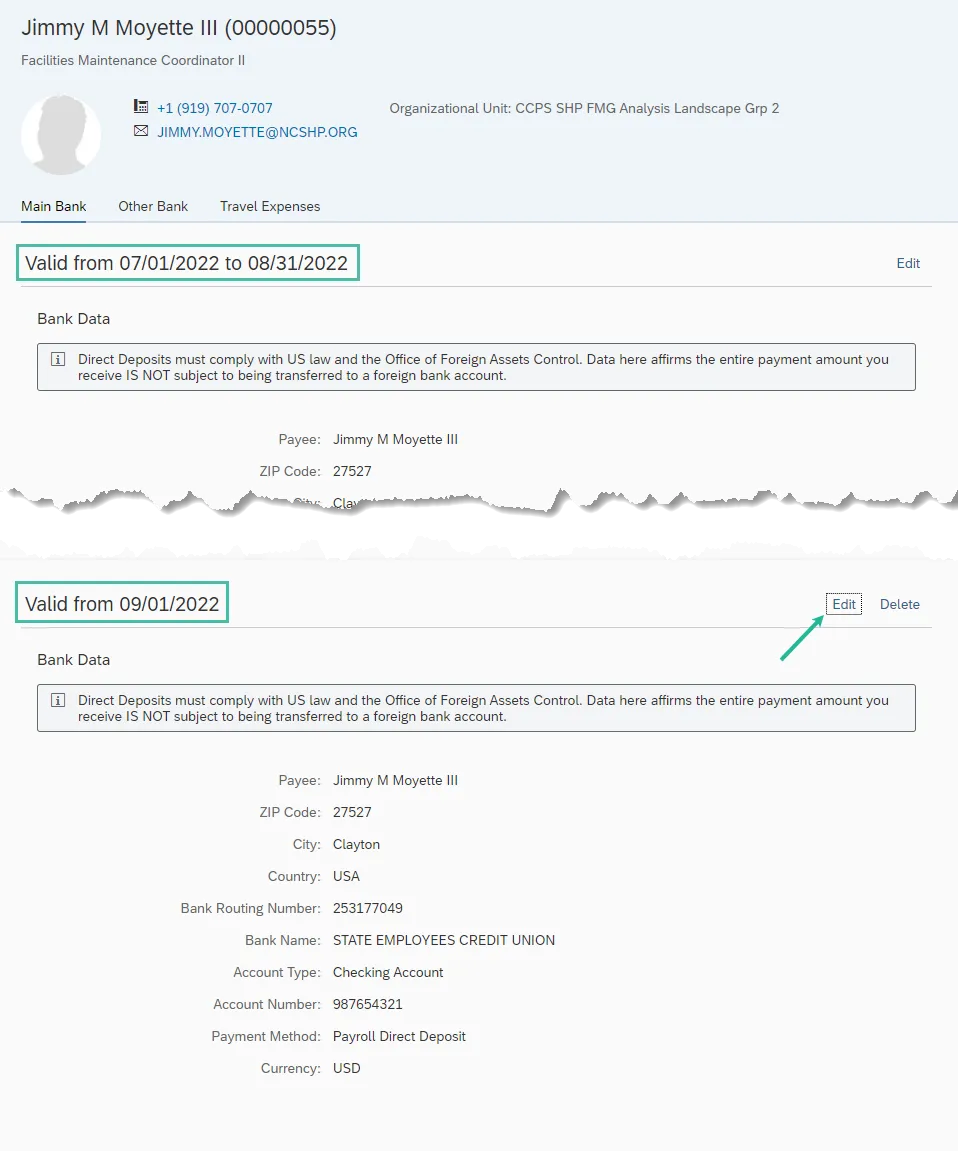
Note: When a change to bank account information is made, a paper letter confirmation will be mailed to the listed mailing address. If no mailing address is listed, then it will be mailed to the permanent address. An email confirmation also will be sent to the employee’s work email address.
Add/Edit Other Bank Details
In addition to the Main Bank information, an employee may have their pay split between up to three additional accounts. When an additional (or Other) bank account is created, you must choose a percentage amount or standard amount to be deposited each pay period.
There are 9 steps to complete this process.
Note: When payroll processes, any Other Bank records will be applied first, then the remainder of your paycheck will be deposited into your Main Bank.
Step 1. Within the Employee tab, click on the My Bank Details card/application.
Step 2. Click on the Other Bank tab. If any Other bank accounts are currently active, they will be displayed and can be changed with the Edit button to the right-hand side. If no Other banks have been created, you will see a ‘No Records Found’ screen and can only use the create function.
The remainder of this section will demonstrate how to create a new account.
Step 3. Click the Create button near the top right of your screen.

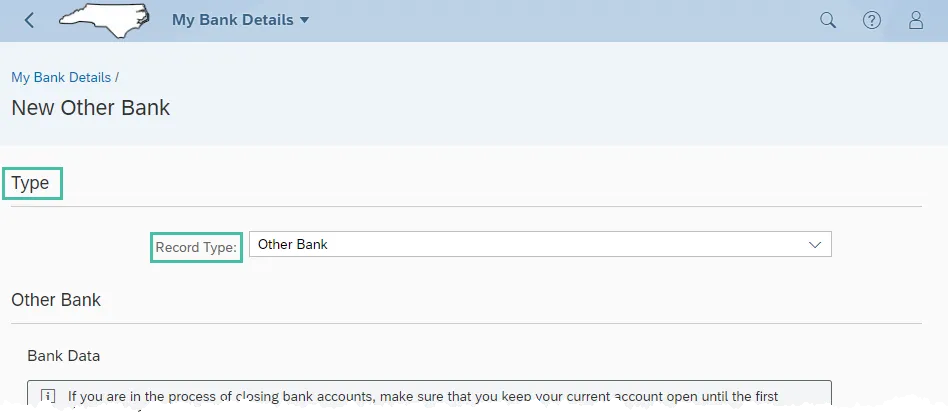
Step 4. In the Type section, leave the Record Type as ‘Other Bank’
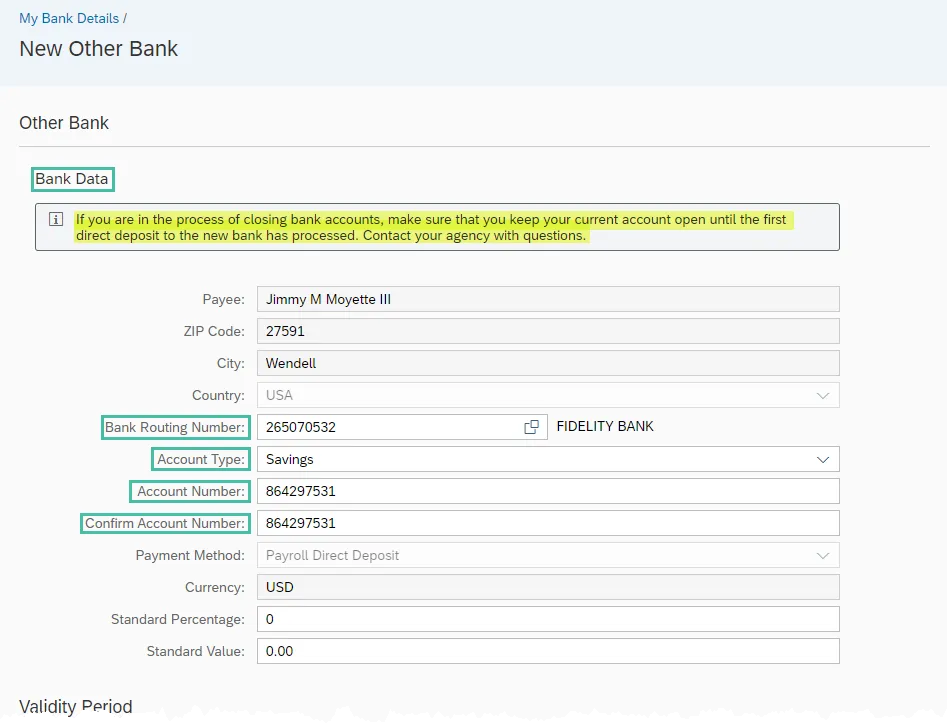
Step 5. In the Other Bank section, some of the fields default from your personnel record and cannot be changed. In the Bank Data subsection, enter the applicable data in the Bank Routing Number, Account Type, and Account Number fields. The Account Number will need to be entered twice to help prevent typos. See the chart and screen shot below for more information on these fields.
| Field Name | Description |
|---|---|
| Bank Routing Number | The ABA routing number for your financial institution. This number is nine (9) digits long. |
| Account Type | Indicates whether the account is a checking or a savings account. |
| Account Number | Number of your Bank account. The length can vary depending on the bank. |
Note: You can find the Bank Routing Number and Account Number on a check provided by your bank as shown in the screen shot below. Please ensure you have one of your checks readily available when maintaining this information in Fiori.

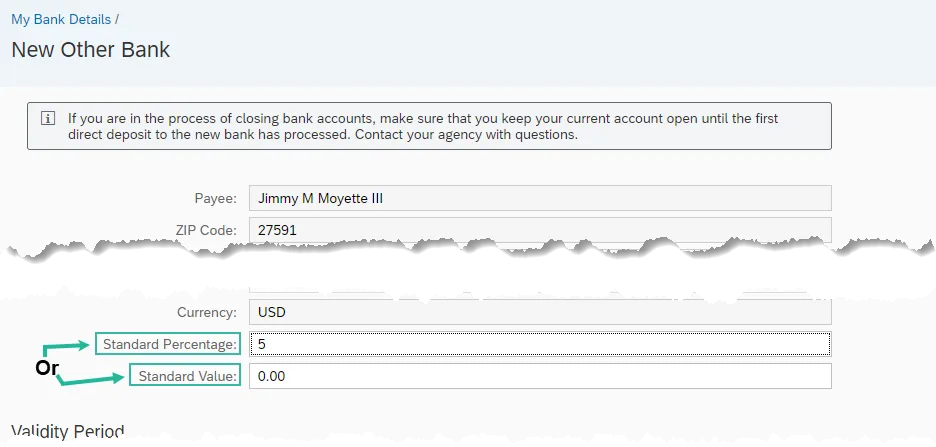
Step 6. You must designate what portion of your paycheck amount will be deposited into the other account. You can choose either a set percentage of your paycheck by using the Standard Percentage field or select a set dollar amount by using the Standard Value field.
Step 7. Within the Validity Period section, click in the From field to activate the drop-down menu. You will be restricted to dates that match the first day of a pay period, and you should only choose a future date.
Change bank information as soon as possible to ensure the change will happen correctly. If payroll has finalized for a pay period, the change will be effective for the next pay period.
IMPORTANT: If you are in the process of closing bank accounts, make sure that you keep your current account open until the first direct deposit to the new bank has processed. Contact your agency with any questions.
Step 8. Review your data for accuracy and then click the Save button at the bottom of the screen.
Step 9. After saving, the system will return to the Other Bank tab. It will now display your newly created bank account data as well as any other active Other banks. Use this opportunity to check for accuracy one more time. If a mistake is discovered, use the Edit button on the new record to make the necessary correction(s).
Note: When payroll processes, any Other Bank records will be applied first, then the remainder of your paycheck will be deposited into your Main Bank.
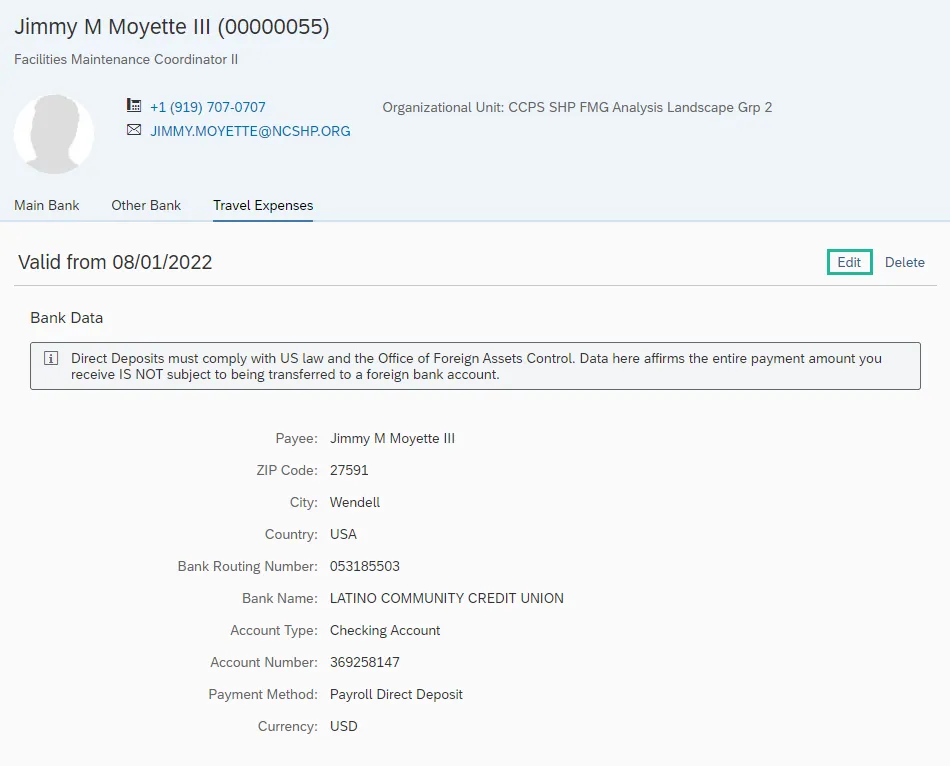
Edit Travel Expenses
There are 8 steps to complete this process.
Note: Depending on your agency, reimbursements are handled by DOT Personnel or the North Carolina Financial System (NCFS) and are not connected to the Integrated HR-Payroll system. Travel expense bank details that are entered using FIORI will be sent to DOT or NCFS. If you have questions about reimbursement dates or processes, contact DOT Human Resources (DOT employees) or NCFS BEST Contact center 919-707-0707 (all others).
Step 1. Within the Employee tab, click on the My Bank Details card/application.
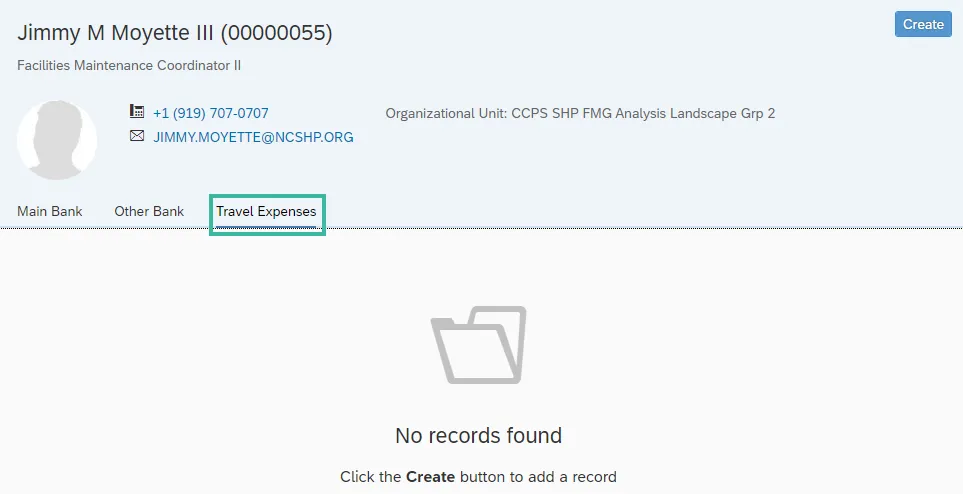
Step 2. Click on the Travel Expenses tab. If a Travel Expenses bank account is currently active, it will be displayed and can be changed with the Edit button to the right-hand side. If no Travel Expenses bank account has been created, you will see a ‘No Records Found’ screen and can only use the create function.
The remainder of this section will demonstrate how to create a new account.
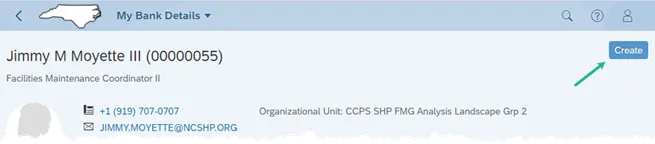
Step 3. Click the Create button near the top right of your screen.
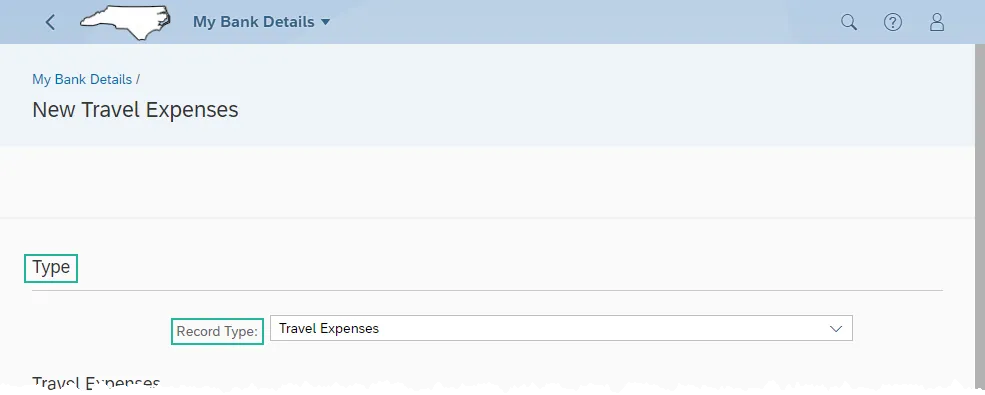
Step 4. In the Type section, leave the Record Type as ‘Travel Expenses’.
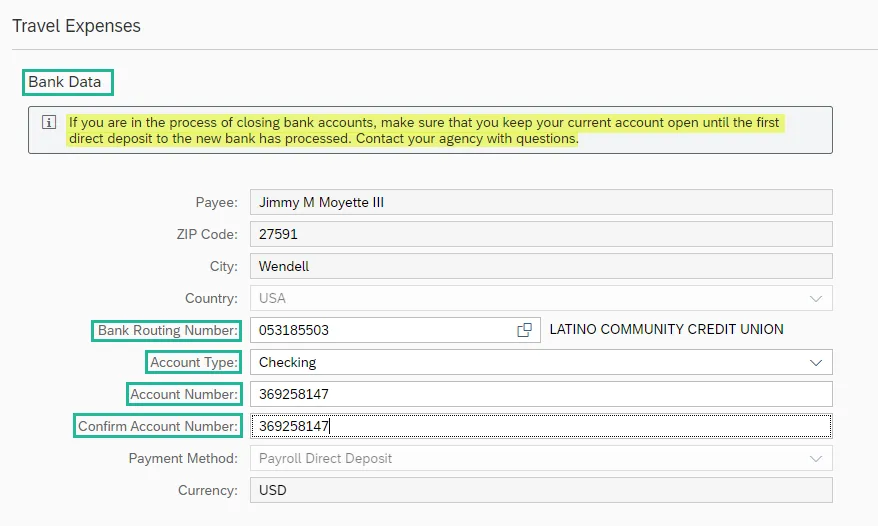
Step 5. In the Travel Expenses section, some of the fields default from your personnel record and cannot be changed. In the Bank Data subsection, enter the applicable data in the Bank Routing Number, Account Type, and Account Number fields. The Account Number will need to be entered twice to help prevent typos. See the chart and screen shot below for more information on these fields.
| Field Name | Description |
|---|---|
| Bank Routing Number | The ABA routing number for your financial institution. This number is nine (9) digits long. |
| Account Type | Indicates whether the account is a checking or a savings account. |
| Account Number | Number of your Bank account. The length can vary depending on the bank. |
Note: You can find the Bank Routing Number and Account Number on a check provided by your bank as shown in the screen shot below. Please ensure you have one of your checks readily available when maintaining this information in Fiori.

Step 6. Within the Validity Period section, click in the From field to activate the drop-down menu. You will be restricted to dates that match the first day of a pay period and you should only choose a future date.
Change bank information as soon as possible to ensure the change will happen correctly. If payroll has finalized for a pay period, the change will be effective for the next pay period.
IMPORTANT: If you are in the process of closing bank accounts, make sure that you keep your current account open until the first direct deposit to the new bank has processed. Contact your agency with any questions.
Step 7. Review your data for accuracy and then click the Save button at the bottom of the screen.
Step 8. After saving, you will be brought back to the Travel Expenses tab. It will now display your newly created bank account data. Use this opportunity to check for accuracy one more time. If a mistake is discovered, use the Edit button on the new record to make the necessary correction(s).